Table of Contents
Configuring a Publishing Destination for
Your Site
One of the objectives in the CSIS 115A, CSIS 117D, and CSIS125A courses is to give students real world experience working with Web sites. As a professional Web Developer one of the most common tasks you will perform is publishing the Web content you create to a Web server. Once your content is published to a Web server it will be viewable by anyone from anywhere in the world. In order to publish the content you create to the Student Web server you need to configure a Publishing Destination in Expression Web.
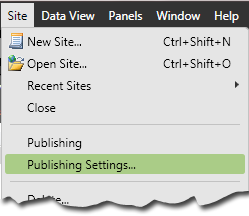
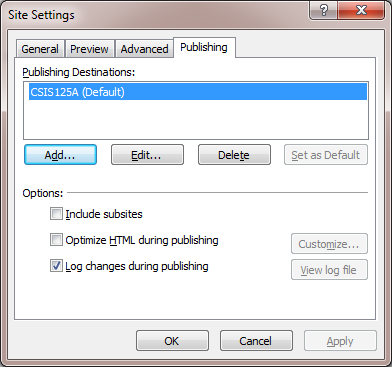
To start the process, open the Site menu by clicking on the word Site in the Menu bar, then click on Publishing Settings in the Site menu. This will open the Site Settings dialog box and make the Publishing tab the active tab. To add a new publishing destination click on the Add... button. When the Connections Settings dialog box opens type in a Name; I recommend you type in Student Web Server because that is the server you are creating this connection to. Leave the Connection Type setting at FTP as that is how you will be connecting to the Student Web server. For the Location type: ia.msjc.edu. For the Directory
type nothing, leave it blank. For your User name type your first initial + your last name. For your Password type your first initial + last name + the last 3-digits of your Student ID. Make sure you type in your Password using all lowercase letters - the password is the only item in this dialog box that is case-sensitive. Once you have everything typed in, click the Add button at the bottom of the dialog box. Once you're returned to the Site Settings dialog box it should look similar to the image you see below. Next, click OK to close the Site Settings dialog box.
Back to TOC
Connecting to the Student Web Server
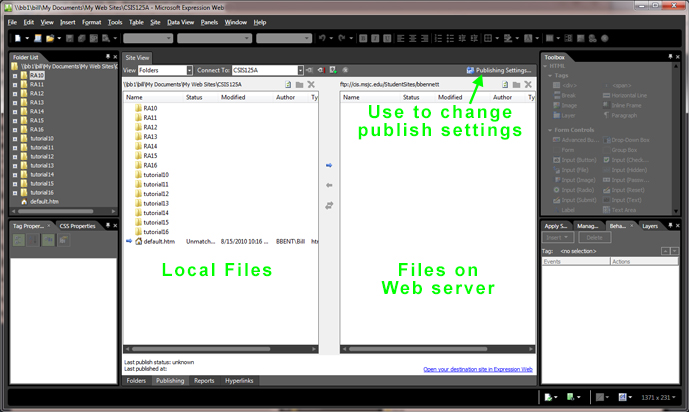
 In order to connect to the Student Web server you need to first change the window your viewing in the Site View of Expression Web. At the bottom of the Site View window you will see four buttons: Folders (the window you're currently viewing), Publishing, Reports, and Hyperlinks, click on Publishing and your Site View window will change to the Site View Publishing window. Once you are viewing the Publishing window you can click on the blue hyperlink in the center of the screen that reads "Connect to the current publishing destination", or you can look to the top of the Site View Publishing window to the toolbar just under the Site View tab and just to the right of the Connect To: location setting drop-down where you'll see the Connect button.
  Clicking on the Connect button will also connect you to the Student Web server. Either way your site view should change to two columns displaying your local files (the ones on your computer) on the left and your student folder on the Student Web server (which should be empty) on the right. If that's the case you have followed these instructions perfectly and are now ready to start building Web pages and publishing them to the Student Web server - good job! If your connection is not
successful, go back and double-check the settings you typed in the Connection Settings dialog box, you can do this by clicking on the Publishing Settings button on the right-end of the same toolbar that has the Connect button.
Clicking on the Connect button will also connect you to the Student Web server. Either way your site view should change to two columns displaying your local files (the ones on your computer) on the left and your student folder on the Student Web server (which should be empty) on the right. If that's the case you have followed these instructions perfectly and are now ready to start building Web pages and publishing them to the Student Web server - good job! If your connection is not
successful, go back and double-check the settings you typed in the Connection Settings dialog box, you can do this by clicking on the Publishing Settings button on the right-end of the same toolbar that has the Connect button.
Back to TOC
Publishing to the Student Web Server
In order to publish a local file from your
computer to the Student Web server using Expression Web choose from
one of these two commonly used methods:
-
Select one or more files you want
published in the Folder List pane,
then right-click a selected file and choose Publish selected file from the context menu that appears.
-
Select one or more files and use the Publish Files arrow in the pane between your local
files column and the files on the Web server column when you are in the
Publishing view of the Site View
tab.
You should see a copy of your file appear in the right column of the
Site View Publishing window once the publishing
process is complete. For most files publishing is very quick. For larger
files, like video files, it will take longer for the publishing process to
complete.
Verify Your Page Has Published Successfully
Check to make sure you can view the file on the Student Web server by opening a Web browser, like Internet Explorer and typing in the appropriate URL in the address bar. View the URL Tutorial for more information on what is the correct URL to use. Once you can see your
published Web page in your Web browser, copy the URL and paste it into an email and send it to me at BBennett@msjc.edu. Remember to fill in the subject line correctly with your course number, section number, and assignment number.
Instructor's Note
Make sure you understand this last step thoroughly, because you will be repeating it each time you submit an assignment. Always check your page in a Web browser before you submit your URL to me via email and always put your course number, assignment number, in the subject all of ALL assignment submissions.