Introduction
In your reading this week you will be learning about project types, project templates, file types, ways to create structured websites, and how to use designer tools to create formatted Web pages.
For most of you this chapter should be a review of what you already know
about creating HTML Web pages and how to build them using an IDE. That
is why CSIS 115A Web Development Level 1 is the recommended preparation
for this class. We don't make it a requirement because we get a lot of
students who are already working as Web developers, but need to upgrade
their skillset to include ASP.NET.
⇑Table of Contents
Instructor's Notes
This section includes my lecture notes which are to designed to help clarify some of what you are reading
in your textbook as it relates to this class and your completion of this
week's assignment.
These first three items apply to all your textbook
reading and all the assignments you will be completing in the class.
- It is important to note that the first page of each
chapter of your textbook has a URL for downloading the files used in the
chapter. You will never need to do this; you
already have all the files you need to complete all of the assignments
for this class.
- In addition please note that C# will always be the
coding language used in this class. If you are a Visual Basic coder
already you may use VB, however I cannot help you with VB coding
errors.
- We will be using ASP.NET 4.8 on our Web server which is compatible with all versions of ASP.NET 4.0 - 4.8. I mention this because different versions of Visual Studio have different versions of the Web form templates used to create new projects, Web sites, and the items you add to your projects and Web sites. Each template version targets a different version of the ASP.NET framework by default, depending on when it were first released. Keep this in mind in case you run into any "wrong version of asp.net framework" errors while developing your assignments during this course.
If you want, complete the Try It Out
portions of Chapter 2 on pages 38, 42 - 43, 44 - 45, and 49 - 52
(I highly encourage you to do so), then you need to create a new
folder in your My Web Sites folder to practice in. In
the Web development world this is called a sandbox because you can test
things out without impacting your live Web site. To summarize
Don't use your CSIS786 Web site for the
Try It Out on pages 38, 42 - 43, 44 - 45, and 49 -52!
As always feel free to email me with any questions:
BBennett@msjc.edu
Subject: CSIS 786 #Week2
⇑Table of Contents
Assignment
In order to receive full credit for your Week 2 assignment you need to complete the
following
steps successfully:
Step 1: Delete
or rename the default.aspx
file in the ASP02 folder of your
CSIS786 Website.
Step 2: Complete
the steps listed in the Try It Out Adding Formatted Text on pages 54 -
56 by adding a new Web form default.aspx to
your ASP02 folder and formatting the text as
instructed in the Try It Out.
Step 3: Complete
the steps listed in the Try It Out Using the Format and Table Menus on pages 57 - 58 to
add the table and list items to your default.aspx
page under the paragraph created in the last step.
Step 4: Complete
the Try It Out Linking Pages
on pages 59 - 60 by adding the link to your table as shown shown in
figure 2-24 (page 60).
Step 5: Publish
your ASP02 folder to
the Student Web server.
Step 6: Post
the URL of your completed Week 2 assignment to Canvas.
 This is what you page should like when completed.
⇑Table of Contents
Instructions
In order to build ASP.NET pages you need to be able to
perform some basic HTML/CSS tasks like inserting and
modifying tables and formatting text. Although actually writing the code in the Source code editor is usually the quickest and best way to accomplish these and other tasks, there are times when modifying an HTML documents contents in the Design view can be more practical.
These tutorials teach you the basic steps you need to
know to accomplish rudimentary HTML tasks using the Design view in Visual Studio.
Formatting Text
Formatting text in the design view of the Visual
Studio document window is very much like it is in just about any
modern-day word processor. You simply select the text you want to format
by clicking and dragging your mouse point over the text you want
selected. Once the text is selected you can use the Formatting toolbar
(see figure 1)
in Visual Studio to apply formatting changes to the selected text.
Tip: Double-click
a word to select it quickly, also you can triple click a word to quickly
select the entire paragraph containing the word.
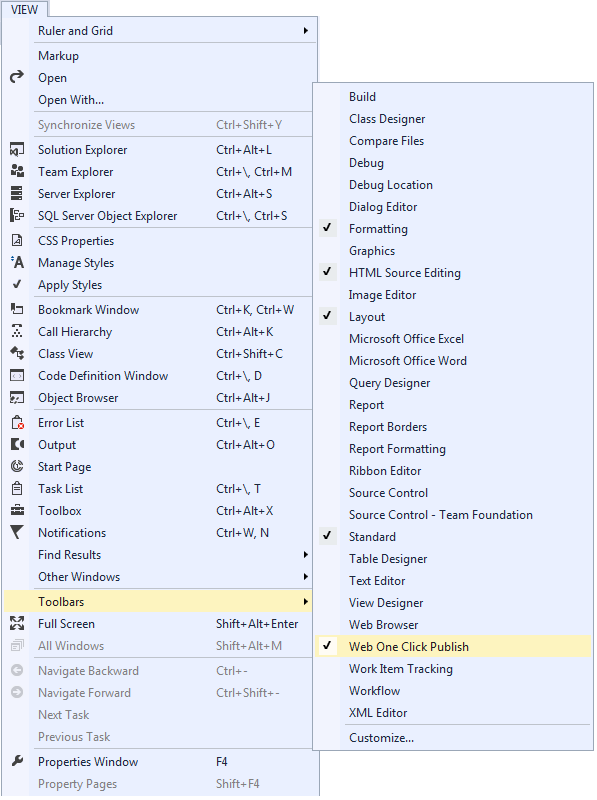
If the Visual Studio Formatting
toolbar is not visible in your Visual Studio toolbars, click the
View menu to open it, click on Toolbars
from the list of available options, then click on Formatting
from the fly-out menu that appears. If there is already a checkmark to
the left of the Formatting option in the fly-out menu then the
Formatting toolbar is already open in Visual Studio (see figure 1.)
 Figure 1: The Visual Studio Formatting toolbar.
 Figure 2: The View menu opened with the Toolbars option highlighted and a check indicating which toolbars are currently open.
Inserting and Modifying Tables
Tables are a great way to organize the display of information in HTML and
ASP.NET Web pages. When editing in Design view you will see a
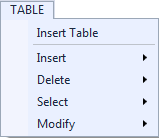
Table menu
in the Visual Studio menu bar. From this menu you can insert a new table
and modify an existing table.
As you
can see in figure 3, in addition to the Insert Table option there are
also four fly-out menus, Insert, Delete,
Select, and Modify.
 Figure 3: The Table menu.
- From the Insert menu you can insert rows, columns, and
a caption to a table.
- From the Delete menu you can delete tables as well as
rows, columns, and cells in a table.
- The Select menu lets you select a table, a table row,
a table column, or a table cell.
- From the Modify menu you can split and merge table
cells as well as distribute row and columns evenly and autofit the
contents of a cell.
Creating Hyperlinks
In order to link your Web pages to other pages and
other resources on your Websites as well as other Websites you will need
to add hyperlinks to your pages - the heart and soul of the World Wide Web.
 Figure 4: The Hyperlink dialog box.
In order to create a hyperlink in Visual Studio's
Design
view all you have to do is select the text you want to turn into a
hyperlink and then click on the Convert to Hyperlink button on the
toolbar or press Ctrl + L on the keyboard as shown in figure
4.
Once the Hyperlink dialog box opens, select the type
of protocol that will be used to request the resource the text will be
linked to and then type in the URL for the resource. Click the OK button
to complete the process. You should now be able to click on the selected
text when you open the page in a Web browser and be navigated to the
location of the resource.
The Tag Navigator
On pages 54-55 of your textbook, the author describes how to use the Tag Navigator in Visual Studio. However, the Tag Navigator was removed from Visual Studio in 2019.
⇑Table of Contents
How to Submit Your Assignment URL for Scoring (for CSIS 115A, 525, and 786 classes only)
In order to receive credit for assignments you have published to the Student Web server, you need to submit the Web address (a.k.a. URL) of your assignment using the Submit an Assignment URL link on the course home page in Canvas.
Once you understand how URLs work, submitting your assignment URL for grading should be simple. Each time you have completed an assignment and published it to the Student Web server using your IDE do the following:
- Click on the Assignments link in your Canvas course menu.
- On the Assignments page, locate the link for the assignment URL you want to submit and click or tap it.
- Click or tap the Submit Assignment button on the screen that appears.
- Then type or paste the URL for your assignment in the Website URL textbox provided.
- Click or tap the Submit Assignment button - and you're done!
TIP: Before posting your URL for scoring you should ALWAYS TEST YOUR URL to see if it works in your Web browser first. Just open your Web browser and type in the URL as described in the How URLS Work tutorial, if it works, then just copy and paste the URL you typed in your Web browser into the Website URL textbox in Canvas. If it doesn't work in your Web browser, it won't work in your instructor's Web browser either - in that case email your instructor for help and be sure to ALWAYS type your Course number and Section number into the subject field of ALL emails you send to your instructor.
⇑Table of Contents
Instructor's Note: Everything MUST be
completed before the due date listed in the syllabus for assignment 2.
Please email me if you have any questions at all!
⇑Table of Contents
Lesson Summary
In this lesson you learned how to:
- Understand the different project types that you can choose from as a starting point for your ASP.NET websites.
- Use different project templates to jump-start your site development
- Recognize the different file types available in ASP.NET and how they are used
- Create structured websites that are easy to manage, now and in the future
- Use the designer tools to create formatted web pages
- Insert and modify tables in Visual Studio
- Create hyperlinks in Visual Studio
Congratulations, that's it for this assignment. You can get a head start on your next lesson by reading chapter 3 in your textbook.
⇑Table of Contents