Introduction
The focus of Week 1 is getting your Planet Wrox Website and Integrated development environment (IDE) installed and configured to publish to the Student Web server. Pay close attention to the steps for publishing your Week 1 assignment to the Student Web server as this is a process you will repeat over and over again each week as you submit your assignments throughout the completion of this course.
Assignment
In order to receive full credit for your Week 1 assignment you must complete the following steps:
Step 1 Download and unzip the Planet Wrox data files that you will use to complete the remaining assignments in this class.
Step 2 Select, download, install, and configure the integrated development environment (IDE) you will be using to build your Planet Wrox Website.
Step 3 Open your Planet Wrox Website in your IDE, add a new HTML page to your ASP01 folder, name it "default.htm" or default.html", type Your Name in an h1 element on the HTML page, and publish the page to your student folder on the Student Web server.
Step 4 After you have published your HTML page to the Student Web server, test your new HTML page in your Web browser and verify you can view it correctly.
Step 5 Post the URL for your new HTML page in Canvas for scoring.
⇑Table of Contents
Instructions
The following tutorials will guide you through, step-by-step, the skills you need to learn in order to complete this week's assignment. These are all skills you need to master to be able to complete the rest of the weekly assignments in this class.
Some of these skills you may already be proficient in, with others you
may need help, that's where the links I provide you with will be benefit
you most as they offer tutorials with more in-depth explanations. Please read all of the information thoroughly and completely
to achieve the best results. Post any questions you have to the
Help forum in the Discussion Board
in Canvas (http://msjc.instructure.com).
Downloading & Unzipping the Planet Wrox Data
Files
Start by downloading the Planet Wrox data files and unzipping them into your My Documents\My Websites folder on your home computer or on the RDS. Your textbook author suggests another folder name and you can use it if you'd like. Wherever you locate your Planet Wrox data files just be sure you know how to find them on your computer when you need to open the Website in your IDE of choice. If you need help with the process click on the link below.
How to Download Student Data Files
Once you have your student data
files downloaded and unzipped into your My Websites folder you'll need to
decide on the IDE you want to use for this class and then download the
program and install it.
⇑Table of Contents
Selecting Your Integrated Development Environment (IDE)
Although you could use a simple ASCII text editor, or Adobe's Dreamweaver, or Microsoft's now defunct Expression Web 4, or even an open-source IDE like Eclipse to complete your weekly assignments, the best bet for building ASP.NET sites and applications is to use a recent version of Visual Studio Community. At the time of this writing Visual Studio Community 2022 is the most recent version and I recommend using it for this class.
How to Get Visual Studio
Visual Studio Community - This is a free version of Visual Studio that is available from VisualStudio.com (recommended).
Appstream - MSJC does have Visual Studio 2019 installed on their MSJC Appstream CSIS Programming Apps, but we have experienced problems using Visual Studio from Appstream in past semesters so I don't recommend it. The only reason for using VS on the Appstream is if you don't have access to a compatible computer that meets the requirements for installing VS or other IDE on it.
⇑Table of Contents
Opening Your Planet Wrox Website in Visual Studio
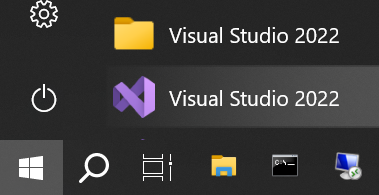 Figure 1: The Windows Start Menu open with Visual Studio Express selected.
In order to open a Website in Visual Studio you need to do the following:
Click on your Windows Start button  .
.
Next, click on All Programs at the bottom of the Start menu.
Scroll down and locate the Visual Studio icon (not the folder), click on the infinity icon to start Visual Studio running (see figure 1).
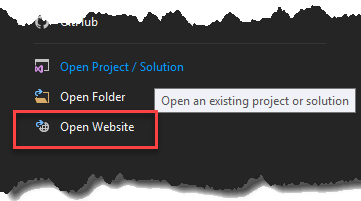 Figure 2: The Visual Studio StartPage.
Once Visual Studio is open on your desktop, you have a couple of options to open your Planet Wrox Web site:
-
You can open the File menu, click Open from the menu list, and then click on Website... from the flyout menu that appears (see figure 3).
The keyboard shortcut for Open Website is Shift+Alt+O, this is a good shortcut to remember. Press and hold the Shift key while you press and hold the Alt key, followed by a press of the letter O key.
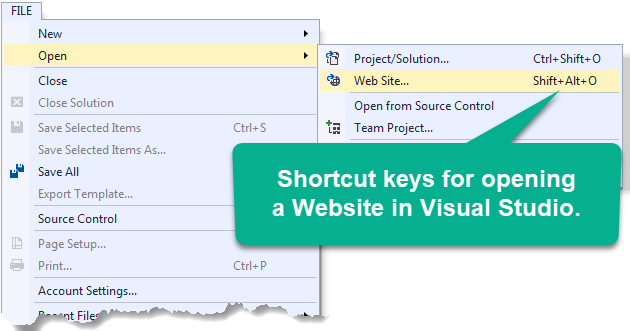 Figure 3: The Visual Studio Open Website selection.
When the Open Web Site dialog box appears, be sure that the
"File System" icon is selected in the left column, and then in the
File System selection window, navigate to and select the CSIS786 folder contained in your My Web Sites folder. Once you have the CSIS 786 folder selected, click the Open button in the lower-right of the dialog box, as seen in figure 4.
After Visual Studio finishes loading your Web Site you should see your Planet Wrox folders in the Visual Studio Solution Explorer as shown in figure 5.
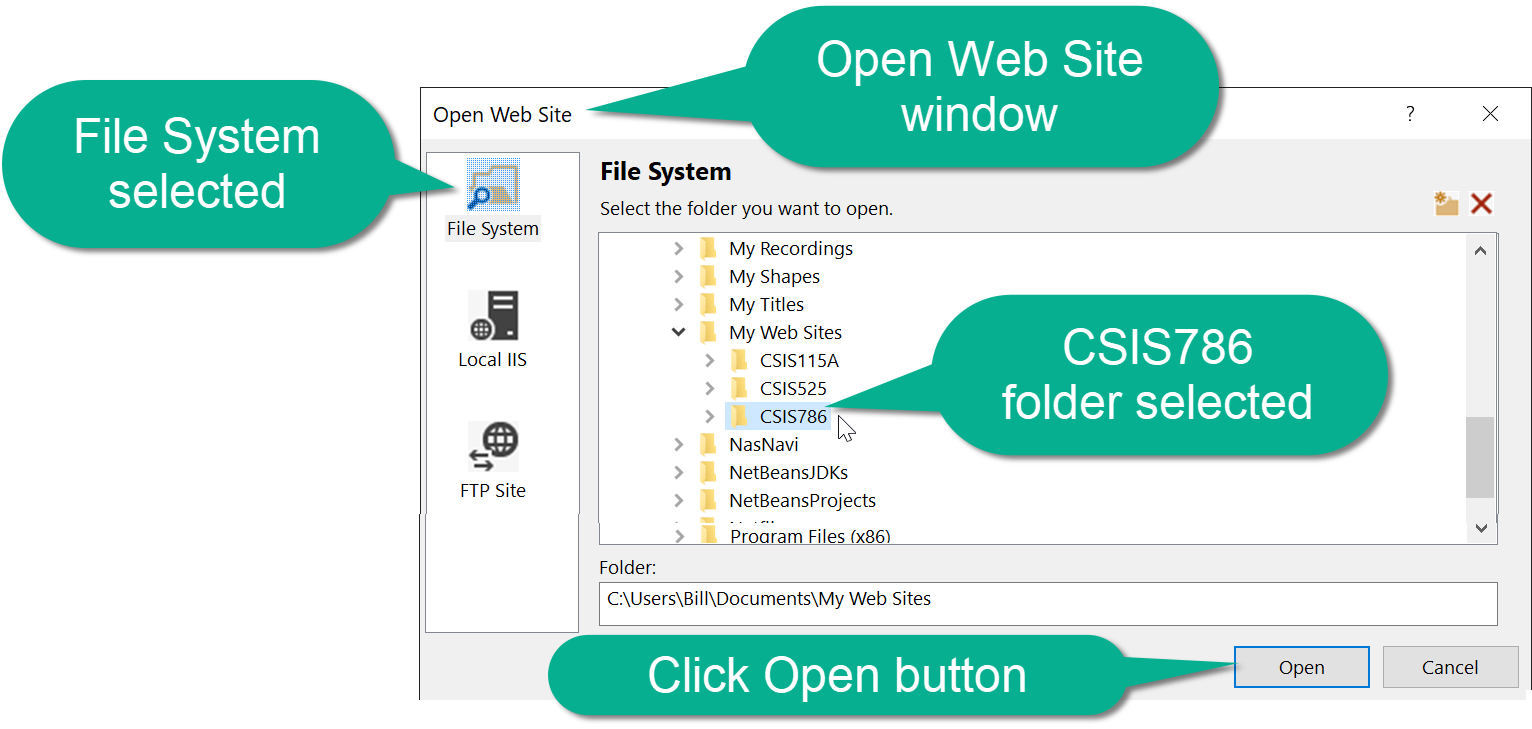 Figure 4. The Open Web Site Dialog box with File System selected in the left column and the CSIS786 folder selected in the folders listed on the right
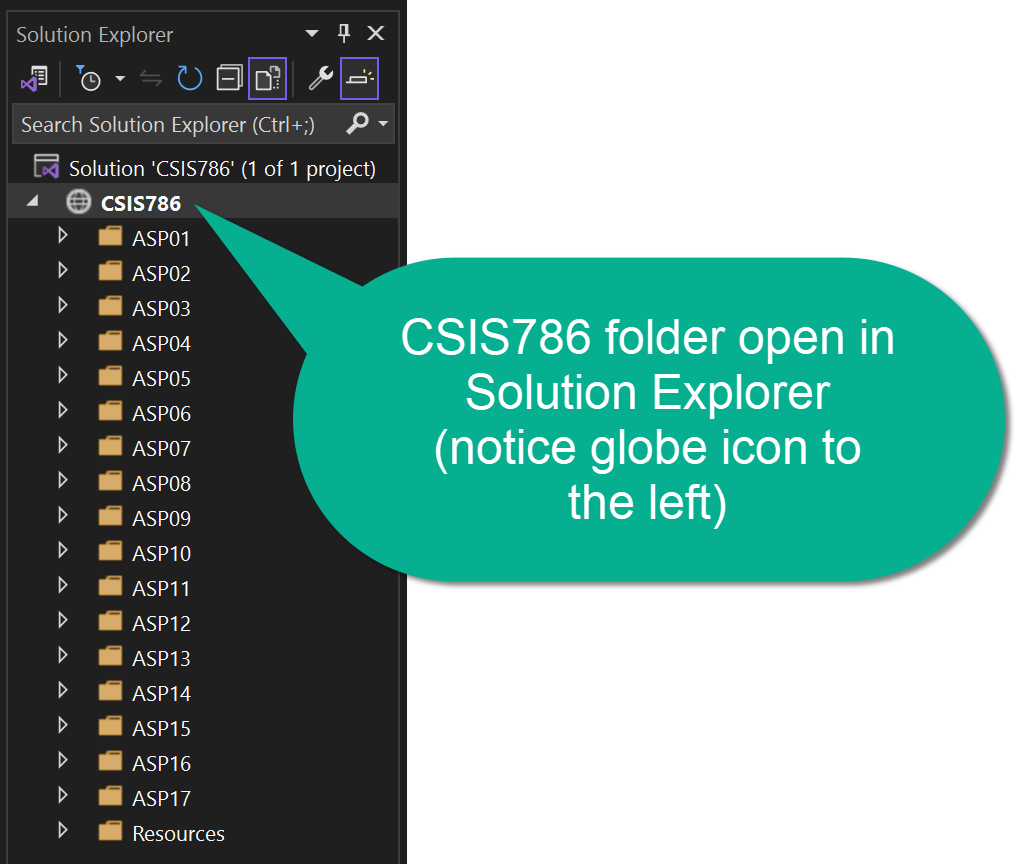 Figure 5. The Visual Studio Solution Explorer displaying the Planet Wrox Website folders.
Text Book Errata
The instructions in the text book for this class are based on Visual Studio Express 2012; this means there are some differences that you will run across in the instructions due to changes in a menu option or button name, etc. On each week's Assignment page I will place a link to the Errata page which will have updates to the instructions in your text book. If you discover a difference that I have missed please post it to the Help discussion forum or email me immediately. I will give you 5 extra credit points for your effort.
Now that you have your Planet Wrox Website open in Visual Studio and your development profile configured for Expert Settings you can continue to the next step, creating a new HTML page in the ASP01 folder.
⇑Table of Contents
How to Add & Edit a New HTML File
There are several ways to add new assets to your Website using Visual Studio including the ability to drag and drop image files from Windows Explorer directly into the Visual Studio Solution Explorer, but we'll get to that later. For now the simplest way to accomplish this task is to right-click on the folder you want to add a new item to, in this case that means the ASP01 folder. When you right-click on the ASP01 folder you will see the context menu shown in figure 6. In the context menu rest your mouse over the Add option and a flyout menu will appear. In the flyout menu click on the option that reads "Add New Item..." and the Add New Item dialog box will appear as shown in figure 7.
Tip: Notice that Ctrl+Shift+A is the keyboard shortcut for adding a new item to a Visual Studio Website - this is a shortcut you will use a lot while completing assignments.
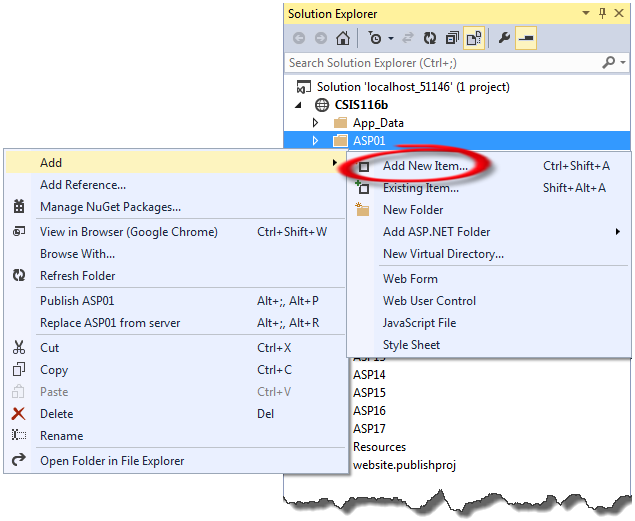 Figure 6. Adding a new item to a folder.
In the Add New Item dialog box select Visual C# in the left-hand column. This selection doesn't really matter right now, but get used to making this choice because all the server-side coding will use C#. In the middle column select HTML Page and at the bottom type "default.html" for Name. Then click the Add button to complete the process. You should now see a new default.html document displaying in the ASP01 folder in the Solution In the HTML editor add an <h1> element which has the course number and your first and last name as shown in figure 8.
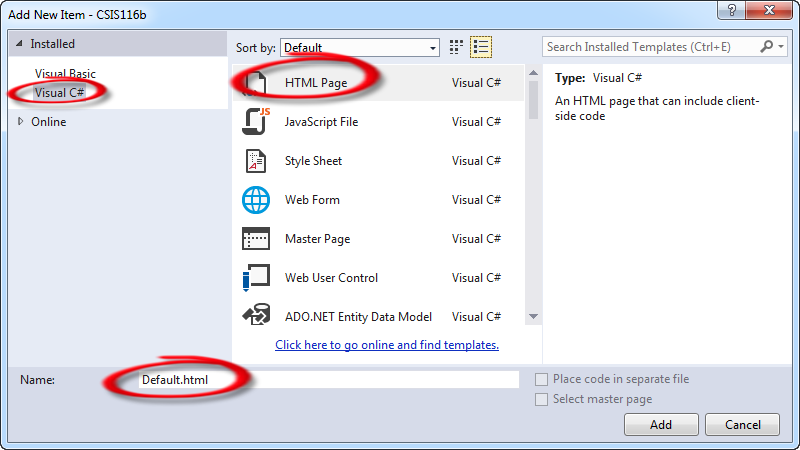 Figure 7. The Add New Item dialog box.
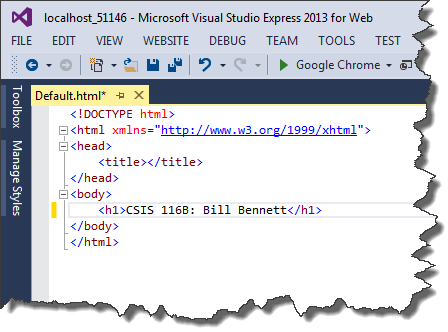 Figure 8. The new default.html file open in the Visual Studio HTML editor showing an added heading which includes the course number and the student's first and last name.
This would be a good time to test out your development environment. Primarily you want to test and see if the Microsoft Web server, the Internet Information Server (IIS) program included with all Visual Studio installations, is working. To test it, hold down the Ctrl key on your keyboard and at the same time press the F5 key - this invokes the build process in Visual Studio and the first thing that will happen is you will get an error message. This is because Visual Studio & VS Community test every page and every bit of code before completing the build process, which must occur before VS will open your page in your testing Web browser. Since the data files that make up your Website are not all completed yet then VS throws an error during the
build process. This is OK and expected. Just click Yes to proceed when the error message appears and asks you if you want to continue with the last successful build. Once the error message has been cleared your page should display in your designated testing Web browser.
So far so good. You're almost there. All that is left is to publish, verify, and email your assignment URL to your instructor.
⇑Table of Contents
Configuring A Web One Click Publish Publishing Profile
In order to be able to
publish your files using Web One Click Publish you must first configure a
Publishing Profile. One of the advantages of having publishing profiles is
that you can have many of them which makes it very easy to quickly choose
the Web server you want to publish to.
 Figure 1 - The Web One Click Publish toolbar.
Adding Web One Click Publish to the Toolbar
Step 1: If you don't already see the Web One Click Publish toolbar grouped with the other tools on your Visual Studio toolbar above the Document window (see figure 1), then you will first need to add the Web One Click Publish toolbar to the Visual Studio collection of toolbars
To add the Web One Click Publish tool, open the View
menu from the Menu bar, then rest your mouse over the Toolbars option and click on the
Web One Click Publish option from the list of options in the flyout menu that appears.
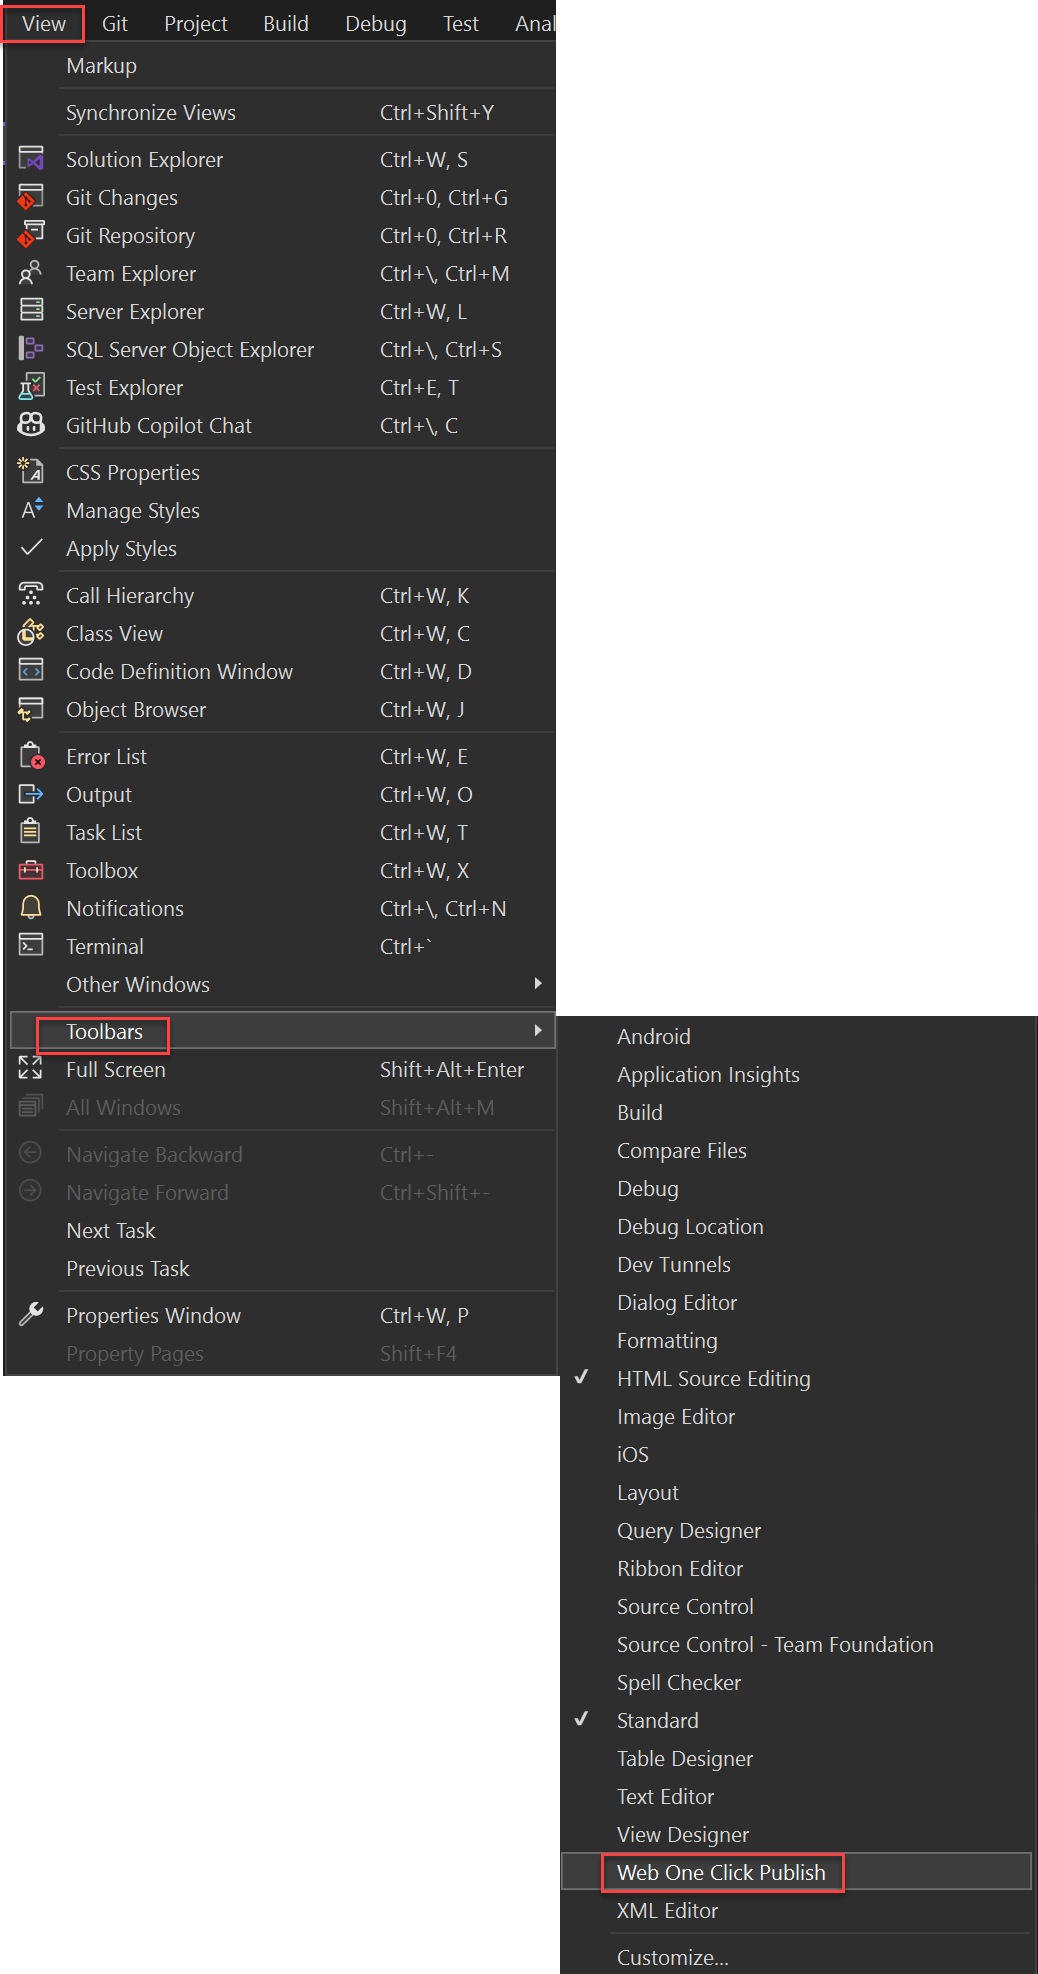 Steps for opening the Web One Click Publishing toolbar (click image for larger view).
Creating a New Publishing Profile
 Figure 2 - The Web One Click Publish toolbar displaying the <New Profile...> option.
Step 2: If this is your first time configuring a publishing profile for your Web site, then on the Web One Click Publish toolbar click the drop-down arrow
to the right of the text that reads "Create Publish Settings" and select
<New
Customer Profile...> from the menu that appears as shown in figure 2.
If you want to modify an existing Web One Click Publish profile then click on Edit Publish Profiles button (the gear icon
 ) on the Web One Click Publish toolbar.
Select the profile you want to modify, then click the down arrow for More Actions and click Edit.
Step 3: In the Target pane that appears, select FTP/FTPS server and then click the Next button (see figure 3).
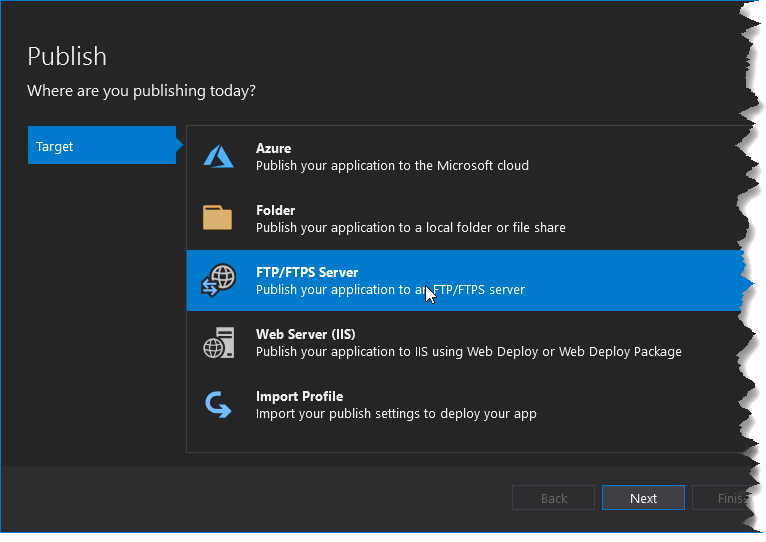 Figure 3 - the Publish Target pane.
Step 4: Complete the rest of the settings
for the Publish Web Connection tab using the information provided on the FTP tutorial page. Click Finish to complete this step (see figure 4).
 Figure 4 - The Connection pane of the Publish window with all of the necessary settings configured.
Step 5: (Only necessary if Web One Click Publish is not working) Once you have completed the FTP configuration, if you are not able to publish your Default.html file, there must be a problem with your FTP configuration. To edit the FTP configuration click the down arrow of the More Actions menu and choose Edit to return to the editing panes. On the left-hand side click Connection to return to the FTP Connection editing pane. Make any necessary changes and then click the Validate Connection button. A green check should appear; if it does not you still do not have the configuration correct. Remember that the password is your MSJC password. If it is still not working, email your instructor a screen capture of your FTP Configuration pane
(see figure 5).
 Figure 5 - the Connection pane of the Publish window with all of the necessary settings configured.
Step 6: Once you have completed configuring or editing your Publish Profile, click the X on the tab located at the top left of the Publish window to close it (see figure 6).
 Figure 6 - Displaying the X on the Publish window tab for closing the Publish window.
⇑ Table of Contents
Publishing Your Files to the Student Web
Server
In order for the rest of the world to be able to view your
Web creations you need to publish them to a Web server. For your CIS classes
of course will be publishing to our Student Web server.
Publishing a file or folder using Web Publishing One Click is as
easy as right-clicking on the file or folder you want to publish in the Solution Explorer and then choosing
the Publish itemname option from the context menu that
appears.
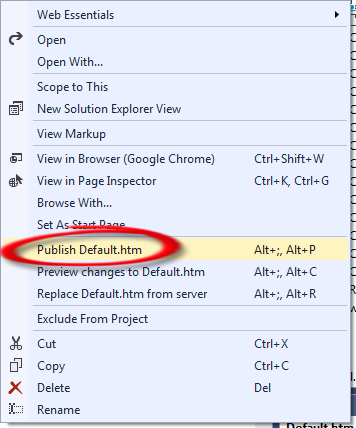 Figure 7 - Publish default.htm is selected in the context menu that appears after right-clicking on the default.htm file in the Solution Explorer.
You can confirm that your file(s) or folder(s) have been successfully published by viewing the Web Publish Activity window which opens below the Document window by default when file(s) and/or folder(s) are published using Web One Click Publish.
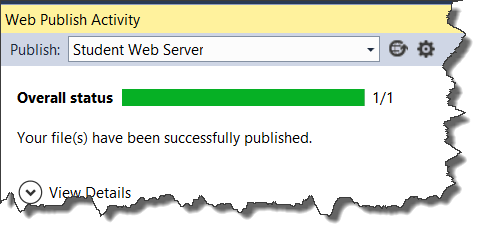 Figure 8 - The Web Publish Activity window showing that the file(s) were successfully published.
Note: If you don't see the Publish itemname option when you right-click a file or folder in the Solution Explorer it may because your Web Publish Activity window is not open. For help opening the Web Publish Activity window view Opening the Web Publish Activity Window.
⇑ Table of Contents
Editing Your Student Web Server Publish Profile
You may need to make a change to your Student Web server Publish Profile if every time you attempt to publish a file, the Connection tab of the Publish dialog box opens. If their is an error in your connection configuration the dialog box will appear each time you try to publish. Even after you make the proper corrections and complete the publish operation, you will still need to edit the Student Web server Publish Profile because just typing the proper configuration during a publish operation does not save those changes to your Website's project configuration file in Visual Studio. When this occurs, you will need to edit the Student Web server Publish Profile Connection properties using the following procedure.
If you need to make changes to your Student Web server Publish Profile, tap or click on the gear looking icon in the Visual Studio toolbar located on the right of the Web One Click Publish tool.
Step 1:
 Figure 9 - the Edit Publish Profiles button
Step 2: When the Publish dialog box appears, tap or click on the Connection tab on the left-hand side of the dialog box.
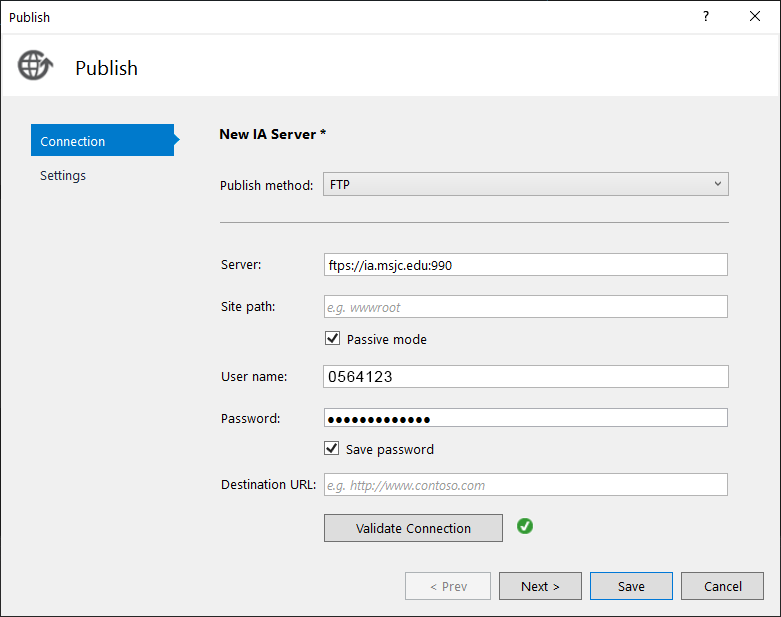 Figure 10 - the Connection pane of the Publish window.
Step 3: In the connection dialog box double-check all the settings and tap or click the Validate Connection button to verify your settings are correct, if the green check appears, tap or click the Close button and the publish operation should complete successfully. If you don't get a green check after tapping of clicking the Validate Connection button, then one of your settings is not correct. In that case take a screenshot of your Publish Connection screen and email it to your instructor.
⇑ Table of Contents
Opening the Web Publish Activity Window
To open the Web Publish Activity window first open the View menu from the Menu bar, then locate and rest your mouse over the More Windows option and click on Web Publish activity from the fly-out menu that appears.
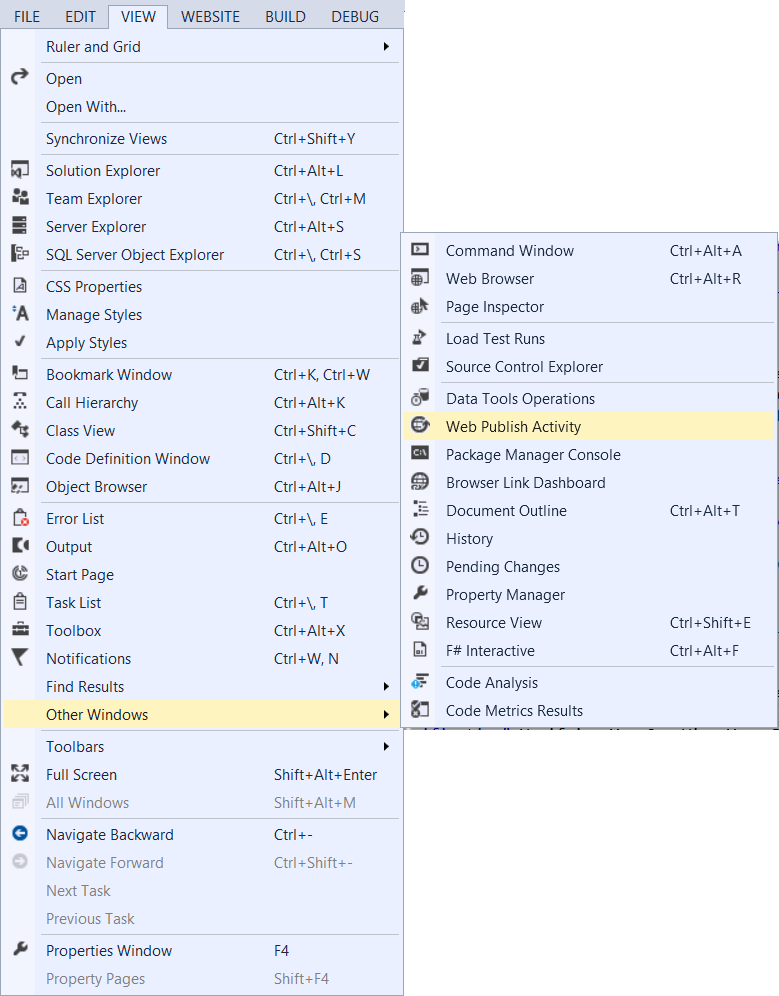 Figure 11 - How to open the Web Publish Activity window from the View menu.
⇑ Table of Contents
Verifying You Can View Your Published
Assignment on the Student Web server
Once you have successfully published your folders and
files to the Student Web server you need to verify that they can be accessed
from the Web server using a Web browser and that it displays correctly.
For more information on how to do this review the
What is a URL tutorial.
⇑ Table of Contents
How to Submit Your Assignment URL for Scoring (for CSIS 115A, 525, and 786 classes only)
In order to receive credit for assignments you have published to the Student Web server, you need to submit the Web address (a.k.a. URL) of your assignment using the Submit an Assignment URL link on the course home page in Canvas.
Once you understand how URLs work, submitting your assignment URL for grading should be simple. Each time you have completed an assignment and published it to the Student Web server using your IDE do the following:
- Click on the Assignments link in your Canvas course menu.
- On the Assignments page, locate the link for the assignment URL you want to submit and click or tap it.
- Click or tap the Submit Assignment button on the screen that appears.
- Then type or paste the URL for your assignment in the Website URL textbox provided.
- Click or tap the Submit Assignment button - and you're done!
TIP: Before posting your URL for scoring you should ALWAYS TEST YOUR URL to see if it works in your Web browser first. Just open your Web browser and type in the URL as described in the How URLS Work tutorial, if it works, then just copy and paste the URL you typed in your Web browser into the Website URL textbox in Canvas. If it doesn't work in your Web browser, it won't work in your instructor's Web browser either - in that case email your instructor for help and be sure to ALWAYS type your Course number and Section number into the subject field of ALL emails you send to your instructor.
⇑Table of Contents
Instructor's Note: Everything MUST be completed before the due date listed in the syllabus for this assignment.
Please email me if you have any questions at all!
⇑Table of Contents
Lesson Summary
In this lesson you learned how to:
- Download and unzip the Planet Wrox data files
- Open you Planet Wrox Website in Visual Studio
- Change your development profile in Visual Studio
- Locate the textbook errata Web page
- Add and edit a new HTML page in Visual Studio
- Create a new publishing profile in Visual Studio
- Publish your ASP01 folder to the student Web server
Congratulations, that's it for this assignment. You can get a head start on your next lesson by reading chapter 2 in your textbook.
⇑Table of Contents