Key Terms
Introducing Multimedia
Interactivity and multimedia elements are a couple of ways you can spice up a Web page. this tutorial will educate you to the ways of Multimedia on the Web. In Web speak the term "multimedia" refers to non-traditional imaging, audio, video, and animation formats. There are two factors you need to consider before adding multimedia elements to a Web page, 1) bandwidth, and 2) is your Web site viewer's device capable of playing the multimedia format posted on your Web site. Forunately, with the advent of HTML5 the process of adding audio and video to an HTML document has become much easier.
Previously the object element was most commonly used to markup audio and video files in HTML documents. With HTML5 audio and video elements have been added to the language making it easier for Web developers to incorporate mp3 and mp4 files into HTML documents.
Multimedia and Bandwidth
One of the most important factors to consider when adding multimedia elements to a Web page is bandwidth. Bandwidth, actually refers to the number of bits per second (bps) that can be downloaded or uploaded by a device using its Internet connection method. Ultimately, as a Web developer you need to be concerned with whether a viewer of your Web page will hang around long enough to view the page in all its multimedia glory, or will they give up and go somewhere else. How long it takes for the file to get from your Web server to the client's devices is determined by three things, 1) most importantly the download speed of the client's Internet service, 2) the speed at which your Web server or Web hosting service can upload the multimedia content to the Internet, and 3) Internet congestion. If your client has a dial-up connection to the Internet their maximum transmission speed will be 56Kbps ("kilo" or thousand bits per second). With the advent of the Digital Subscriber Line (DSL) viewers who are connected to the Internet via their phone company's copper wire connections can achieve download speeds up to 3 Mbps ("mega" or million bits per second). Users who use cable modems and their cable company's network to connect to the Internet can achieve download speeds of up to 20 Mbps. And for those who are lucky enough to use an Internet Service provider which supplies fiber optic connections to their home or business can acheive download speeds of up to 50 Mbps or more as fiber optic technology continues to improve. If your clientele is exclusively accessing you multimedia content over a corporate intranet they can experience download speeds of up to 1 Gbps ("giga" or billion bits per second).
The type of mutlimedia-enabled device your clients uses to access your Web page will also affect their ability to view its multimedia content. As of 2010 Apple announced that its iPod and iPad devices will no longer offer support for the Flash animation format and shortyl after all Web browser manufactuers removed support for Flash files as well. Out-of-the-box Apple Macintosh computers don't support the Windows Media player format and unless it is downloaded and installed, a PC will not support the Apple Quicktime media format. Plus, older versions of the Windows Media player won't support the mp3 format without a plug-in being purchased and installed. Newer Windows computer do support mp3 files out-of-the box.
As show in figure 7-1, multimedia is made available on the Web in two different ways: as external and embedded media. With external media, the media file is accessed through a link that the user clicks to download the media file to his or her device. An advantage of using an external file is that users don't have to retrieve a multimedia clip; they do so only if they want to. This is useful in situations where a user has a low-bandwidth connection and wants to choose whether to spend time downloading a large multimedia file or not.
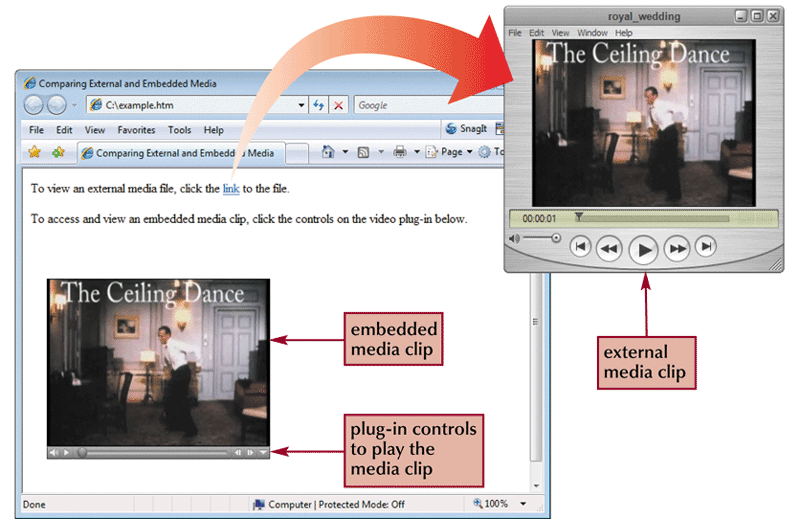
Figure 7-1: Comparing external and embedded media.
When the link is clicked the sound or video file will be downloaded to the user's device, where it can be played by a media player program such as Apple's QuickTime Player or Windows Media Player. The sound file will also be stored in one of the user's folders, where it can be played again and again, and copied to another location if the user desires.
Embedded media, on the other hand, is displayed within the Web page in a fashion similar to an inline image. The controls to play the media clip are also displayed as part of the Web page. Users who wish to play the clip do not leave the Web page to do so; instead they click the player controls from within the Web page. Because embedded media appears within the page, you can supplement it with other material such as text that describes the clip's content and purpose. In essence, embedded media becomes part of the content of the page just as inline images become part of the page content.
Exploring Digital Audio
Figure 7-2: Anatomy of a Sound Wave

Figure 7-3: Different sampling rates.
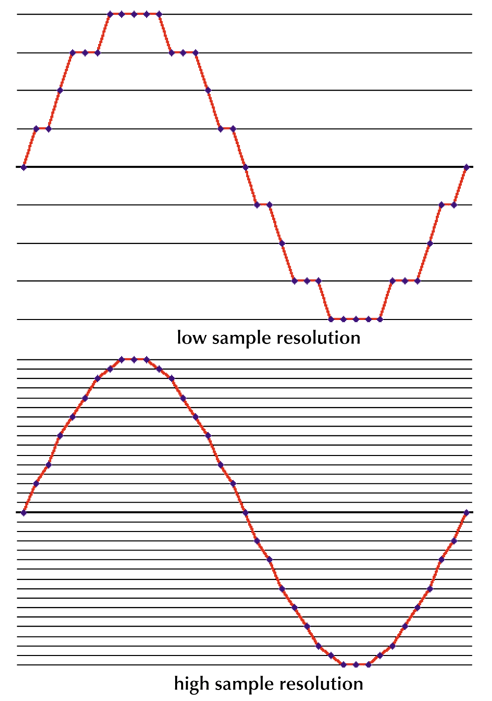
Figure 7-4: Different sampling rates.
When you hear an instrument playing at a live concert or a vocalist singing, or any sound for that matter, your ears are hearing an analog (continuously varying) signal created by the vibrations (called sound waves) that the sound makes on your eardrum. Those sound waves are being generated at different amplitudes (volumes) and frequencies (how fast the sound wave moves). In order to convert those analog sound waves into a digital audio format the sound must be sampled (translated) into zeros and ones based on the amplitude and frequency of the sound wave at a given point in time. How often the conversion from of the analog wave to a digital representation occurs is called the sampling rate which in the case of a standard CD is 44.1 thousand samples per second in tech jargon that's 44.1 kHz (thousand cycles per second). Figure 7-2 displays what an analog sound wave looks like when displayed on an oscilloscope. Figure 7-3 depicts how higher sampling rates increases how much more closely the digitized sound matches the original analog signal.
How precise the measurement is for each sample is referred to as the sample resolution or bit depth because how many bits are used to capture the measurement determines how accurate the sample is. Three commonly used bit rates are 8 bit, 16 bit, and 32 bit. An analog to digital converter (ADC) is used to convert the sound to digital audio using a specified sampling rate and bit resolution. CD audio is recorded at 44.1 kHz (44,100 samples per second) and captures 16 bits per channel (left + right = 32 bits in the case of stereo) per sample.
So what does this mean to you the Web developer? Well like any media type that is distributed over the Web it is a question of balancing the user's ability to quickly download media content from a Web page while attempting to maintain as much of the original quality of the content being downloaded. The higher the sampling rate and the more the bit depth, the larger the file size is going to be. Plus if you choose to use two channel sound (stereo) instead of a single (monaural) sound your sound has a richer, fuller sound, but you double the size of the sound file. The size of an audio clip is therefore related to the sampling rate, the bit depth, and the number of channels. The total size can be expressed in terms of the bit-rate, which is the number of bits of data required for each second of sound. For music stored on compact discs, the bit-rate is determined by multiplying the sampling rate by the bit depth by the number of channels. A typical CD track has a bit-rate value of 1411 Kbps, which is too high for practical use on the Web. In order to make file sizes smaller, in others words faster to download, software engineers have developed several different "lossey" compression schemes. Lossy means that you are losing some of the original information in the process of compressing the file to a smaller size. Whereas the WAV audio format is a lossless audio format that maintains the original sampling information exactly as it was when recorded, lossy formats like MP3 and WMA do lose some information, with the trade-off being a smaller file size.
While the patented MP3 format reigns king in the world of digital audio, due mainly to Apple's implementation into its very successful iPod product, Microsoft's proprietary WMA format actually does a better job of maintaining higher quality audio at higher compression rates than does the MP3 format. WMA's big drawback is that it is limited to only being playable on devices which use a Microsoft operating system. However, some automobile manufacturers like Chrysler, Ford, and GM do support the format on their in car digital media players which are rumored to be the next frontier for distribution of digital content.
Table 7-1 lists some of the common sound file formats that a Web developer might consider for use on the Web.
| Format |
Description |
| AIFF/AIFC |
Audio Interchange File Format. Aiff was developed by Apple for use on the Macintosh operating system. AIFF sound files can be either 8 bit or 16 bit, can be mono or stereo, and can be recorded at several different sampling rates. |
| AU |
Also called mlaw (mu-law) format. One of the oldest sound formats, it is primarily used on UNIX workstations. AU sound files have 8 bit sample resolutions, use a sampling rate of 8 KHz, and are recorded in mono. |
| MIDI |
Musical Instrument Digital Interface. MIDI files cannot be used for general sound recording, like other sound formats, but are limited to synthesizers and music files. The MIDI format represents sound by recording each note's pitch, length, and volume. MIDI files tend to be much smaller in size than other sound formats. |
| MP3 |
The most popular format for downloading and storing music, MP3 compresses sound files to roughly one-tenth the size of uncompressed files while maintaining good audio quality. |
| RealAudio |
The files are designed for the real-time playing over low to high bandwidth connections. RealAudio files tend to be much smaller than AU or WAV files, but sound quality is usually not as good. |
| SND |
The SND format is primarily used on the Macintosh operating system for creating system sounds. This format is not widely supported on the Web. |
| WAV |
WAV is the standard audio format for Windows PCs and is commonly used for storing uncompressed CD-quality audio files. In its uncompressed format, a WAV file will require about 10 megabytes per minute of sound; however, compression algorithms are available to reduce the file size. |
| WMA |
Windows Media Audio is a proprietary audio format developed by Microsoft to compete with MP3s, offering better quality audio at higher compression levels than that of MP3s. |
Table 7-1: Audio File Formats
Working With Embedded Objects
For embedding multimedia files into a Web page most Web browsers recognize two elements for this purpose, the <embed> element and the <object> element. The <embed> element is an older way of supporting multimedia plug-ins in browsers. The <embed> element is currently supported in most Web browsers, it is not a W3C specification making it a less appealing choice for developers. Although the W3C's HTML 5 specification is adding some new elements for multimedia, the object element is currently the most commonly used element by Web developers to insert multimedia content into a Web page and has the following syntax:
<object attributes>
  parameters
</object>
Like any HTML element, the attributes are the properties of the element. The parameters are name/value pairs of information that are passed to and control the functionality of the actual embedded multimedia object. The object element can be used to embed just about any type of content including: PDF files, sound files, videos files, even other HTML document files.
Object Data Sources and MIME
| Format |
File Extension |
MIME Type |
| AIFC |
aifc |
audio/x-aiff |
| AIFF |
aif |
audio/x-aiff |
| AIFF |
aiff |
audio/x-aiff |
| AU |
au |
audio/basic |
| MIDI |
mid |
audio/mid |
| MIDI |
rmi |
audio/mid |
| MP3 |
mp3 |
audio/mpeg |
| MP3 |
mp3 |
audio/x-mpeg |
| MP4 |
mp4 |
video/mp4 |
| OGA |
oga |
audio/ogg |
| OGG |
ogg |
audio/ogg |
| RealAudio |
ra |
audio/x-pn-realaudio |
| RealAudio |
ram |
audio/x-pn-realaudio |
| SND |
snd |
audio/basic |
| WAV |
wav |
audio/wav |
| WAV |
wav |
audio/x-wav |
| WMA |
wma |
audio/x-ms-wma |
Table 7-2: MIME types.
To specify the source of the content to be displayed within the object, you add the data attribute
<object data="url"> . . . </object>
to the opening <object> tag and specify the file path and name in place of "url" in the example. For example the following code specifies the StrawberryFileds.mp3 file as the object's data source":
<object data="PennyLane.mp3"> . . . </object>
Because the object element can be used with a wide variety of data types, you indicate the type of object by adding the type attribute
<object data="url" type="MIME type"> . . . </object>
to the opening <object> tag, where MIME type describes the type of data in the object. MIME types or Multipurpose Internet Mail Extension types identify the type of data contained in the file which provides information to the Web browser about how the data file should be interpreted. One common MIME type you have already been using is text/css, which identifies a text file as containing CSS style rules. The MIME type for mp3 files is audio/mpeg, though audio/x-mpeg is also supported by most Web browsers. Table 7-2 lists the MIME types for other sound formats.
Setting the Object Width and Height
An embedded sound clip is displayed with controls that allow the user to start, pause, rewind, and control the volume of the playback. So part of inserting the sound clip also includes defining how many of these controls appear on the Web page. This is done by setting the size of the sound clip using the attributes width and height using the syntax
width="value" height="value"
where the width and height attributes set the size of the control in pixels. The width and height attributes are required for XHTML code.
For sound clips, you should set the height to at least 25 pixels to allow enough space to display the control buttons. The width determines how many control buttons are displayed. In some case, you might only need to display the play button; while in other cases, you'll want to display all of the buttons available with the plug-in. Table 7-3 shows the minimum widths needed to display controls for two popular sound plug-ins: QuickTime and Windows Media Player.
Table 7-3: Plug-in controls under different width values.
Working with Parameters
Every plug-in has a collection of parameters that define the appearance and behavior of the embedded object. These parameters are defined by adding the parameter elements
<object attributes>

    <param name="name1" value="value1" />

    <param name="name2" value="value2" />

    <param name="name3" value="value3" />

 . . .

 </object>
Within the <object tag, where name1, name2, name3, and so forth are the parameter names and value1, value2, value3, etc. are the values of each parameter. The parameter names and values are based on the type of object being embedded and on the plug-in used to display the object. One parameter common to most plug-ins for embedded sound is the src parameter, which defines the source of the sound file. So to set the source of your object to the PennyLane.mp3 file, you would enter the following src parameter:
<object attributes>
<param name="src" value="PennyLane.mp3 />
</object>
Although the src parameter is similar to the data attribute you've already studied, it's required for some browsers such as Internet Explorer, so you should include it in addition to the data attribute. Table 7-4 lists some of the parameters supported by QuickTime and Windows Media Player.
| Plug-in |
Parameter |
Description |
Values |
QuickTime Player
| autoplay |
Starts playing the clip automatically when the page loads |
true | false |
| bgcolor |
Sets the background color for the space alotted to the object |
#rrggbb | color name |
| controller |
Specifies whether or not to show the object controls |
true | false |
| endtime |
Specifies the time in the clip at which playback ends |
hh:mm:ss |
| href |
Specifies a page to load when the user clicks on the object |
url |
| loop |
Play the clip in a continuous loop, forward, backward, or both (palindrome) |
true | false | palindrome |
| src |
The source of the clip |
url |
| starttime |
Specifies the time in the clip at which playback begins |
hh:mm:ss |
| volume |
Sets the initial audio volume |
0 - 255 |
Windows Media Player |
autostart |
Starts play the clip automatically when the page loads |
true | false |
| filename |
The source of the clip |
url |
| mute |
Specifies whether or not the clip should be initially muted |
true | false |
| selectionstart |
Specifies the time in the clip at which playback begins |
seconds |
| selectionstop |
Specifies the time in the clip at which playback ends |
seconds |
| playcount |
Specifies the number of times the clip will play |
integer |
| showcontrols |
Specifies whether or not to show the object controls |
|
| volume |
Sets the initial audio volume |
-10,000 - 0 |
Table 7-4: Parameters for QuickTime and Windows Media Player.
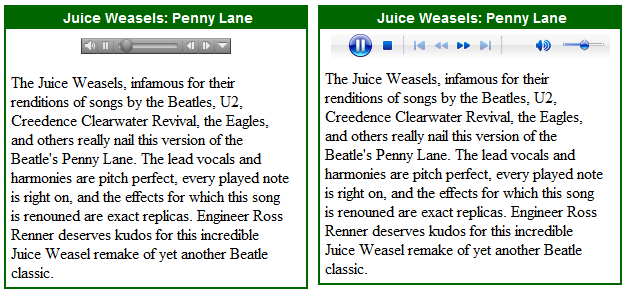
Figure 7-5: Plug-ins for the PennyLane.mp3 audio clip. Click on the image above to view the audio object example page.
Working with ActiveX Components
Different browsers support embedded media in different way. For example, Internet Explorer supports a technology called ActiveX to play embedded media. ActiveX is a technology developed by Microsoft involving reusable software components that can be run from within a variety of Windows programs. For example, a programmer could create an ActiveX component to display a drop-down list box to be run within Internet Explorer, and that same component could be run from within Microsoft Word or Microsoft Excel. Another ActiveX component could be created to play video clips or sound files. The media player shown in figure 7-5 is one example of an ActiveX control playing such files.
There are literally thousands of ActiveX components available to the programmer and end user. The problem is that ActiveX is a technology designed for Windows only, and thus you cannot rely solely upon it if you're developing a program or Web site that will be used under a variety of operating systems.
The classid Attribute
Each ActiveX control is identified by a unique string of characters called the class id. The class id value is determined by the manufacturer of the ActiveX control. Table 7-5 lists the class id values for several ActiveX controls that can be used in created a Web site.
| ActiveX Control |
Class ID |
| Flash Shockwave Player |
D27CDB6E-AE6D-11cf-96B8-444553540000 |
| QuickTime Player |
02BF25D5-8C17-4B23-BC80-D3488ABDDC6B |
| Real Audio Player |
CFCDAA03-8BE4-11cf-B84B-0020AFBBCCFA |
| Windows Media Player |
6BF52A52-394A-11d3-B153-00C04F79FAA6 |
| Java Applet |
8AD9C840-044E-11D1-B3E9-00805F499D93 |
Table 7-5: Class ids for ActiveX Controls
To insert a specific ActiveX control into your Web page, you would add the classid attribute
classid="clsid:id"
to the <object> tag, where id is the class id of the ActiveX control. For example, to insert the ActiveX control for the QuickTime Player, you would add the following classid attribute to the <object> tag:
classid="clsid:02BF25D5-8C17-4B23-BC80-D3488ABDDC6B"
Class id values are not case-sensitive, so you can use lower- or upper-case letters in your HTML code; but you do have to enter the entire class id string with no omissions or errors. Given the length of the class id text string, this makes writing code for ActiveX objects a bit cumbersome. You can find the class id values for each ActiveX control by viewing the manufacturer's documentation.
The codebase Attribute
When browsers encounter plug-ins or ActiveX controls they don't recognize, they usually leave a blank space where the embedded object would normally appear. One way of dealing with this problem is to provide the browser with information about where a working version of the plug-in or control can be downloaded. This is done by adding the codebase attribute
codebase="url"
to the <object> tag, where url is the filename and location of the program. In some cases, these programs are stored in installation files called cab or cabinet files, which automatically install the necessary software on the user's computer. You can usually find the location of the installation programs in the manufacturer's documentation. For the ActiveX QuickTime Player, the URL for the cabinet file is http://www.apple.com/qtactivex/qtplugin.cab. So to embed an object using the ActiveX version of the QuickTime Player, you would enter the following code in your Web page:
<object classid="clsid:02BF25D5-8C17-4B23-BC80-D3488ABDDC6B" codebase="http://www.apple.com/qtactivex/qtplugin.cab">
parameters
</object>
When Internet Explorer encounters this object, it will first attempt to insert the ActiveX QuickTime Player control into the Web. If it can't find an ActiveX control on the computer with the class id value, it will then access the cab file at the URL specified in the codebase attribute and prompt the user to install the ActiveX control from that location. This frees the user from having to search for the program file.
With the classid codebase attributes, you are able to embed the ActiveX QuickTime Player control in Internet Explorer, but at the expense of removing it from other browsers. The problem is that ActiveX controls are designed for the Internet Explorer browser; other browsers do not support them. When those browsers encounter the classid attribute in the code you just entered, they're unable to process the <object> tag and ignore the embedded object altogether. One way to resolve this problem is with Internet Explorer conditional comments. Another way is by using HTML 5's audio and video tags which we will explore later in this tutorial.
Internet Explorer Conditional Comments
By now you've realized that Internet Explorer implements HTML and CSS differently than other browsers. Sometimes the easiest way to reconcile the two approaches is to run one set of code for Internet Explorer and another set of code for the other browsers. In tutorial 4, you were briefly introduced to Internet Explorer's conditional comment syntax, which allows you to run different code for different versions of Internet Explorer as well as for different browsers. The general syntax of an Internet Explorer conditional comment is
<!-- [if condition IE version] ><!-->
HTML Code
<!--<! [endif] -->
where condition is a condition that is either true or false, version is the version number of an IE browser, and HTML code is the code that will run if the condition is true. If you want to run code only for Internet Explorer (regardless of the version), you would enter the following code:
<!-- [if IE] ><!-->
HTML code
<!--<! [endif] -->
If a non-IE browser encounters this code structure, it will interpret the whole structure as one long HTML comment and will not attempt to parse any of the HTML code within the comment tags. So you can insert the entire opening <object> tag within the following structure and it will be run only within Internet Explorer.
<!-- [if IE] ><!-->
<object data="PennyLane.mp3" type="audio/mpeg" classid="clsid:02BF25D5-8C17-4B23-BC80-D3488ABDDC6B" codebase="http://www.apple.com/qtactivex/qtplugin.cab" width="280" height="25">
<!--<! [endif] -->
You can also mark the code that will only be parsed if the browser is not Internet Explorer. This time using !IE as a conditional statement which means "not Internet Explorer." So to create an opening <object> tag for non-IE browsers that doesn't have the classid and codebase attributes, you would enter the following code:
<!-- [if !IE] ><!-->
<object data="PennyLane.mp3" type="audio/mpeg" width="280" height="25">
<!--<! [endif] -->
Figure 7-6 shows how you can insert a sound clip tailored to both IE and non-IE browsers using both sets of conditional comments.
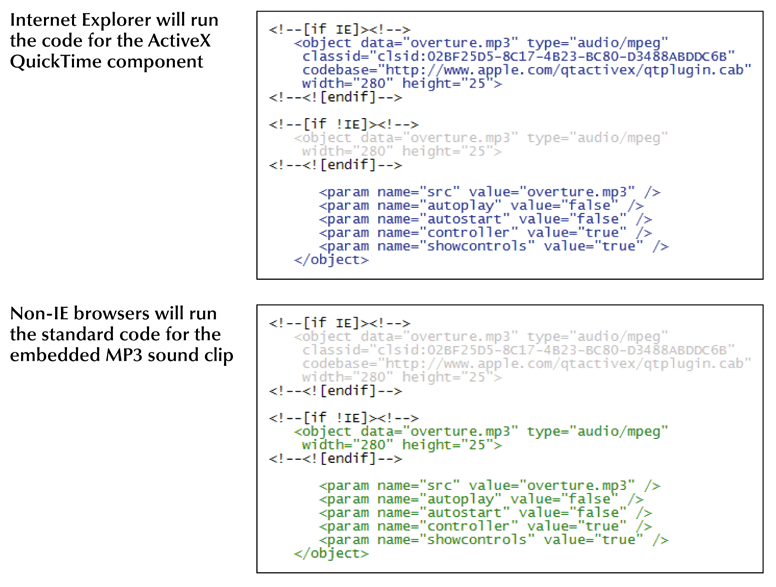 Figure 7-6: Writing code for IE and non-IE browsers.
Feature Detection Favored by Microsoft Over Browser Detection
Even though this tutorial demonstrates how to detect a Web browser using HTML comments, Microsoft recommends that you write code that tests for whether or not a particular feature is installed in the viewer's Web browser. This MSDN article goes into more detail about the drawbacks of browser detection and the advantages of using feature detection instead.
Creating Background Sound
You may want to enhance a Web page by adding a background music that starts when the page is loaded by the browser and whose controls are hidden on the Web page. The parameters for Windows Media Player to create a hidden clip that starts automatically are
<param name="autostart" value="true" />
<param name="showcontrols" value="false" />
While for QuickTime the parameter values are
<param name="autoplay" value="true" />
<param name="hidden" value="true" />
If you want the background music to play continuously as long as the page is open using Windows Media Player, you would add the parameter
<param name="playcount" value="0" />
for the QuickTime Player you would add
<param name="loop" value="true" />
Another way of creating background sound for Internet Explorer is to use the bgsound element
<bgsound src="url" balance="value" loop="value" volume="value" />
where url is the filename and location of the background sound clip, the balance attribute defines how the sound should be balanced between the left and right speakers, the loop attribute defines how many times the sound clip is played, and the volume attribute indicates the volume ranging from 0 (muted) to 10,000 (the loudest). To have the sound clip play continuously, set the loop value to infinite. The bgsound element is supported only by Internet Explorer and is not part of the specifications for HTML or XHTML.
If you choose to add background music to your Web page, make sure you pick a sound clip that will not irritate your users. Background music can be annoying, especially if the music clip is set to loop indefinitely with no way of shutting it off.
Exploring Digital Video
Displaying video is one of the most popular uses of the Web. With high-speed connections more available to the public, video has transitioned from simply a source of entertainment to an essential source of content and information.
Digital video can be recorded using digital camcorders, digital cameras, and cell phones, and with video capture boards installed in computers to record images from television, DVDs, and VCRs. You can also create video clips using computer animation software or screen capture software. When creating a video clip for distribution on the Web, you must determine what size and type of video will work best when played back over the viewer's Internet connection. You must also consider what video format will be most accessible to your users. The goal is to create video that will be easily playable by most people, with a smooth playback that is easy to watch.
Data Rates and Video Quality
A video file is composed of a series of single images or frames that are played in rapid succession to create the illusion of motion. Frames are sized to have width-to-height ratios known as aspect ratios. Their are two commonly used aspect rations on PC screens, tablets, and smart phones, standard which is a 4:3 ratio, and wide-screen which is a 16:9 ratio. Common standard-screen frame sizes are 160 x 120 pixels, 320 x 240 pixels, and 640 x 480 pixels, 800 x 600 pixels, 1024 x 768 pixels. Common wide-screen frame sizes are 720 x 480 pixels, 1280 x 720, 1600 x 900 pixels, and 1920 x 1080 pixels (also known as "high definition or HD").
When a video is played, the frames are rapidly shown in sequence, giving the illusion of motion. The number of frames shown in a given amount of time is called frame rate, commonly expressed in frames per second (fps). Higher frame rates usually, but not always, result in smoother motion. For comparison, DVDs typically render video at 24 fps, while frame rates of 10 to 15 fps, commonly used on the Web, can still result in videos of good quality.
However, the frame rate is not the only factor that determines the quality of a video. Another more important factor is the data rate, which is the amount of data that has to be processed by the video player each second to play the video clip. The size of the frame, the frame rate and the bit rate of any audio attached to the video are also factored into the calculation of the data rate. When settling on a data rate for video embedded on a Web site, you should take into account the bandwidth of the connection of your viewer. The bandwidth must be large enough to accommodate the amount of information processed each second to smoothly play the video. If the user attempts to play a video with too high of a data rate, the playback will be choppy and uneven as the connection tries in vain to keep up with the pace of the clip. A common mistake is to assume that a high-quality video with a fast frame rate will result in the best video for the user. This is not necessarily the case. For slower connections, a lower-quality clip with a slower data frame rate might actually look and perform better.
A general rule of thumb is that for a local area network, you should be able to get good quality playback with a data rate of 400 to 600 kilobits per second (Kbps). For DSL and ISDN, keep the data rate at 350 Kbps or less. If your viewers are connecting at low bandwidth such as through a dial-up line, the data rate should be kept below 100 Kbps. If you are running a video installed on your own computer or on a very fast network connection, you can work with data rates of a megabit per second or more.
You can reduce the data rate by reducing the frame size, using monaural rather than stereo sound, and reducing the frame rate. The content of your video clip also has impact on the data rate. A so-called "talking head" video in which a narrator in front of a largely static background can be saved with a low frame rate at little cost in video quality; on the other hand, a clip with a lot of motion (such as a dance sequence) would become choppy and uneven when played at a low frame rate.
Finally, video size can be greatly reduced through the use of file compression. When a compressed video is replayed, each frame is decompressed on the client's device as it is rendered. The technology that compresses and decompresses a media clip is called a codec (short for compression/decompression). Many different codes exist, each with its own advantages and disadvantages. Some codecs create smaller video files but at the expense of chipper playback. Video editing software allows you to choose the codec for your video clip, but you might need to experiment to determine which codec provides the best file compression without sacrificing video quality. Recent developments in video editing have introduced codecs that greatly reduce video size, resulting in high-quality video at data rates that are reasonable even under lower bandwidths.
As with sound formats, there are a variety of video formats in use on the Web. Table 7-6 lists some of the video file formats that you might want to use on your Web site.
| Format |
Filename Extension |
MIME Type |
Description |
| AVI |
.avi |
video/x-msvideo |
Audio/Video Interleaved. AVI is a common video file format developed by Microsoft for use with Windows. It is not always possible to play AVI files on non-Windows computers unless special software has been installed on the computer. |
| Flash Video |
.flv |
video/x-flv |
FLV is a proprietary file format developed by Adobe to deliver video over the Internet using the popular Adobe Flash Player. It is the preferred file format for online video sites such as YouTube and Google Video. |
| MPEG |
.mpg, .mpeg, .mp3 |
video/mpeg |
Moving Picture Experts Group. The MPEG format allows for high compression of the video file, resulting in a smaller file size. MPEG files have good support across various browsers and operating systems but tend to be much larger than flash videos. |
| QuickTime |
.mov |
video/quicktime |
QuickTime is a video format developed by Apple Computer for Windows and APple computers. Like MPEG, QuickTime employs a compression algorithm that can result in smaller files sizes. QuickTime files require QuickTime Player, available for either Windows or the Macintosh. |
| RealVideo |
.rm, .rv |
application/vnd.rn-multimedia |
RealVideo is a video format developed by RealNetworks for transmitting live video over the Internet at both low and high bandwidth. It uses a variety of data compression techniques and requires the installation of the RealPlayer media player. |
| Shockwave Flash |
.swf |
application/x-shockwave-flash |
SWF is a proprietary file format developed by Adobe to deliver multimedia and vector graphics on the Web. A SWF file can contain animations, video, audio, interactive scripts, and control buttons. SWF files can be played using Adobe Flash Player either as a browser plug-in or a stand-alone player. |
| Windows Media |
.wmv |
video/x-ms-wmv |
Developed by Microsoft, WMV is a popular video format for creating streaming video on the Web. The WMV format offers good compression and video quality, but is primarily designed for Windows users. Windows Media Player. |
| WebM |
.webm |
video/webm |
WebM is an open, royalty-free, media file format designed for the Web. WebM defines the file container structure, video, and audio formats. WebM files consist of video streams compressed with the VP8 video codec and audio streams compressed with the Vorbis audio codec. The WebM file structure is based on the Matroska container. More info on WebM |
| H.264/MPEG4 |
.mp4 |
video/mp4 |
H.264/MPEG-4 Part 10 or AVC (Advanced Video Coding) is a standard for video compression, and is currently one of the most commonly used formats for the recording, compression, and distribution of high definition video. The final drafting work on the first version of the standard was completed in May 2003. Widely used by streaming Internet services like Vimeo and YouTube. |
Table 7-6: Video formats.
The video format you select depends a great deal on your target audience. You want a video format that users will be able to play without having to install software, and it should be a format that will result in good video quality with reasonable data rates.
Media Players
There are four standard media players for use with video on the Web: Windows Media Player, QuickTime Player, Flash Player, RealPlayer. Table 7-7 details the video formats that each player typically supports. Note that these media players support other formats than those listed here, and in some cases the user can install additional codecs to enable the player to support even more formats.
| Video Format |
Adobe Flash Player |
Windows Media Player |
QuickTime Player |
RealPlayer |
| .asf |
|
yes |
|
|
| .avi |
|
yes |
|
|
| .mov |
yes |
|
yes |
|
| .mp4 |
yes |
|
yes |
yes |
| .mpg |
|
yes |
yes |
yes |
| .rm |
|
|
|
yes |
| .swf |
yes |
|
|
|
| .wmv |
|
yes |
|
|
Table 7-7: Video formats, media players, and plug-ins.
No matter what video format you choose for your Web videos, your viewers will need to have access to a media player capable of playing the files. Windows Media Player comes pre-installed on Windows computers, QuickTime comes pre-installed on Macintosh computers, Flash comes pre-installed on both Windows and Macs, and RealPlayer comes pre-installed on neither. A recent Stat Owl market survey (October 2011) have indicated that almost 95% of Internet viewers have the Adobe Flash Player plug-in installed in their browser, %54 can run the Windows Media Player, 57% have the QuickTime player plug-in, and 17% have RealPlayer installed according to this Adobe report. The Stat Owl survey also indicates that usage of SilverLight, a browser plug-in technology similar to Adobe's Flash player but developed by Microsoft, is at 67%.
Since you probably saying to yourself, well this is a no brainer - use Flash; You might want to re-think that once you read this post by Danny Winokur, Vice President & General Manager for Interactive Development at Adobe. The executive summary is that Adobe is no longer going to be developing the Flash player for mobile environments and they recommend using HTML5 for this purpose instead. This essentially means using the new <video> element and the WebM video format which will be universally supported by mobile browsers and PC browsers. The RA7 assignment uses the older <object> and <embed> elements, but feel free to use the <video> element if you feel comfortable doing so. There is more information about the <video> element at the end of this lesson.
Exploring QuickTime Video
QuickTime movies are displayed in the same player you used to play the PennyLane.mp3 audio file, and therefore much of what you learned about adding QuickTime audio will also apply to video. You will two sets of opening <object> tags, one for Internet Explorer, in which the QuickTime Player is inserted using an ActiveX control, and the other for non-IE browsers, in which the video clip is inserted as a plug-in. You can use the same classif and codebase attributes for the movie player. The MIME type for QuickTime videos is video/quicktime.
| Parameter |
Description |
Value(s) |
| autohref |
Automatically loads the Web page specified in url |
url |
| goto |
Plays a movie from the numbered list specified in the qtnext parameter |
integer |
| href |
Loads url when the viewer clicks the movie |
url |
| kioskmode |
Does not include the Save option in the movie controller bar |
true |
| movieid |
Identifies the movie so that it can be referenced |
text |
| moviename |
Names the movie so that it can be referenced |
text |
| playeveryframe |
Does not drop any frames of the video playback |
true | false |
| qtnext |
Specifies a numbered list of movies to play in the player |
n=<url>T<target> | GOTOn |
| qtsrc |
Loads a file or stream different from the one specified in the src parameter |
url |
| qtsrcchokedspeed |
Limits the outgoing bandwidth from the server to a specified data rate |
data rate |
| saveembedtags |
Preserves the current parameter values when loading a new movie |
true |
| scale |
Defines how the movie should be rescaled to fit the defined space; use tofit to change the movie's dimension to fit the space, aspect to fit the movie to the space wile retaining the aspect ratio, and n to scale the movie by a factor of n |
tofit | aspect | n |
| showlogo |
Shows the QuickTime logo until the movie is ready to play |
true | false |
| target |
Places the movie within the QuickTime player or within a named frame, or replaces the current movie with a new movie |
quicktimeplayer | frame | myself |
Table 7-10: Parameters of the QuickTime Player.
For example, you can use the QuickTime parameters to format the size of the video clip. The width and height attributes define the space reserved for the QuickTime Player, but within the space you can resize the video clip using the parameter
<param name="scale" value="scale" />
where scale value is tofit, aspect, or a numeric value. A value of tofit fits the video clip and the video controls exactly to the available space (even if it distorts the image). The aspect value fits the width of the video clip and player to the space while retaining its aspect ratio. If a numeric value is specified, it indicates the factor by which the video is rescaled while retaining its aspect ratio. For example, to reduce the video to 70% of its size, you would enter the following parameter:
<param name="scale" value="0.7" />
If you reduce the size of the player relative to the space available for it, you can apply a background color using the bgcolor parameter. Background colors are entered using either the color name of a hexadecimal color value (for a discussion of hexadecimal color values see Tutorial 3). Rescaling a video clip does not change the size or data rate. It only changes how the browser renders the clip on the page. If you need to resize the clip to reduce its file size or data rate, you must use video editing software.
Exploring Windows Media Player
Like other players, the Windows Media Player includes support for several parameters specifically related to playing videos. Table 7-11 list some of the parameters you might consider using in addition to those shown earlier in table 7-#.
| Parameter |
Description |
Value(s) |
fullscreen |
Specifies whether the video content is played back in full-screen mode |
true | false |
rate |
Specifies the playback raet, where a value of 0.5 indicates a playback at half-speed and a value of 2 plays the video back at twice normal speed |
value |
stretchtofit |
Specifies whether the video automatically sizes to fit the video window |
true | false |
url |
Specifies the name of the media file to play |
url |
windowlessvideo |
Specifies whether the Windows Media Player renders the video in windowless mode, in which the video is rendered directly on the page where you can apply special effects or overlay the video with text |
true | false |
Table 7-11: Video-related parameters of the Windows Media Player
Introducing the embed Element
The <object> tag represents the W3C standard for inserting multimedia content. Although it is supported by current browsers, it might not be supported by older browser versions. To make your pages backward compatible, you can use the embed element along with the <object> tag to insert multimedia content. The embed element was never part of any previous version of (X)HTML, but has finally been standardized in HTML 5. The syntax of the embed element is
<embed src="url" attributes></embed>
| Attribute |
Description |
Value(s) |
| align |
Specifies the horizontal alignment of the embedded element |
absbottom | absmiddle | baseline | bottom | left | middle | right | textop | top |
| alt |
Specifies alternate text to be displayed in place of the embedded element |
text |
| classid |
Provides the classid for an ActiveX object or Java applet inserted as an embedded element |
text |
| code |
The location of the class file used with embedded Java applets |
url |
| codebase |
The location of a Java applet class file if it differs from the location of the Web page |
url |
| height |
The height of the embedded element in pixels |
value |
| id |
Provides the id of the embedded element |
text |
| name |
Provides the name of the embedded element |
text |
| pluginspage |
Provides the location of a document containing instructions for installing the plug-in if it is not laready installed |
url |
| pluginurl |
Provides the location of an installation file for installing the plug-in specified by the embedded element |
url |
| src |
The source of the medi file used by the embedded element |
url |
| type |
The MIME type of the embedded element |
mime-type |
| width |
The width of the embedded element in pixels |
value |
Table 7-12: Attributes of the embed element.
For example, to insert a Flash player using the <embed> tag, you would enter the following HTML code:
<embed src="filename.swf" type=application/x-shockwave-flash" pluinspage="http://www.adobe.com/go/getflashplayer width="value" height="value">
</embed>
Note that the pluginspage attribute provides a url for browsers that do not have the Shockwave Flash plug-in. Users running such a browser would be prompted with an option to install the player so they wouldn't have to search for the player on their own.
The <embed> tag to insert the QuickTime Player is:
<embed src="filename.mov" type="video/quicktime" pluginspage="http://www.apple.com/quicktime/download" width="value" height="value">
</embed>
Finally, the <embed> tag to insert the Windows Media Player has the following form:
<embed src="filename.wmv" type="video/x-ms-wmv" pluginspage="http://www.microsoft.com/windows/mediaplayer" width="value" height="value">
</embed>
The embed element does not support the <param> tag, so many features specific to a particular player are added as attributes to the <embed> tag. So the parameter element
<param name="name" value="value" />
for an object would be entered using the following attribute in the <embed> tag:
<embed name="value" . . .></embed>
For example, the following code applies to the autstart, bgcolor, controlled, and scale values as attributes rather than parameters in embedding the rwdance.mov QuickTime video:
<embed src="rwdance.mov" type="video/quicktime" pluginspage="http://www.apple.com/quicktime/download" width="280" height="239" autoplay="false" controller="true" scale="0.7" bgcolor="#F0BC4C">
</embed>
Nesting Embedded Objects
When you add embedded content to your Web pages, you need to provide support for as many browser configurations as possible. Users might access your page using an older browser that supports only the <embed> tag and not the <object> tag. Other users might be running browsers without the capability of displaying embedded content, or they might have turned off those features for their browsers to speed up their Web browsing. To accommodate all of those situations, your code needs to match the capabilities of the variety of browsers and browser settings. You've already studied one way of accommodating different browser capabilities through the use of conditional comments; another important approach is to nest media objects within one another.
As shown in figure 7-7, the idea behind nesting media clips is to first attempt to display the clip using the <object> tag; if that fails, the browser attempts to display the media clip using the <embed> tag. Finally, if the browser is unable to embed the media clip using either the <object> or the <embed> tag, it will still be able to display a hypertext link to the media clip.
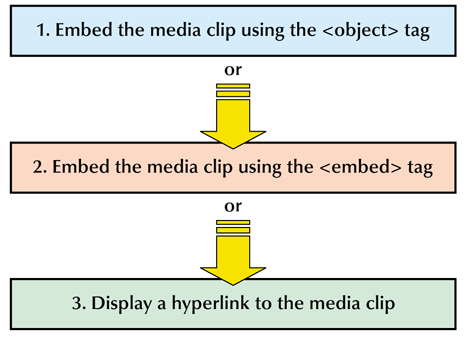
Figure 7-7: Nesting embedded objects.
The general syntax of this approach is therefore:
<object data="url" attributes>
<embed src="url" attributes>
<a href="url">Link to media clip</a>
</embed>
</object>
Browsers that can display the media clip using the <object> tag will ignore any elements nested within the <object> tag other than <param> tags. If a browser cannot work with the <object> tag, it will ignore it and attempt to display the contents of the <embed> tag. Finally, if the browser cannot display the contents of the <embed> tag, it will ignore it as well and display the hypertext link.
Figure 7-8 shows how to use this approach to insert a QuickTime movie clip forst as an ActiveX contrl, then as an embedded object using the <embed> tag, and finally as a hypertext link.
 Figure 7-8: HTML code to nest a QuickTime movie.
You can also nest <object> tags within one another. The following general code shows three levels of nested objects:
<object data="video.mov" type="video/quicktime">
<object data="video.wmv" type="video/x-ms-wmv">
Click to <a href="video.avi">download</a> the movie clip.
</object>
</object>
The uppermost level uses the <object> tag to insert a QuickTime movie clip. If that video format is not supported by the browser, the browser will then attempt to display the clip in .wmv format. If the browser supports neither of those object types, it will display a hypertext link to the video file in .avi format.
Nesting <object> tags in this fashion works for all browsers other than Internet Explorer prior to verison 7. Earlier versions of Internet Explorer will treat the nested <object> tags as separate objects and will display both of them within the Web page. You can override this behavior by hiding one of the objects using CSS.
You can test object nesting within your browser by temporarily disabling plug-ins. For example, the Opera browser allows users to turn off plug-ins from the preferences window. Firefox requires users to remove or rename the plug-in from the Mozilla Firefox\plugins folder. Under Internet Explorer, you can disable plug-ins and add-ons by selecting the Manage Add-Ons dialog box. From the dialog box, you can select and disable each plug-in associated with Internet Explorer. Figure 7-9 shows the appearance of the Web page in Internet Explorer with both QuickTime and Flash disabled.
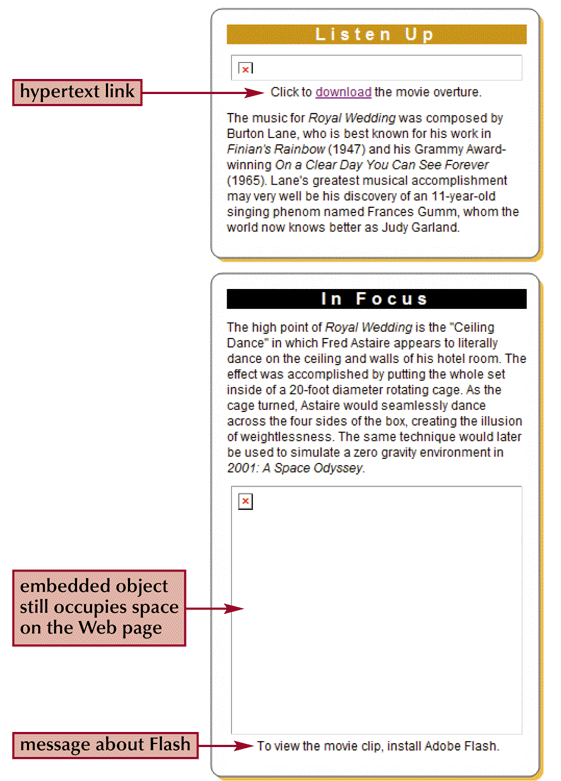
Figure 7-9: The Web page with disabled plug-ins.
Notice that the embedded objects still occupy space within the Web page even if they're unable to be displayed by the browser.
Embedding YouTube Videos
Note: You always have the option of uploading your file to [YouTube] or [Vimeo]. In many cases, this is preferable to the procedure described here. Those services handle formatting and filetype conversion for you, as well as provide the means to embed a video in your web page.
In order to embed a video uploaded to YouTube in a Web page is actually quite simple. underneath the video click on the Share button, then click on the Embed button and the code needed to embed the video will appear in a box underneath the button. Just copy the code in the box and paste it into your Web at the location where you want the embedded video to appear. Here is an example:
<iframe width="560" height="315" src="http://www.youtube.com/embed/ohoM7360z_8" frameborder="0" allowfullscreen></iframe>
The code above creates an iframe on the page in which the embeded video will appear as seen below.
Video 7-1: The embedded YouTube video.
Introducing Java
As with many computing innovations, Java came from some unexpected sources. In the early 1990s programmers at Sun Microsystems envisioned a day when common appliances and devices, such as refrigerators, toasters, and garage door openers, would be networked and controllable using a single operating system. Such an operating system would need to be portable because it would obviously need to be able to work with a wide variety of devices. The programmers began development on such an operating system and based it on a language called Oak. The project did not succeed at that point (perhaps the world was not ready for toasters and refrigerators to communicate), but the initial work on Oak was so promising that SUn Microsystems saw its potential for use on the Internet. Oak was modified in 1995 and renamed Java.
Each Java program works with a Java Virtual Machine (JVM), a software program that runs the Java code and returns the results to the user's computer. Java Virtual Machines can be created for different operating systems, so a Java program can be run from any operating system, including UNIX, Windows, DOS, and the Macintosh. Just as Web pages were designed at the beginning to be platform-independent, so was Java, and it became a natural fit for use on the Web. Netscape incorporated a Java Virtual Machine into Netscape Navigator version 2.0. Microsoft wasted little time in including its own JVM in Internet Explorer version 3.0. Because of the popularity of Java, JVMs are usually installed as part of the operating system or along with the user's Web browser. Java is still used throughout the Web today, though many of the uses are now being supplied by Flash, which is easier to program.
A Java program is not a stand-alone application, but instead runs in conjunction with a hosting program such as a Web browser. The program is therefore a "mini" application or applet. When the user connects to a Web page containing a Java applet, the applet is downloaded along with the Web page from a Web server, but the applet itself runs within the user's Web browser. This frees up the Web server for other tasks, as shown in figure 7-10.
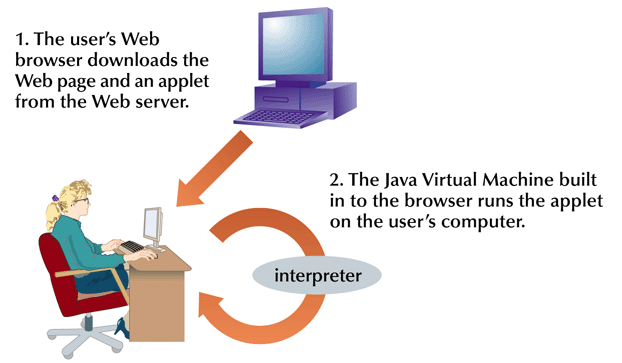
Figure 7-10: Applets and Java Virtual Machines
Applets are embedded within Web pages just like the sound and video clips you learned to embed previously. The applet runs within an applet window, which can be resized and positioned anywhere on the page.
Several libraries of Java applets are available on the Web. Some applets are free to download and use for non-commercial purposes. In other cases, programmers charge a fee for use of their applets. You can find Java applets for a variety of tasks, including stock market tickers, games, animations, and utilities for your browser or Web page.
A Java program is stored in an executable file called a class file, which has the file extension .class. Some Java applets might require several .class files to run properly. Each class file is run within a Java Virtual Machine. This is different from other programs on your computer, such as your Web browser, which are run by the computer's operating system.
Working with Java Applets
Java applets are embedded using the same <object> tag you used for sound and video clips. The general syntax of an embedded Java applet is
<object classid="id" type="application/x-java-applet" width="value" height="value">
parameters
</object>
where id is the class id of the Java applet, the width and height attributes define the dimensions of the applet window, and parameters are the parameters associated with the applet. Internet Explorer and non-IE browsers differ in the class id values they use for Java. To embed a Java applet under Internet Explorer, you would use the code
<object classid="clsid:8AD9C840-044E-11D1-B3E9-00805F499D93" type="application/x-java-applet" width="value" height="value">
<param name="code" value="filename.class />
parameters
</object>
where filename.css is the name of the file containing the Java applet. For non-IE browsers, Java is installed as a plug-in and the object code is
<object classid="java::filename.css" type="application/x-java-applet" width="value height="value">
parameters
</object>
where once again filename.css is the name of the file containing the Java applet. Note that for non-IE browsers, you do not need the code parameter. To reconcile the two approaches, you can use IE conditional comments as you did for the Embedded sound and video clips previously.
Embedding a Java Applet
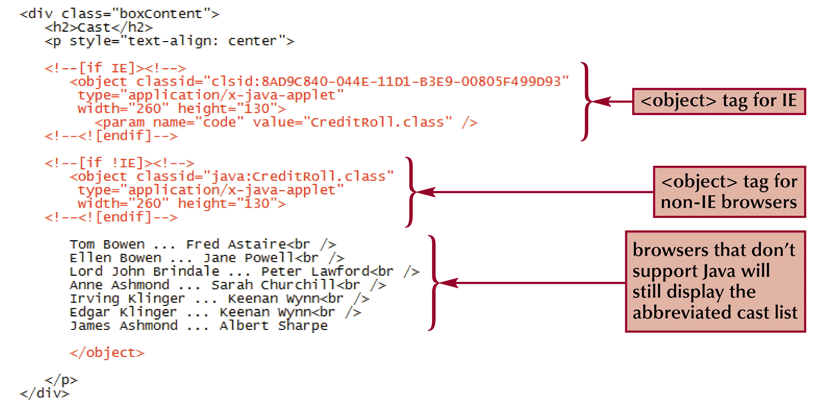
Figure 7-11: Inserting an object element for a Java applet.
Figure 7-11 displays the code used to embed a Java applet with a filename of CreditRoll.class. The CreditRoll.class applet displays scrolling text in the browser's Java applet window. You'll notice that the text which is to be scrolled by the applet is nested within the <object> tag. If this page is opened by a browser that does not support Java, it will ignore the <object> tags but will still display the abbreviated cast list.
Inserting Java Parameters
The CreditRoll applet contains several parameters that define the text being scrolled, the speed of the scrolling, and the font and background style. Table 7-13 describes the parameters used by the CreditRoll applet.
| Parameter |
Description |
| bgcolor |
The background color of the applet window, expressed as a hexadecimal color value |
| fadzone |
The text in the applet window fades in and out as it scrolls; this parameter sets the size of the area in which the text fades (in pixels) |
| textcolor |
The color value of the text in the applet window |
| textx |
Each line of text in the applet window requires a separate textx parameter, where x is the line number; for example, the parameter text1 sets the text for the first line in the applet window, text2 sets the text for the second line in the applet window, and so forth |
| url |
Specifies the Web page that is opened if the applet window is clicked |
| repeat |
Specifies whether the text in the applet window is repeated; setting this parameter's value to yes causes the text to scroll continuously |
| speed |
The speed at which the text scrolls, expressed in milliseconds between each movement |
| vspace |
The space between each line of text, in pixels |
| fontsize |
The point size of the text in the applet window |
Table 7-12: Parameters of the CreditRoll.class applet.
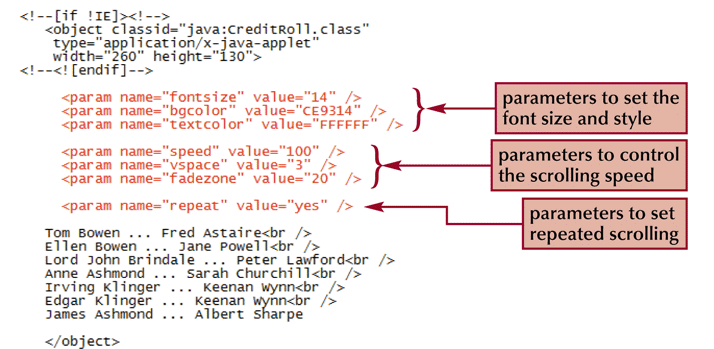
Figure 7-8: Adding parameters for the font style and scrolling speed
Next you must specify the text of the rolling marquee. The credit roll text is entered into parameters named textx, where x is the number of the line in the credit roll. Because of the length of the cast list, parameters named text1 through text19 have already been created for you and stored in a separate file in the tutorial.07\tutorial folder.
The credit roll applet also supports a parameter named url that adds a link to the credit roll applet, opening a Web page when the user clicks on the applet window. In order to link the credit roll applet to the page about the movie The Royal Wedding in the IMDB database, add
<param name="url" value="http://www.imdb.com/title/tt0043983
Figure 7-13 shows the addition of the textx and url parameters to the credit roll applet.
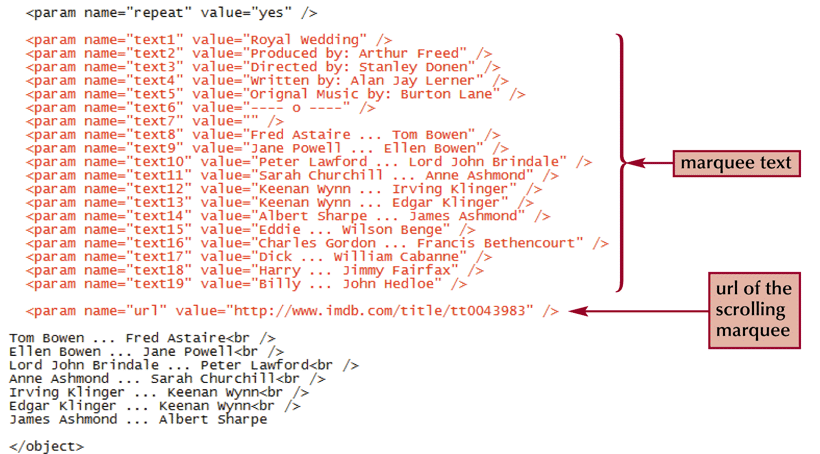 Figure 7-13: Specifying the marquee text.
To include information for Internet Explorer users about how to install Java if they don't have it, add the following code to the <object> tag:
codebase="http://java.sun.com/update/1.6.0/jinstall-6-windows-i586.cab"
If Internet Explorer doesn't have Java installed or has an older version installed, this code prompts users to decide whether or not to upgrade their Java support. For other browsers, you can insert a link to the java download page
<br /><br />
To view a scrolling marquee, get the latest
<a href="http://www.java.com/en/download/index.jsp">Java Plug-in
</a>

Figure 7-10: Specifying the codebase for Internet Explorer.
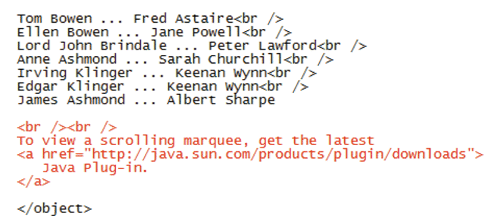
Figure 7-14: Text displayed when Java is not installed.
You can temporarily disable Java in your Web browser to test whether or not the message from figure 7-14 will be displayed to the user. The commends to disable Java will usually be found in the Options or Preferences window of your browser. For example, to disable Java in the Firefox browser, select Options from the Tools menu to open the Options dialog box, and then click on the Content tab. De-select the Enable Java check box to disable Java. The Enable Java check box for Opera is located under the Advanced tab in the Preferences dialog box. For Safari, it's under the Security tab of the Preferences dialog box. Finally, for Internet Explorer, you can disable Java by opening the Manage Add-ons dialog box and disabling the Java plug-in. Figure 7-15 shows the appearance of the movie credit box when Java is disabled.
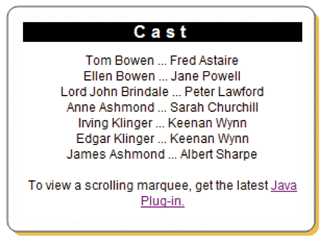
Figure 7-15: Text for Java-less browsers.
Exploring the Java Applet
Older browsers might not support the <object> tag for inserting Java applets. If you expect some users to be running older browsers, you can still allow them to view you applet by using the applet element
<applet code="filename.css" width="value height="value" alt="text">
parameters
</applet>
where file is the name of the Java class file, the width and height attributes set the dimension of the applet window, the alt attribute defines the alternate text to be displayed by the browser if it doesn't support Java, and parameters are the parameters associated with the applet. For example, to embed the CreditRoll.class applet using the <applet> tag, you could enter the code
<applet code="CreditRoll.class" width="260" height="130">
parameters
</applet>
with parameters being the same <param> tags you used with the object element. Like the <embed> tag discussed previously, the <applet> tag is not part of the W3C specifications for HTML or XHTML and is gradually being phased out, though you might still encounter it in code for older Web pages.
Embedding Other Objects
In this tutorial you've used the object element to embed sound clips, video clips, and Java applets. However, you can use the object element for many other purposes. Any type of content can be embedded using the <object> tag. In fact, the original vision of the object element was to act as a general container for any content not directly entered into the HTML code of the Web page.
Inserting Inline Images
You can use the <object> tag to insert all of your inline images. One advantage of entering images as embedded objects is that you can apply markup tags for the alternate text. For example, the inline image
<img src="jplogo.jpg" alt="Jumbo Popcorn" width="300" height="200" />
can be replaced with the embedded object
<object data="jplogo.jpg" type="image/jpeg" width="300" height="200" >
<h1>Jumbo Popcorn</h1>
</object>
Another advantage of treating images as embedded object is that you can provide the user with different formats of the same graphic image. For example, the following code allows the browser to first display the Jumbo Popcorn logo in png format:
<object data="jplogo.png" type="image/png" width="300" height="200">
<object data="jplogo.jpg" type="image/jpeg" width="300" height="200"
<h1Jumbo Popcorn</h1>
</object>
</object>
If that format is not supported, the browser displays the logo as a jpeg. Finally, if the browser does not support either format or is a nongraphhical browser, it displays the text Jumbo Popcorn masked as an h1 heading.
You can also nest videos and inline images. For example, you can embed a video clip and nest an image object within the video clip, allowing the browser to choose which type of object it is able to display.
Embedding an HTML File
Web Pages themselves can be embedded as objects. To embed a Web page you use the <object> tag syntax
<object data="url" type="text/html" width="value" hright="value">
</object>
where url is the URL of the HTML file to be embedded. When you embed a Web page, that file is displayed within the dimensions specified by the width and height attributes. The browser will automatically add horizontal and vertical scroll bars to allow users to scroll around the document. Figure 7-16 shows an example that might be used on the Jumbo Popcorn Web site in which previews of two Web pages are shown embedded side-by-side.
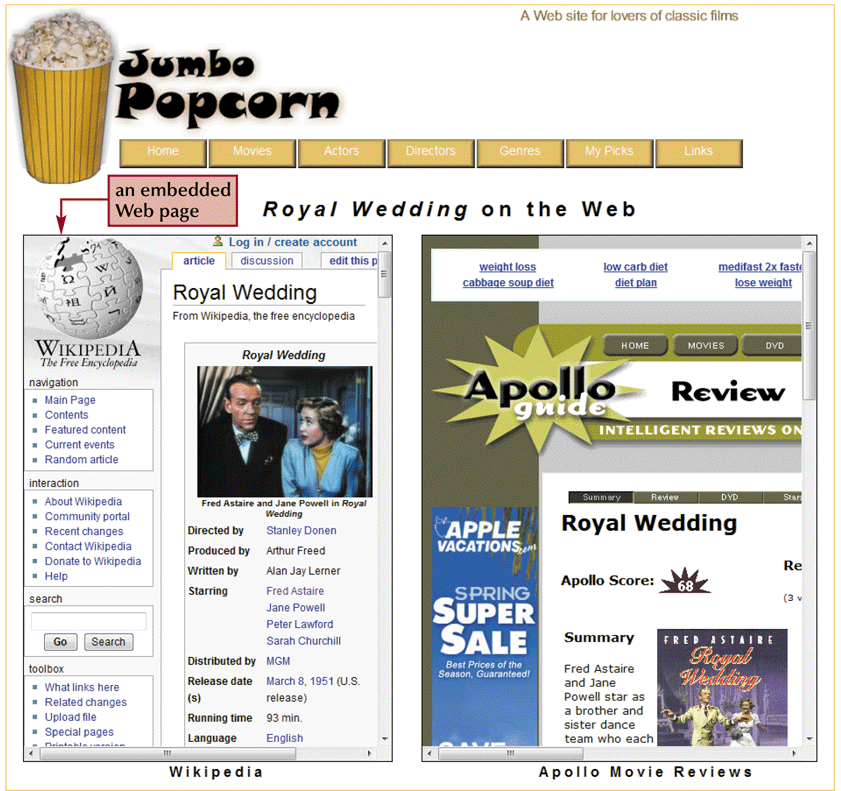
Figure 7-16: Embedding Web pages as objects.
Using HTML5 To Embed Media
Tutorial Summary
In this tutorial, you learned how to work with multimedia on your Web pages. The tutorial explored the use of the object element to embed various types of multimedia. The first session focused on sound, starting with a discussion of the issues surrounding working with digital sound. The session then explored how to embed sound files of different types either as plug-ins or ActiveX objects. The second session explored the use of video, focusing on three video formats: Flash, QuickTime, and Windows Media. The session also examined some of the issues involved with working with video servers such as YouTube. The final session looked at embedded Java applets within a Web page and ended with how to embed other objects, such as images and other Web pages, into a Web page. The tutorial ended with a discussion on the new HTML 5 elements used for embedding media into a Web page.