Using FileZilla to Publish Your Files and Folders to the Student Web Server
FileZilla is a free FTP program that you can use to copy files from the MSJC Remote Desktop System (RDS), or your personal computer to the CIS Student Web Server.
Using Filezilla on a Chromebook
Although you cannot directly install the traditional FileZilla application on a Chromebook, you can use it by enabling the Linux development environment on your Chromebook.Here's how to do it:
- Enable theLinux development environment in your Chromebook's settings.
- Open the terminal and install FileZilla using a command like sudo apt-get install filezilla
Keep in mind that when using FileZilla in this manner, the Linux file system is separate from the Chrome OS file system. To access files downloaded via FileZilla on your Chromebook, you will need to move them to a shared folder.
For a visual guide, you can check out a video tutorial on how to install FileZilla on a Chromebook on YouTube.
For a visual guide, you can check out a video tutorial on how to install FileZilla on a Chromebook on YouTube.
Using FileZilla on MSJC RDS
If your are using the MSJC RDS to store your Web Development files and folders, you can access the FileZilla program in the Web Development folder on the RDS.
Downloading and Installing FileZilla on Your Personal Computer
- Open a Web browser and go to https://filezilla-project.org
- Once you are viewing the FileZilla Website, click on the Download FileZilla Client button. FileZilla will examine your computer to determine the best download option for it.
- On the next screen you will see another Download FileZilla Client button, verify that the text above it correctly identifies your computer's operating system and CPU type (32 or 64 bit).
- If it is correct click the button to begin the download process.
- If it is not correct, click on the icon representing your computer's operating system under the heading More download options, then again view and verify the text above the Download FileZilla Client button is correct for your computer, and if it is, click the button to begin the download process. If it is not, FileZilla may not have an compliant program that will run on your computer and you might want to consider using another computer for uploading your files to the Student Web Server.
- Assuming you found an appropriate choice in step 3, once the FileZilla exe file (actual file name changes depending on the current version available when download it) is done downloading to your computer, run the exe file to begin the installation process.
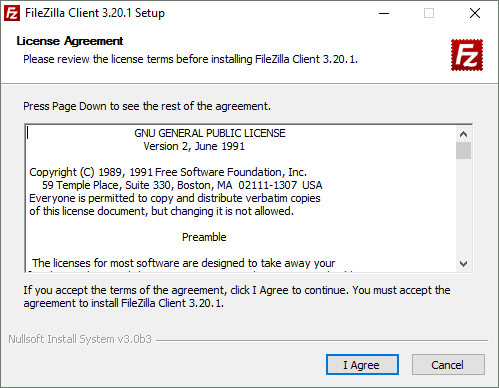
5. The first screen that appears is the License Agreement screen, click I Agree.
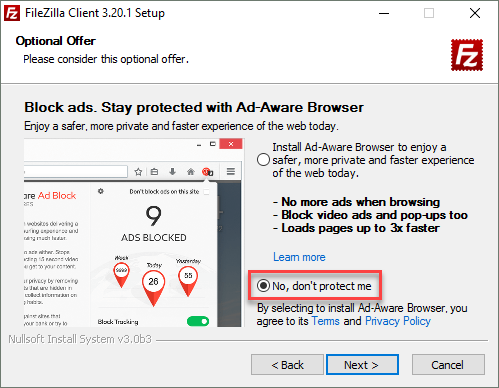
6. Note: Be careful!!! On the next screen after the License Agreement screen the setup program has an option to download an AdAware Web Browser, if you don't wish to have this program installed disable it (my recommendation)by choosing "Don't Protect Me", then click Next to proceed to the next screen.
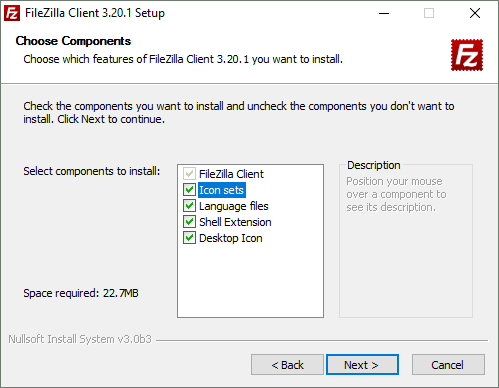
7. On the Options screen, check all the boxes, and click Next.
8. Once the program is installed, click OK on the final screen and FileZilla should open on your computer. The first screen to appear is the Welcome (title) screen with some help links in it. Click OK to close the title screen.
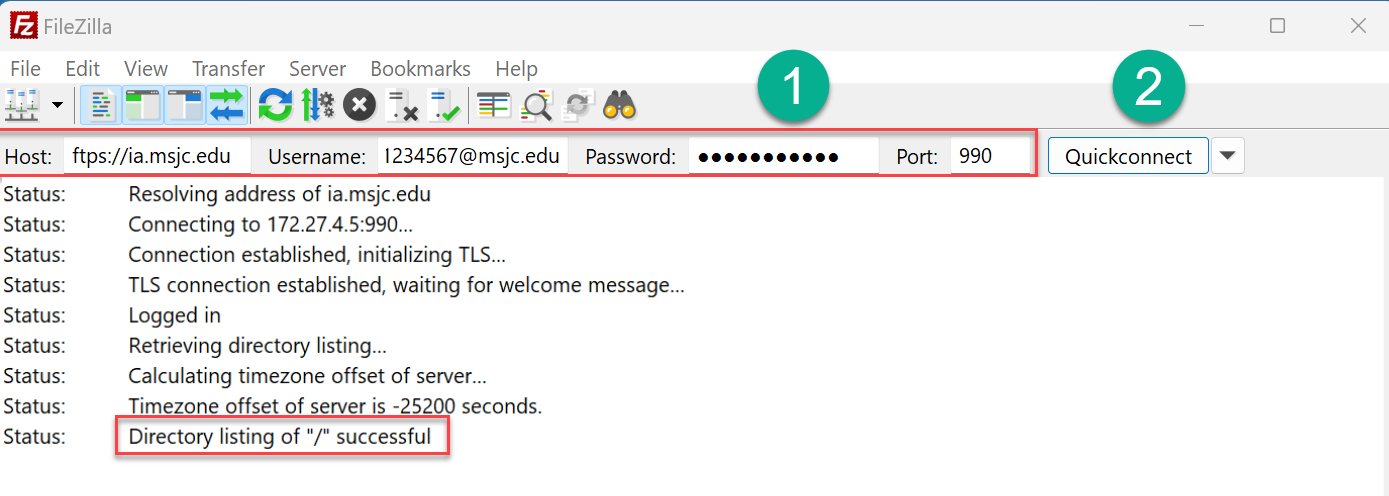 This image shows the FileZilla Quickconnect settings (1) and the Quickconnect button (2) as described in step 9 & the success status as described in step 10.
9. Once the FileZilla program is open on your screen, type in the Host computer information (ftps://ia.msjc.edu) followed by your (7-digit student ID number), followed by your password (the same password you use to login to Canvas), type 990 for the port, and then click the Quick Connect button.
10. Verify that you were able to connect to the Student Web Server by viewing the status messages that appear under the Host login bar. If you don't see the phrase Directory listing of "/" successful, double-check your Host settings and verify they are correct. If you believe they are correct but still are not able to login, perform a screen capture of your Host settings, attach the screen capture to an email and send it to me.
11. Once you are successfully logged in to the Student Web Server, locate your Web Development folder on your local computer (either CSIS115A, CSIS125A or CSIS 786). I will be using the CSIS115A folder in this example.
12. Depending what you want to upload to the student Web server file or folder, you need to browse to and select the file or folder in the local files box.
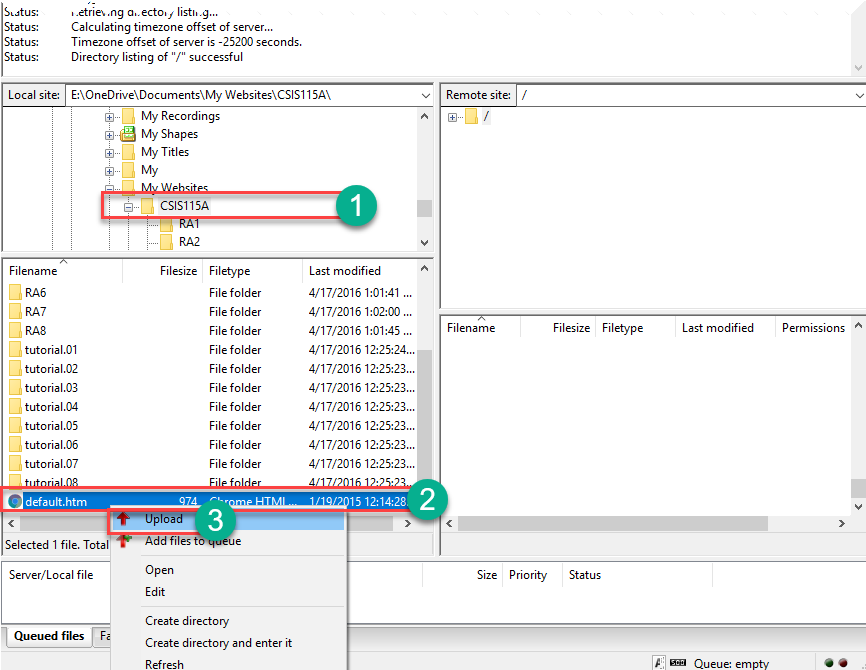
13. Once you have the file or folder selected, right-click on it and choose Upload from the context menu that appears.

If you have done these steps correctly, your file or folder will be uploaded to the Student Web Server and you will now see the copied file or folder in the folder on the right which is displaying your uploaded files or folders in your student folder on the CIS Student Web server.
How to Submit Your Assignment URL for Scoring (for CSIS 115A, 525, and 786 classes only)
In order to receive credit for assignments you have published to the Student Web server, you need to submit the Web address (a.k.a. URL) of your assignment using the Submit an Assignment URL link on the course home page in Canvas.
Once you understand how URLs work, submitting your assignment URL for grading should be simple. Each time you have completed an assignment and published it to the Student Web server using your IDE do the following:
- Click on the Assignments link in your Canvas course menu.
- On the Assignments page, locate the link for the assignment URL you want to submit and click or tap it.
- Click or tap the Submit Assignment button on the screen that appears.
- Then type or paste the URL for your assignment in the Website URL textbox provided.
- Click or tap the Submit Assignment button - and you're done!
TIP: Before posting your URL for scoring you should ALWAYS TEST YOUR URL to see if it works in your Web browser first. Just open your Web browser and type in the URL as described in the How URLS Work tutorial, if it works, then just copy and paste the URL you typed in your Web browser into the Website URL textbox in Canvas. If it doesn't work in your Web browser, it won't work in your instructor's Web browser either - in that case email your instructor for help and be sure to ALWAYS type your Course number and Section number into the subject field of ALL emails you send to your instructor.
⇑Table of Contents