What Is An IDE?
The acronym IDE stands for integrated development environment. IDEs are computer applications you install on your computer or access via the Internet for the purpose of creating a Web page, a computer program, or a mobile app. IDEs provide many features that help Web developers and programmers to write code more quickly by providing features like Intellisense which "senses" what code you're about to type and offers to finish the statement for you. Most IDEs also have pre-built components which you can drag and drop into your document window. The code needed to create these components is automatically written for you, thereby saving you the time necessary to write the code yourself
and the time required for debugging typos. Examples of IDEs are Microsoft's Expression Web and Visual Studio, Adobe's Dreamweaver and Flash Builder, and open source (meaning "free") IDEs like NetBeans and Eclipse. If you already know how to use one of these IDEs you are welcome to use it to complete the Case Study
8 assignment - however, your instructor will not be providing any support to you on how to use any of these IDEs in this course. In other words if you use an IDE - you are on your own.
In the future, if you would like to take a class to learn how to write code using one of the IDEs mentioned above review the table below for the MSJC course number and the corresponding IDE that is being taught.
| MSJC Course |
IDE Being Taught |
| CSIS 103: Introduction to the Internet |
Microsoft Notepad/Apple TextEdit (non-IDEs) |
| CSIS 113A: C++ Programming - Level 1 |
Microsoft Visual Studio |
| CSIS 113B: Java Programming - Level 1 |
NetBeans |
| CSIS 113C: C# Programming - Level 1 |
Microsoft Visual Studio |
| CSIS 115A: Web Development - Level 1 |
Microsoft Visual Studio Express for Web |
| CSIS 116B: Developing ASP.NET Web Applications |
Microsoft Visual Studio Express for Web |
| CSIS 117D: Web Development - Level 1 |
Microsoft Visual Studio Express for Web |
| CSIS 125A: Web Development - Level 2 |
Microsoft Visual Studio Express for Web |
For Case Study 8 you are provided with instruction on how to build a very basic Web page using the most basic type of program you can to write your HTML code; Microsoft's text editor called
Notepad or Apple's TextEdit. Read
Creating Effective Web Pages in your text book, watch the video
demonstrations, and read everything below very carefully.
Case Study 8 Instructions
In order to successfully complete Assignment 8 read and follow all of the instructions that pertain to the computer platform you will be using to complete the assignment.
Substitution for Non-Windows Users
Each computer operating system has a different ASCII text editor that comes installed on it. MAC, Linux, etc. Non-Windows users can follow the instructions in the book and in the video demonstration by using the ASCII text editor that came with your operating system. Apple's MAC PCs come with an application called TextEdit. You can learn how to use TextEdit to write HTML code by following these instructions. Once you have learned how to use TextEdit to create an HTML file, return
to this page and read the rest of the instructions on this page.
Putting On Your Best Face
We're getting towards the end of this course and by now you should realize how important it is for any modern day business to have a Web presence. So, for this case study you are going to build a one page Web site for the Lakeside Police Department or for your new company if you prefer.
Step 1: Read through all of the instructions on this page. Be sure you read the Scoring Rubric so you will know what components are required to be included in your Web page to receive full credit for this assignment.
Step 2: Read Module 8 in your textbook. This tutorial explains everything you need to know about the HTML elements you will be including in your Web page.
Step 3: View the instructional videos. They will give you more specific instructions about how to go about creating your Web page.
Step 4: Create your Web page.
Step 5: Preview your Web page in your Web browser (if you need help post it to the Help! discussion forum). Make sure everything shows up properly.
Step 6: Zip ALL your files (HTML file & image files) into a single zip file.
DO NOT submit RAR files!!!
Step 7: Submit your zip file using
the Assignment 8 submission page for scoring. DO NOT post your HTML file and image file(s) separately because Canvas will apply a security protection that removes all of the coding from your files - rendering them un-viewable - be sure you complete Step 6
before you submit your assignment.
How The Heck Do You Do All Of This?
You can start by reading Creating Effective Web Pages in your textbook and you can view the instructional videos I have posted on how to create a basic HTML page.
Below are additional instructions which focus on the problems students run into most with this assignment. If you are having a problem, then more than likely you'll find some answers in the instructions below. Also, remember that you can post any questions you have to the Help! discussion forum.
Saving Your File In Notepad
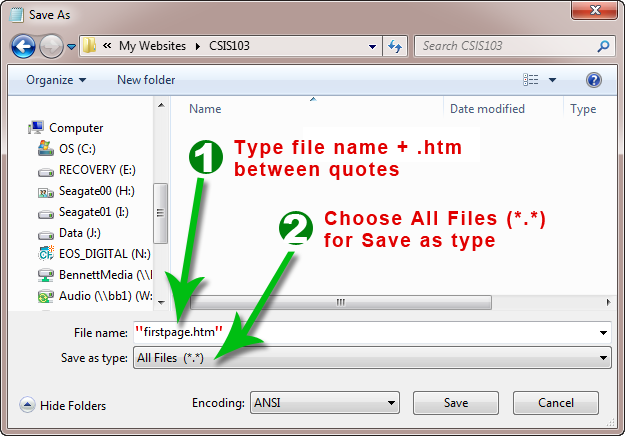
By default on a Windows-based computer Notepad wants to save your file as a text file, which means it wants to modify your file by adding a "txt" extension after the file name. This
will cause a problem when trying to open the file in your Web browser. In order for your Web browser to be able to open your Web page file, your file needs to have the extension "htm" added to the file name. In order save your file as an HTML file, in
Notepad's Save As dialog box, type out the name of your file inside of a pair of quotes and add the "htm" extension yourself, e.g. "firstpage.htm" (see image below).
| If you have done the step above correctly your file's icon should look
like this: |
If
you did the previous step incorrectly and Notepad still thinks
your file is a text file, then it will look like this: |
 |
 |
How To Submit Your Web Page
Before you even attempt to submit your Web page for grading, first open your HTML file in a Web browser on your computer to make sure everything looks the way you want it, including being able to see that your image file is displaying correctly, and that your JavaScript code is working correctly.
Once you have finished building and testing your Web page, you will need to zip all your files together into one file; include the HTML file and any image file(s) you have included on your page. Post the zipped file to the Assignment 8 submission page by the due date listed in the Syllabus. Read these instructions if you are not familiar with how to zip files.
Important!!! Read ALL of the following tips:
Tip 1: Be sure to include your image file(s)
along with you HTML page. Not including the image file in the zip along with the HTML file is one of the most common mistakes I see and a loss of 15 points on the assignment.
Tip 2: Another common mistake is having the "src=" path of your image file pointing to a folder on your computer. If your src= path looks something like this: src="file://Users/Your%20Name/My%20Documents/ImageName.jpg" it is NOT CORRECT. Keep it simple. Save your image file in the same folder as your HTML file and make the code read like this: src="ImageFileName.jpg" or src="ImageFileName.png" or src="ImageFileName.gif".
Tip 3: Your image file should only be in either the jpeg, png, or gif formats - DON'T USE bmp files or any other image file format.
Scoring Rubric
You can create your Web page using any ASCII or IDE editor you'd like. Write the HTML code from scratch using Notepad, Notepad++, TextEdit, or if you know how, you can use an IDE like Expression Web, Visual Studio Community, Visual Studio Code, Brackets, Sublime or Dreamweaver (no instructional support will be provided for the use of IDEs).
In order to get full credit for this case study your new company Web site needs to include the following:
- A document type declaration (DTD) for HTML5 (10 points)
- Have an HTML comment and a
<title> element in the <head> section of your HTML page (10 points)
- A correctly implemented
<html> element (10 points)
- A correctly implement
<body> section (10 points)
- A level 1 heading correctly implemented with text aligned center (10 points)
- This criterion is linked to a Learning OutcomeA level 2 heading correctly implemented with text aligned center (10 points)
- A paragraph of text with bolded and italicized text (10 points)
- A bulleted list correctly implemented. (10 points)
- An
<img> element correctly implemented. (10 points)
- A working hypertext link correctly implemented (10 points)