Before You Begin...
In order to complete this tutorial you MUST have
already completed the following steps:
- Downloaded and extracted (unzipped) the CSIS525 Data Files into your My Web Sites folder on your computer.
- Opened your CSIS525 Web site in Visual Studio or another IDE.
- Downloaded, installed, and configured Visual Studio or another IDE to publish files to your student folder on the Student Web server.
If you have not already completed the steps listed
above then view & complete the following lessons as necessary:
If you have already completed the steps listed above
then you are ready to complete this assignment, please continue reading
below.
Opening Your Website
In order to open a Website in Visual Studio Community, once you have opened the Visual Studio Community program, you need to go to the bottom of the Get started section and click on the "Continue without code" link.
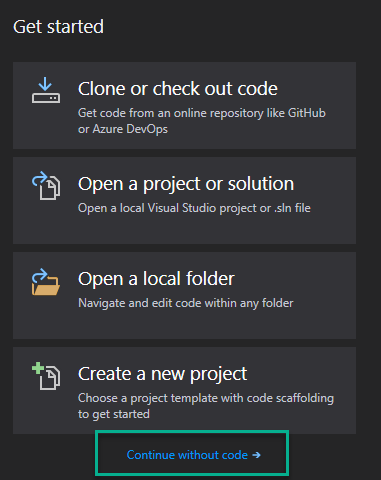 Figure 1: The Get Started section of the Visual Studio Community Start window
Next, on the Menu bar, click or tap File to open the menu, in the menu that appears click or tap on the Open option, and then click or tap Website to choose it from the fly-out menu.
 Figure 2: Using the File --> Open --> Web Site menu sequence to open the Open Web Site dialog box.
When the Open Website dialog box appears, navigate to the location of your unzipped data files folder. It's the folder you just downloaded and unzipped and it will have your course number as the folder name. Click or tap the folder to select it, and then click or tap the Open button to open your data files folder as the root folder for your Website.
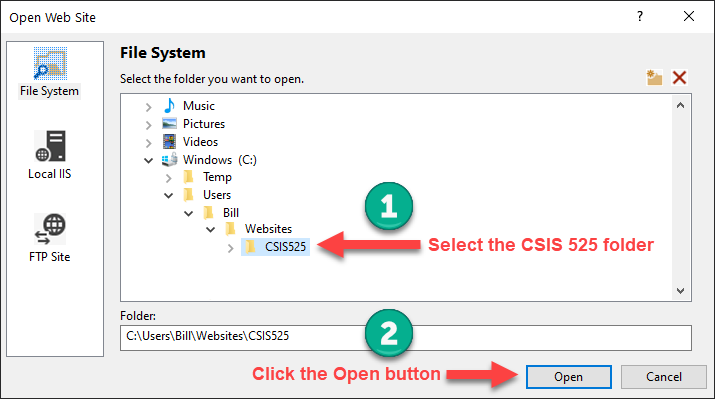 Figure 3: This figure shows the steps for selecting and opening your unzipped data files folder as the root folder of your Website.
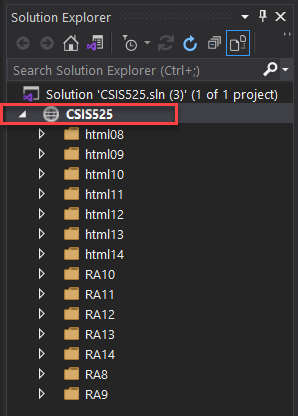 Figure 4: This is what your Visual Studio Solution Explorer window should look like when you have correctly opened your data file folder from the root folder - the folder that matches your class number (CSIS115A, CSIS 525, or CSIS786).
When you open your Website correctly in Visual Studio Community, its contents are displayed in the Solution Explorer window. You should be able to see all of the folders which contain all the files you will need to complete your CSIS 525 tutorials and assignments (see figure 4).
Important! Notice the globe icon to the left of your CSIS 525 folder. That icon signifies that the CSIS 525 folder is the root folder for your Website. If you see any other folder name at the top as the root folder or any subfolders off the root which differ from what is shown in figure 1.1, you have opened your Website incorrectly in Visual Studio. It is very important that the folder structure you see in figure 1.1 matches identically in order for you to be able to publish your Review assignments correctly to the student Web server.
If you do not see the Solution Explorer window open in Visual Studio, click View on the menu bar to open the View menu, then click Solution Explorer from the list of choices that appear in the View menu — or — use the keyboard shortcut, Ctrl + Alt + L, to open the Solution Explorer window.
How to Submit Your Assignment URL for Scoring (for CSIS 115A, 525, and 786 classes only)
In order to receive credit for assignments you have published to the Student Web server, you need to submit the Web address (a.k.a. URL) of your assignment using the Submit an Assignment URL link on the course home page in Canvas.
Once you understand how URLs work, submitting your assignment URL for grading should be simple. Each time you have completed an assignment and published it to the Student Web server using your IDE do the following:
- Click on the Assignments link in your Canvas course menu.
- On the Assignments page, locate the link for the assignment URL you want to submit and click or tap it.
- Click or tap the Submit Assignment button on the screen that appears.
- Then type or paste the URL for your assignment in the Website URL textbox provided.
- Click or tap the Submit Assignment button - and you're done!
TIP: Before posting your URL for scoring you should ALWAYS TEST YOUR URL to see if it works in your Web browser first. Just open your Web browser and type in the URL as described in the How URLS Work tutorial, if it works, then just copy and paste the URL you typed in your Web browser into the Website URL textbox in Canvas. If it doesn't work in your Web browser, it won't work in your instructor's Web browser either - in that case email your instructor for help and be sure to ALWAYS type your Course number and Section number into the subject field of ALL emails you send to your instructor.
⇑Table of Contents