Videos
Window's Command Line Utilities
To be a good administrator it is important that you learn how to use the Microsoft Windows command line utilities. The most frequently used MS command line utilities are: PING, IPCONFIG, ARP, and ROUTE. the reason they are called command line utilities is because they are utility programs that must be run from a command prompt. There are two ways to open a command prompt from within the Windows operating systems, you can open the Run dialog box and type cmd or you can click on the shortcut icon which you'll find by opening the Start
  menu, then clicking on the
 menu link at the bottom of the Start menu, and then opening the
  folder. Once you have your command prompt open type in the name of any one of the utilities mentioned above followed by a space and then a forward slash and a question mark /? to view the syntax of the utility, a list of the switches available for the utility, and information about what you will see by using each switch. Click on the video links above to learn more information about how to use these basic utilities.
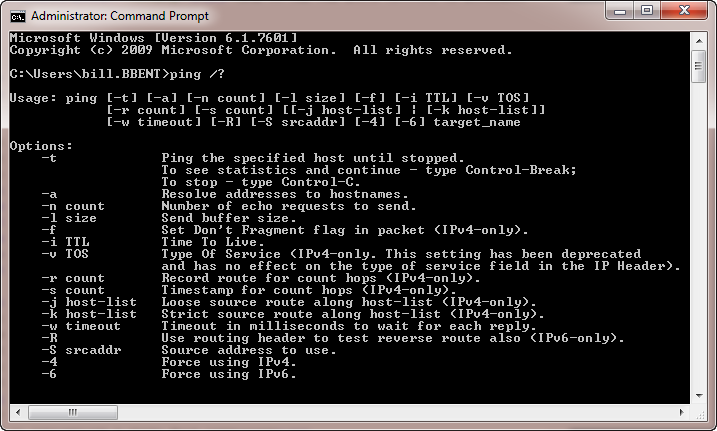
Figure 1: The Windows Command utility displaying the PING "Help screen.
Back to top
Introduction to Configuring a Local Area Connection
In order for a data communications device to be able to communicate with other data communication devices over a network they are attached to, the device needs to have a network interface installed and properly configured. Using a network interface card (NIC) is one common method for enabling data communication devices to communicate on data communications networks. In addition to a NIC, several software components need to be installed and configured to work in conjunction with the NIC; this is done through a process that is referred to as binding. One such software component is called a network client or redirector. A redirector receives commands from the operating system when the data communication device requests access to a resource that is located remotely (not attached to the computer). Another necessary software component that needs to be bound to the NIC is a network transport protocol. The network transport protocol is the software that is responsible for taking messages from the computer's operating system, packaging the messages in a discernable fashion, and forwarding the messages to the NIC for dissemenation out onto the network media for delivery to their destination.
Back to top
Configuring a network connection on a Microsoft Windows 7 computer is very similar to the method used on a Windows Vista computer and a Windows XP computer. First you need to access the Network and Sharing Center from the Windows Control Panel. To do this, click on the Windows Start button  (in the lower-left of the desktop in a default configuration). Once you've clicked on the Windows Start button you should see a menu option the reads Control Panel, click on it.
 Depending on how your computer is configured, clicking on the Control Panel menu option will either open a Control Panel window (default setting) or a fly-out menu with a list of Control Panel items. If you are using a Windows 7 computer where a fly-out menu appears when clicking on Control Panel, look for the Network and Sharing Center option
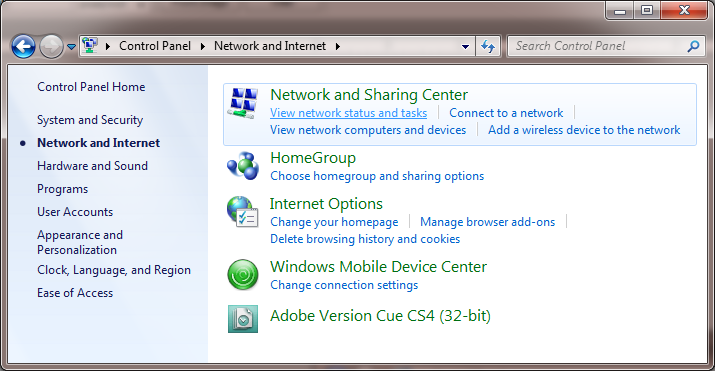
  in the fly-out menu and click on it. If you are using a Windows 7 computer in its default configuration, when you click on Control Panel a window will open and you will see a list of Control Panel categories, click on Network and Internet.

Once you are viewing the Network and Internet screen, click on Network and Sharing Center.
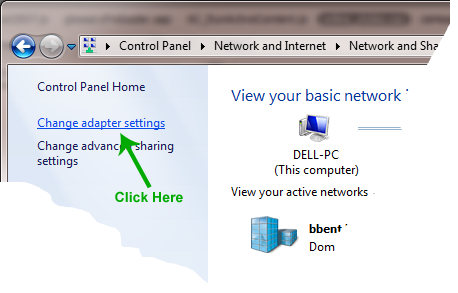
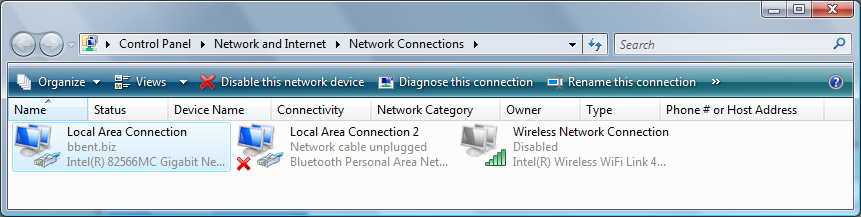
In the Network and Sharing Center window, click on Change adapter settings from the choices on the far left of the screen.
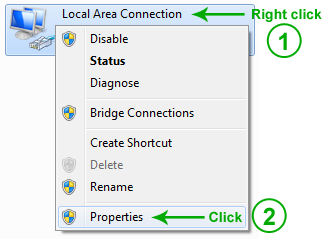
You should now see a list of adapters which are installed on the computer, right-click on the adpater that reads Local Area Connection and choose Properties from the context menu that appears.
At this point, configuring your Local Area Connection is the same on the Windows 7, Windows Vista, and Windows XP computers. To learn the next steps in configuring a Local Area Connection go to the section titled Local Area Connection Properties Dialog Box.
Back to top
Starting with Windows Vista, Microsoft introduced the Network and Sharing Center. You can access the Network and Sharing Center from the Windows Control Panel. Using the Network and Sharing Center you can see a graphical representation of your network connectivity, and what you have access to via which connection(s). The Tasks list consist of: View computer and devices, Connect to network, Set up a connection or network, Manage network connections, and Diagnose and repair. By clicking on the Manage network connections task you can access the Network Connections screen.
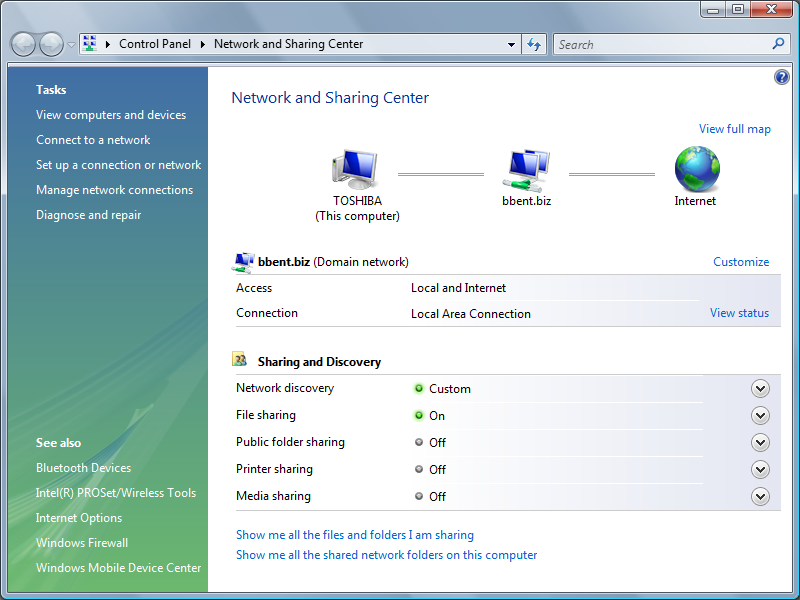
The Network Connections screen is very similar in appearance and functionality to that of the Windows 7 and Windows XP Pro Network Connections screen. From this screen you can right-click on the network connection of choice and choose Properties from the context menu that appears.
Back to top
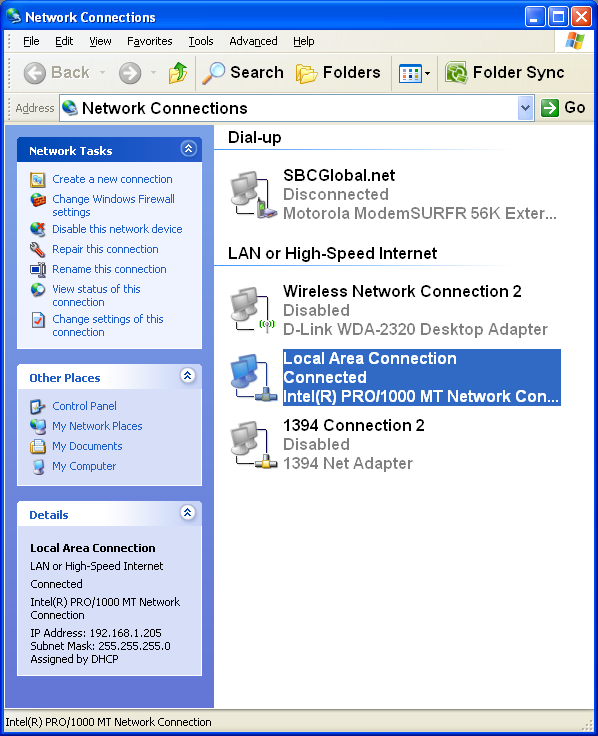
As you can see in the Network Connections dialog box on a Windows XP Pro computer, the "Connections" are divided into two categories Dial-Up and LAN or High-Speed Internet. You select a connection by clicking on the connection icon or connection name in the Network Connections dialog box.
Once your connetion is selected a list of Network Tasks appear to the left. The Network Tasks list provides the following options: Create a new connection, Change Windows Firewall settings, Disable the Network device, Repair this connection, View status of the connection, and Change settings of this connection.
In the bottom left corner of the Network Connections dialog box you can view the Details of the selected connection.
If you click on Change settings of connection from the Network Tasks list or if you right-click on the connection and choose Properties from the context menu that pops up, you will see the Local Area Connection Properties dialog box appear, this is where you can configure the interface the connection is using, you can add and configure network clients (the redirector components in Windows), you can add or remove File and Print Sharing, and you can change and configure the protocol stack that your computer uses to communicate with other computers on the local network and/or the Internet.
Back to top
Local Area Connection Properties Dialog Box
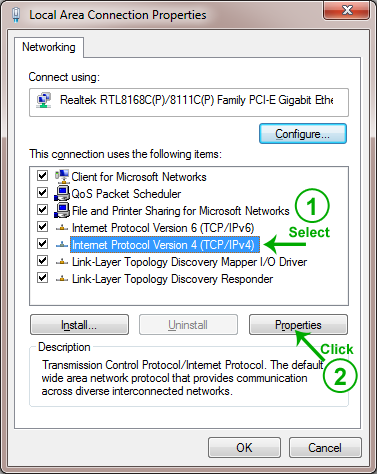
The Local Area Connection dialog box in most cases will contain: Client for Microsoft Networks which allows your network card to communicate with other Microsoft-based computers on the network; File and Printer Sharing for Microsoft Networks which allows your computer to share folders and printers with other Microsoft-based computers on your network; QOS Packet Scheduler which prioritizes network traffic sent and received by your network card depending on whether the traffic is video, audio, or text; and Internet Protocol (TCP/IPv6) and Internet Protocol (TCP/IPv4) both of which which allow your network card to communicate on the network using the TCP/IP protocol suite, which is the most commonly used communications protocol on LANs and the Internet. To modify the TCP/IP version 4 properties of your network card, select Internet Protocol (TCP/IPv4) and then click on the Properties button which will open and display the Internet Protocol version 4 (TCP/IPv4) Properties dialog box.
Back to top
Internet Protocol Version 4 (TCP/IPv4) Properties Dialog Box
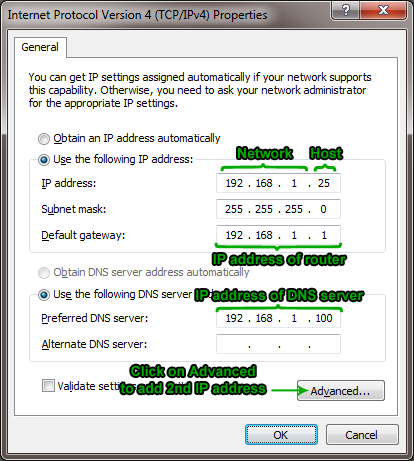
The Internet Protocol (TCP/IP) Properties dialog box allows you to configure your network card's TCP/IP version 4 properties dynamically or statically. To configure your network interface's TCP/IP properties automically, choose the Obtain an IP address automatically option. Your network interface will then be configured dynamically, as long as it has access to a Dynamic Host Configuration Protocol (DHCP) server. In order to configure the Internet Protocol Version 4 (TCP/IPv4) settings manually you need to know the proper values to type for the IP Address, the Subnet Mask, and the Default gateway. In most cases you will also need to assign a value for at least one Dynamic Name Server's (DNS) IP address. By clicking on the Advanced button you will gain access to the Advanced TCP/IP Settings dialog box, which will allow you to add a one or more additional IP addresses to the network interface you are configuring.
Back to top
The Advanced TCP/IP Settings Dialog Box
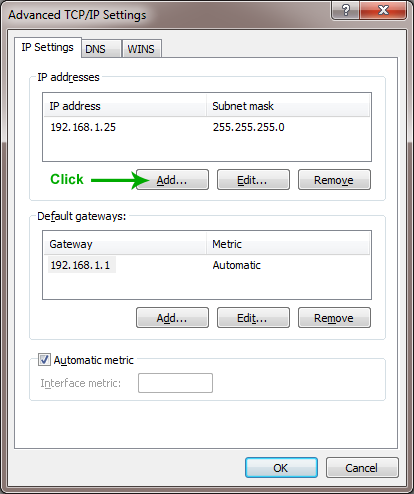
In the Advanced TCP/IP Settings dialog box you can add additional IP addresses to your network interface card as well as additional IP addresses of default gateways for your NIC to use when sending data outside of the network it is attached to. To add an additional IP address to the network interface you are configuring, click on the Add . . . button.
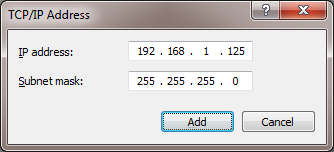
In the TCP/IP Address dialog box that appears, type in the additional IP address you want to add to your netork interface and a valid subnet mask, then click Add to complete the process.
Now that your local area connection is configured the way you want it click OK on all of the open dialog boxes in order for the changes you've made to take affect. If you don't want your changes to take affect then click Cancel on each of the open dialog boxes.
Back to top
Rubric
Each task is worth 50 points.
- Correctly configure your computer's Local Area Connection with 2 IP addresses, a subnet mask, and a default gateway for the assigned network.
- Successfully Ping teammates devices. [demonstration video]
- Display IP configuration including DNS server's address from Command prompt. [demonstration video]
- Display ARP cache from the Command prompt. [demonstration video]
- Display IP Routing table from the Command prompt. [demonstration video]
Note: After your configuration has been evaluated by your instructor, you MUST reset your local area connection back to the way you found it, i.e. delete the additional IP address you created and click on both the Obtain an IP address automatically and Obtain DNS server address automatically radio buttons in the Internet Protocol Version 4 dialog box to return the interface to its dynamic IP configuration state. If you do not do this step your score will be zero for this assignment.