AWS Client VPN
Downloading and Installing the AWS Client VPN
- To download the AWS Client VPN installer, goto the AWS Client VPN download page.
- Click on the Download button in the box that has the name of your computer's operating system.
- Double-click the installer file that is downloaded to your computer to begin the install process.
- Follow the on-screen instructions to complete the install process.
Configuring the AWS Client VPN
- Once you have downloaded and installed the AWS VPN client on your computer, you will need to add a profile to it for the IA.MSJC.EDU student web server. You will find a link to the AWS Client VPN configuration file on the Home page of the Canvas course shell for your class (CSIS 115A, CSIS 525 or CSIS 786) under the heading AWS Client VPN Links.
- Step 1: On the Home page for your Canvas class locate the AWS VPN Configuration File link and click on it. This will download the file to your computer.
- Step 2: Once the AWS VPN configuration file has completed downloading to your computer you will need to unzip it.
- On a Windows computers, locate the downloaded zip file using your Windows File Explorer.
- Right-click the zip file and choose Extract All... on the context menu that appears.
- On a Mac computer locate the file on you computer and use your WinZip application to unzip it.
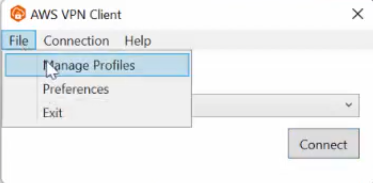
- Step 3: Open the AWS VPN client, open the File menu, and choose Manage Profiles.
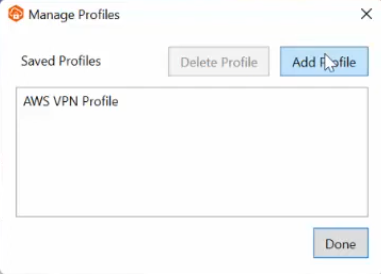
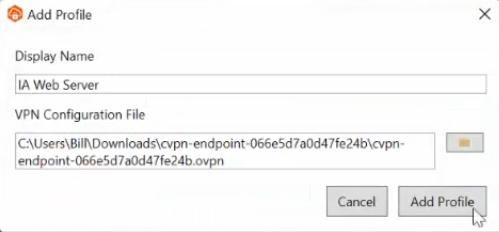
- Step 4: On the Manage Profiles screen that appears, click the Add Profile button.
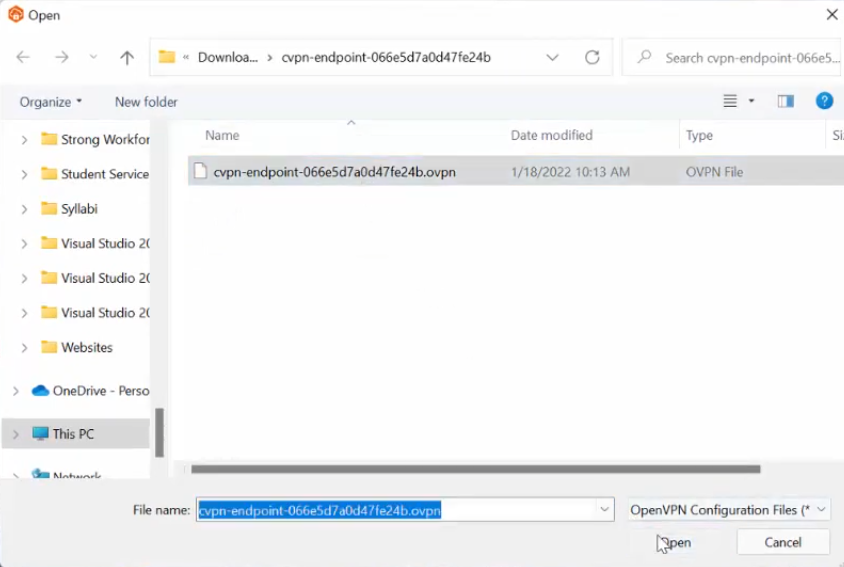
- Step 5: On the Open dialog box that appears, locate the AWS VPN configuration file you downloaded on your computer. Click on the filename to select it, and then click the Open button.
- Step 6: Now you should be viewing the Add Profile dialog box, click the Add Profile button.
- Step 7: You are returned to the initial AWS VPN Client screen with your newly added profile showing in the drop-down list box. Click the Connect button to activate the AWS VPN.
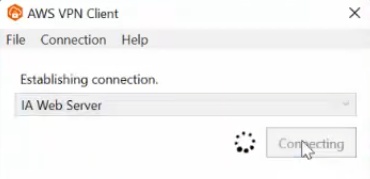
- Step 8: Next you should see the MSJC authentication screen pop up requesting you to login. Complete the login screen and click OK. As long as you typed in the correct credentials for the MSJC Login screen you should see the AWS VPN client's Connect button displaying the word Disconnect. This indicates that you have successfully activated the AWS VPN

- Step 9: Once you have completed the AWS VPN add profile process for the IA Web server, all you will have to do is open the AWS VPN client application and click the Connect button every time you want to activate the AWS VPN to be able to access the IA Web server.
Note: You will need to activate the AWS VPN for the IA Web server EVERY time you want to publish to the student Web server or view a Web page on the IA Web server.
View this video for help downloading the AWS VPN configuration file and adding it as a new profile to the AWS VPN client. Video has no audio.
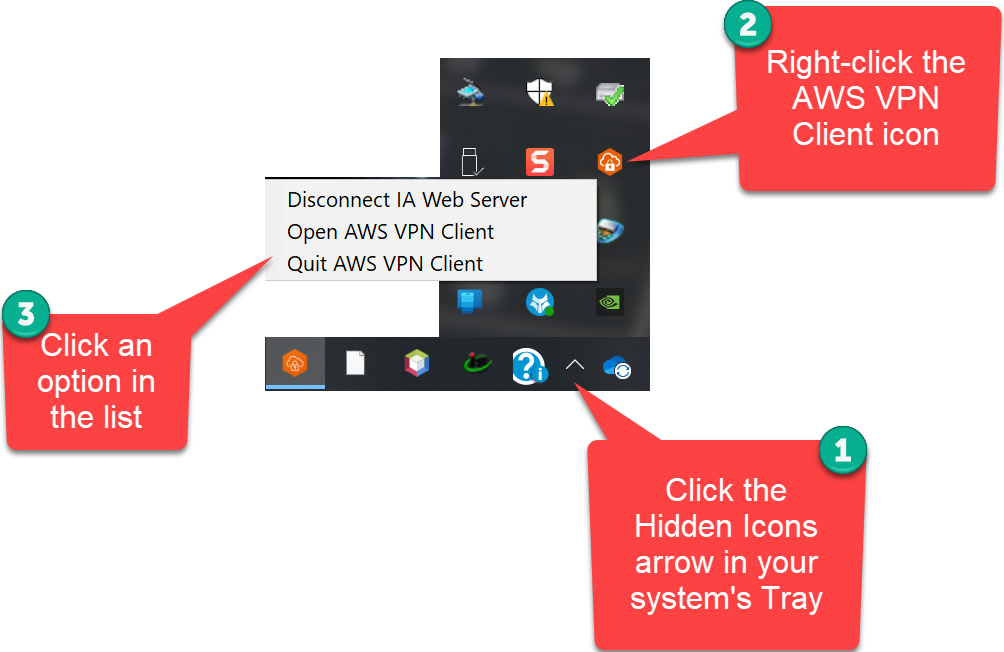
Managing the Client VPN App
I know it seems counter-intuitive, but when you click the close icon [X] on the AWS VPN client window it only closes the window and does not remove the app from memory - it's still running at that point. To close the app you can use the Task Manager to end the Client VPN app, or use the AWS VPN Client's menu which is accessible with a right-click on the AWS VPN client icon located in the Hidden Icons pop-up from your System Tray.