Adding a Table to a Database
Specifications
Create a new table in your online student database, name it ContactForm, and add the following fields and attributes:
    NAME       DATA TYPE    ALLOW NULLS
    [Id]      INT            IDENTITY (1, 1) NOT NULL,
    [Name]    NVARCHAR (100) NOT NULL,
    [Address] NVARCHAR (150) NULL,
    [City]    NVARCHAR (150) NULL,
    [State]   NVARCHAR (2)   NULL,
    [ZipCode] NCHAR (9)      NULL,
    [Phone]   NCHAR (10)     NULL,
    [Email]   NVARCHAR (100) NOT NULL
    CONSTRAINT [PK_ContactForm] PRIMARY KEY ([Id])
Use this SQL script if you'd like!
Adding the Table Using the Visual Studio Table Designer
Note: This tutorial assumes you already have a connection to the Student Database Server in the Visual Studio SQL Object Explorer. If this is not the case, then review this tutorial for how to establish a connection to the Student Database Server using the Visual Studio SQL Object Explorer.
To add a new table to your database complete the following steps:
-
Open Visual Studio
-
In Visual Studio, open the SQL Server Object Explorer
-
In the SQL Server Object Explorer, right-click on the the Tables folder and choose Add New Table.
-
In the Design dbo.Table tab that appears type the Name, Data Type, and Allow Nulls value for each field listed in the Specifications (above).
-
Right-click on the Id field under the Name heading in the Design window, choose Set Primary Key
-
Still in the Design tab where the T-SQL script code is being written, change: [dbo].[Table] to [dbo].[ContactForm].
-
Still in the Design/T-SQL tab, for the definition of the Id field add: Identity(1,1).
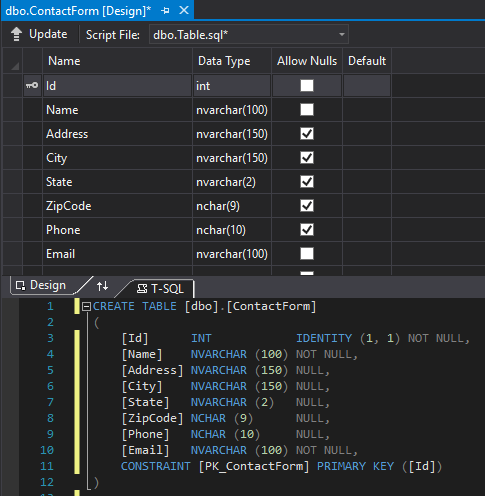
Your Design tab should look like figure 1.
 Figure 1: The Design tab with all of the ContactForm table definitions in-place.
-
Click on the Update button at the top-left of the Design tab.
-
The Preview Database Updates dialog box will open, click on the Update Database button.
-
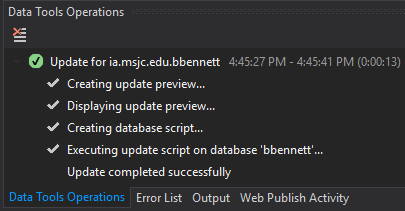
At the bottom of Visual Studio the Data Tools Operations window should display that your update completed successfully as shown in figure 2.
 Figure 2: The Data Tools Operations window displaying the steps occuring in the update operation, concluding with "Update completed successfully."
- In the SQL Server Object Explorer window, click the refresh button, your newly created ContactForm table should now appear in the Tables folder of your student database. If it doesn't, go back and double-check your steps against the instructions.
Adding the Table Using a New SQL Query
- In the Visual Studio SQL Server Object Explorer window, right-click on your database icon and choose New Query... from the context menu that appears.
- Type or paste your SQL Create Table query into the document window.
- Click on the Execute button on the SQL Query toolbar or press Ctrl + Shift + E on your keyboard.
- You should see the "Command(s) completed successfully" message on the Message tab and you should see the newly created table in the Tables folder of your database in the SQL Server Object Explorer.
 Figure 3: The Query windows Message tab displaying the the script successfully completed.