Using Packet Tracer to Complete Your Packet Tracer Activities
First copy the PKA file for the lab assignment you want to complete to your computer from the Packet Tracer Config Files page. TIP - you might want to organize your downloaded PKA files into a folder called CSIS202.
Opening the PKA File in Packet Tracer
If Packet Tracer Is Installed on Your Computer
If you have installed the Cisco Packet Tracer program on your computer then simply run the Cisco Packet Tracer program and use the File menu from within the Cisco Packet Tracer program to open the appropriate PKA file from your computer.
If You Are Using Packet Tracer on the RDS
If you are using MSJC's RemoteApplication and Desktop System (RDS) follow the RDS instructions to access and login to the RDS server. Once you're logged into the RDS server open the My Documents folder on the RDS server's desktop screen. Now copy the PKA file you previously downloaded to your computer by right-clicking on the file located on your computer and choosing Copy. Next right-click in a blank are of the My Documents folder open on the RDS server and choose Paste.
Once you have copied the PKA file to your My Documents folder on the RDS server, double-click on the Cisco Packet Tracer icon from the RDS desktop screen to load and run the Cisco Packet Tracer program. You will be asked to login again using the same username and password used to login to the RDS server. Don't forget that you must type "its\" before your username and be sure you've type a backslash and NOT a forward slash. Be patient while the program loads into memory.
From the Cisco Packet Tracer program click on the File menu, choose Open from the drop down menu and navigate to the PKA file in your My Documents folder. Select the PKA file and click the Open button.
The Packet Tracer Activity Screen
When the PKA file opens in the Cisco Packet Tracer program you will be presented with information about the lab in a window called the PT Activity screen, as shown in figure 1.4.3 below. The information on this screen includes: a topology diagram, learning objectives, some background info, and one or more tasks with a set of step-by-step instructions. You may need to adjust the size of the window to better read its contents. Before getting started on completing the activity you first need to configure your User Profile. To do so click on the Option menu from the Packet Tracer program and choose User Profile as shown in figure 1.4.1 below.
 Figure 1.4.1: The Packet Tracer Options menu.
 Figure 1.4.2: The Packet Tracer User profile dialog box.
In the User Profile dialog box as shown in figure 1.4.2 appears, type in your full name and email address and click OK. This step is necessary so that your name will appear on the Activity Results screen once you have completed the Packet Tracer activity.
Completing the Packet Tracer Activity
Return to the PT Activity screen and read the instructions of how to complete the activity. Complete the steps for each task until your Completion percentage in the bottom-right corner of the instruction window reads 100% (see figure 1.4.3). Once you see that your completion percentage is 100% click on the Check Results button in the lower-left corner of the instruction window (see figure 1.4.3). TIP - You don't have to complete the entire PT activity all at once. If you get interrupted while working on a PT activity open the File menu in the Packet Tracer program and click Save. When you resume the PT activity the program will pick up right where you left off.
 Figure 1.4.3: The Packet Tracer Activity screen.
After you have completed the Packet Tracer activity and you click on the Check Results button, an Activity Results screen will appear, click on the Assessment Items tab as shown in figure 1.4.4 below. At this point you need to do a screen capture to save an image of your Activity Results screen. To perform the screen capture, make sure your Activity Results screen is the active window (click on its title bar to be sure), hold down the Alt key on your keyboard and simultaneously press the PrtScn key (usually located above or near the numeric keypad on the keyboard). This will capture an image of the Activity Results screen to your computer's memory. Next you need to paste that image into a bitmap editor, like
Microsoft Paint or Adobe Photoshop for example, and save the file as a
JPEG or PNG file.
 Figure 1.4.4 Packet Tracer Activity Results screen.
How to Submit Your Activity Results Screenshot
 Figure 1.4.5: The CSIS 202 Course menu.
Once you have your screenshot saved as an image file you're ready to upload it to the appropriate Blackboard forum in the Discussion board. Begin by clicking on Submit PTAs in the CSIS 202
course menu in Blackboard (figure 1.4.5). Click on the link for the forum you want to post your image file to. Click on the
Create Journal Entry button. In the toolbar under the heading
Journal Entry Information click on the
Insert/Edit Image button (figure 1.4.7).
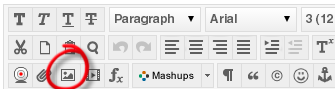 Figure 1.4.7: The
Insert/Edit Image button.
Figure 1.4.7: The
Insert/Edit Image button.
 Figure 1.4.6: The Show More button.
If you do not see an Insert/Edit Image button on the
Entry Message toolbar, then you will need to click on the
Show More button
(figure 1.4.6) on the right- end of the message toolbar. This will
expand the message toolbar and reveal two more rows of buttons. The
Insert/Edit Image button will be the third button from the
left in the third row of buttons in the message toolbar. Once you
click on the Insert/Edit Image button, a new window opens asking you to Select Image. Click on the
Browse My Computer button and navigate to the location of your image file on your computer's hard drive. Once you see the file listed, click on the image file and choose
Open. Your screen should look like the screen in figure 1.4.8. Click
Submit and you'll be taken to the Insert/Edit Image screen. Click
Submit again and your image should now be displaying in your
Journal Entry Information. Click
Post Entry and you have completed that PKA assignment. Under normal circumstances you should see your score posted within one week after the assignments due. If you posted your assignment late then your score
won't be posted until the following week.

Figure 1.4.8: the Blackboard Insert/Edit Image screen.