Introduction to Zip Files/Folders
In many of our Web development and programming classes you will be provided supplemental files that will be used to complete assignments or to help you better understand a particular lecture. Most Web browsers will block code files due to security issues that code files might have and negatively impact your computer. To circumvent these security blocks we zip the code files for downloading.
Zip files/folders have a very distinct look to identify them as being zip files/folders. The reality is a zip file/folder is one or more files or folders compressed into an single zip file which has a folder icon with a zipper on it.

Note: In order to use the contents of a zip file you must unzip the contents first.
In this tutuorial you will learn how to zip as well as unzip zip files/folders
Unzipping a Zip File/Folder
In order to unzip a downloaded zip file/folder, first locate the downloaded file in your File Explorer. The easiest way to do this is to click the down arrow next to the download file in your Web browser and choose Show In Folder.

If you don't see the downloaded zip file/folder in the status bar of your Web browser, then open your File Explorer and navigate to your Downloads folder. Most likely the zip file/folder you downloaded will be located there.
Once you have located the downloaded zip file/folder in your File Explorer, right-click on the file and choose Extract all...

Zipping Files/Folders On a MAC Computer
Creating a zip file on a MAC computer is quite easy. First you need to select all of the files that you want to add to your zip file. You can do
this by holding down the Shift key on your keyboard and clicking on each file you want to add to the zip or you can lasso your files by holding
down the left mouse button when the pointer is above and to the left of your files and then click your left mouse button and hold it down as you
drag your mouse down and to the right to lasso all of the files you want to include in your zip file. Once you have the files selected,
right-click on any one of the selected files and the Context menu you see in figure 1 will appear. Move your mouse down to the Send to option and click, a flyout menu will appear. From the flyout menu choose the Compress (number of) Items option.
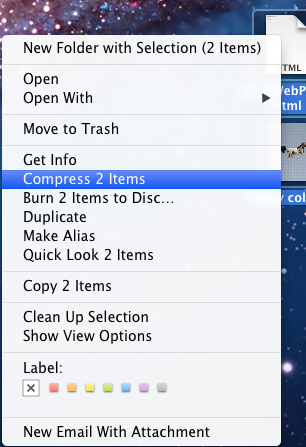 Figure 1: The Compress (number of) Items option highlighted in the Mac context menu.
A new folder will be created and it will have a zipper on its icon and it will be named Archive.zip - this is your zip file which contains a copy of all of the files you had previously selected (see figure 2).
 Figure 2: Image of a zipped folder on a Mac.
Zipping Files/Folders On a Windows Computer
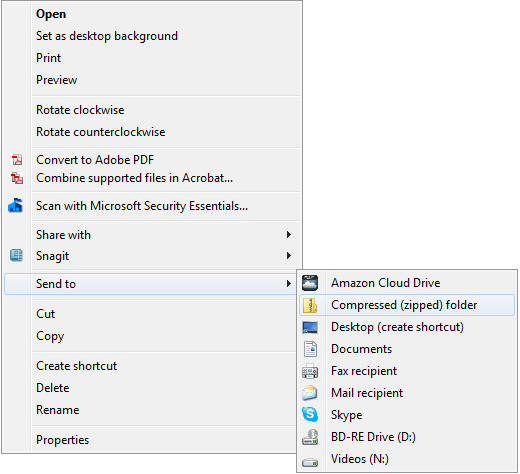 Figure 1: The Context menu showing the Compressed (Zipped) folder option..
Creating a zip file on a Windows-based computer is quite easy. First you need to
select all of the files that you want to add to your zip file. You can do this by holding down the CTRL key on your keyboard and clicking on each file you want to add to the zip. Or you can lasso your files by clicking and holding down your left mouse button when the pointer is above and to the left of your files and then keep holding down the mouse button as you drag your
mouse down and to the right to lasso all of the files you want to include in your zip file. Once you have the files selected, right-click on any one of the selected files and the Context menu you see in figure 1 will appear. Move your mouse down to the Send to option and click, a flyout menu will appear. From the flyout menu choose the Compressed (zipped) folder option. A new folder will be created and it will have a zipper on its icon - this is your zip file which contains a copy of all of the files you had previously selected.
How to Zip A Visual Studio Solution Folder
In order to send a Visual Studio Solution folder to your instructor, do the following:
- Using your Windows File Explorer locate your Repos folder.
- Right-click the root folder for your project.
- Click the "Send to" option that appears on the fly-out menu.
- Click the "Compressed (zipped) folder" option that appears on the next fly-out menu.
- Locate the zipped folder that was created in the last step. Attach it to an email and send it to your instructor.
