Introduction
There are two software products that Microsoft sells using the Visual Studio moniker, Visual Studio Code and Visual Studio Community. This tutorial focuses on Visual Studio Community. Visual Studio Community is an integrated development
environment (IDE) that can be used for many purposes including: writing, compiling, deploying C++, C#, JavaScript and Python programs, developing and publishing ASP.NET Web applications, even creating applications which run on any device (server, workstation, tablet, phone, and other misc. embedded systems) and on any operating system (Windows, Windows RTM, Android). Unfortunately, Microsoft no longer offers a MAC OS verion of Visual Studio Community. Instead, MAC Users can use Jetbrains Rider or Visual Studio Code for programming projects or Adobe Dreamweaver for Web projects.
In order to build Web sites and apps you will
be interacting with the Visual Studio Community (VS for short) graphical user
interface (GUI) shown in the figure below. This tutorial will cover
basic VS GUI operations to help familiarize you with components
and features you will use throughout the Internet
Authoring pathway and the C# and C++ Programming pathway courses you take here at MSJC.
The VS interface will look different depending on what type of project you are working on and the language(s) you're using. The image below is similar to what you will see when building Web applications using the HTML (Web Forms) editor. If it were a C# Console project it would not have a split Document window, instead it would contain the C# source code editor. The top level menus and the tools available on the toolbar will also change depending on the task at hand. The windows which are on the left and right sides of the Visual Studio Editor interface will change to some degree although the Solution Explorer window exist in all project types and contains the list of files that are being used to make-up the project. Detailed instructions about the Solution Explorer can be found below. The Properties window is another window that is common to most
projects. As the name implies it is used to set property values for different components that make up the project. The Solution Explorer and Properties windows can be opened and closed using the View menu.
Note: the toolbars and windows can be manually repositioned by the user. Be careful not to drag and drop a toolbar or window into a new location in the GUI unless you feel comfortable with the process; otherwise things can easily get closed or lost behind other toolbars or windows. It is best in most cases to not worry about customizing the Visual Studio GUI until you become more familiar with Visual Studio and all the components that make up the VS GUI.
Tip: Click the image below to view it at a larger size.
 The Visual Studio graphical user interface (GUI).
If you look closely at the document above, you will see that there are three documents open Default.aspx, TableDemo.aspx, and Default.html. Having multiple documents open at once allows you to quickly move from editing one document to another by just clicking on the tab with the document's name on it.
⇑ Table of Contents
The Visual Studio menu bar is a chameleon in that it dynamically changes the available options depending on what you are working on.
⇑ Table of Contents
- The toolbars are also predetermined by project type, but, you can open and close the toolbars manually using the View --> Toolbars menu. Click a toolbar name to toggle its visibility. A check beside a name means it's visible and without a check means it is not visible.
- In order to identify the name of a particular tool on a toolbar, rest your mouse over a tool icon and a tooltip will appear with the name of the tool you're resting you mouse over.


The Text Editor toolbar

In order to open the Web One Click Publish toolbar, first click and open the View menu, then select the Toolbars option, locate and click on the Web One Click Publish option from the flyout menu that appears. The Web One Click Publish toolbar should now be showing in the toolbar area at the top of your Visual Studio GUI under the Menu bar.
 Figure 10: The Web One Click Publish toolbar.
Links of Interest:
⇑ Table of Contents
The Solution Explorer Window

Once you have a Web site or a Project/Solution folder open in Visual Studio all of the files that are included in the Web site or Project/Solution will be listed in the Solution Explorer window. In a default configuration of Visual Studio the Solution Explorer is located on the right-side of the Visual Studio program window, usually it is closed and only displays as a tab. Click on the Solution Explorer tab to open it. Once it is open if you click elsewhere in the Visual Studio IDE, the Solution Explorer windows automatically closes to give you more room to work on your open document(s).

If you want the Solution Explorer window to remain open when you're clicking elsewhere in the IDE, then click the Push Pin icon in the Titlebar of the Solution Explorer window to "pin it" open. To change it back to where Solution Explorer automatically closes when not in use, just click the push pin again, it will twirl to a horizontally oriented push pin and the Solution Explorer window collapse immediately back to its tabbed position.

Just below the Solution Explorer Titlebar is the Solution Explorer Toolbar which has some handy tools that you can use to manipulate and locate files within the Solution Explorer window. The icon that looks like a house is the Home button. If you have scrolled up or down in the Solution Explorer and want to quickly go back to the last selected folder or file in the Solution Explorer, just click the Home button.
To the right of the Home button is the Pending Changes Filter button which lets you filter the list of files you are viewing in the Solution Explorer so that you will only see a list of the files currently open in the Document window or a list of files that have been modified and need to be published to the Web server where the Web site's files are being stored for public viewing. This is an important concept for Web developers to remember, if you make changes to one or more Web site files in Visual Studio those changes only exist locally on the computer where you are working; in order for the public
(and your instructor) to see any changes you have made to your files, they need to be published to the Web server first (see the Visual Studio Publishing tutorial for more on this).
To the right of the Pending Changes Filter button is the Sync With Active Document button. Clicking this button quickly locates the file for the open document (the one you're editing in the Document window) in the Solution Explorer window.
To the right of the Sync With Active Document button is the Refresh button. This button will refresh the Solution Explorer window to display newly added files. The most common usage for this is if you add files to a Web site or Project/Solution outside of Visual Studio; e.g. while copying files from one folder to another using the Windows File Manager. By the way you can also copy files from your Windows File Manager directly into the Solution Explorer to add new files to your Website or Project/Solution if you like. This a very efficient method for quickly grabbing files from one Web site or Project/Solution and copying them into your currently open Web site or Project/Solution in Visual Studio.
The next three buttons in the Solution Explorer toolbar are used for Expanding, Collapsing, or Nesting files in the Solution Explorer window. An example of a nested file would be a code-behind file for a Web Forms or Windows Forms parent file. After that is the View Code button which will open the code-behind file for a Web or Windows Form file. The wrench icon next to it is the Properties button which will open up the Properties windows and display the properties for the selected file in Solution Explorer.
The final button is the Preview Selected Items toggle button. When it is toggled to the on state and you click a file in the Solution Explorer the file will be opened in a Preview window. To turn this option off, just click the Preview Selected Items button to turn it off and the next time you click a file in the Solution Explorer it will not be show in a Preview window. Finally, just below the Solution Explorer Toolbar is the Search Box which allows you to type a filename, press Enter on the keyboard or click the Magnifying Glass icon, and all matching instances of that file name will be displayed in the Solution Explorer window.
Can't Find The Solution Explorer Window?
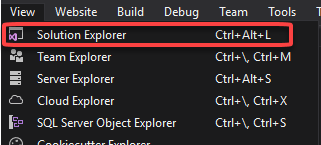
If you do not see the Solution Explorer window it may have been closed accidentally. In this case, you need to open the View menu from the Visual Studio Menu bar. Then choose Solution Explorer from the list of options that appear to re-open it.
 ⇑ Table of Contents
The Document Window
The Document Window is where you edit your open documents. Depending on which VS editor you're using at the time you may have the option of viewing your code in a Design View in addition to your Source View and you also have the option of viewing both views, Source View and Design View, simultaneously in a Split View which can also be configured to display the split vertically or horizontally which is the default split view. The Document Window also provides several other helpful features like line numbers, word wrap, automatic brace completion, and a navigation bar which helps in debugging and quickly locating sections of your code.
Changing Views
When editing a document in an editor which supports Design View you can change the current view by clicking on one of the View buttons at the bottom of the document window. The Design button displays only the Design view in the Document Window, the Source button changes the Document Window to display the Source Code view only, and Split view allows both the Design and the Source Code views to be displayed simultaneously in either a vertical or a horizontal split.
 Figure 11: The HTML (Web Forms) Editor View buttons are used for changing the view displayed in the Document Window
Editing Mode

If you find yourself typing in Source view or Design view and you are overwriting the existing characters, then you are editing in Overwrite mode. You can confirm what mode you are editing in by looking to the right end of the Status bar, it should read INS for insert mode, if it reads OVR then you are editing in overwrite mode. To change this mode press the Insert key on your keyboard. Each time you press the Insert key on the keyboard you will see the editing mode status change back and forth between Insert mode and Overwrite mode.
⇑ Table of Contents
Modifying the Visual Studio Graphical User Interface (GUI)
Here are a few helpful tips on options you can change in Visual Studio in order to help increase your Web development
productivity.
Setting the
HTML (Web Forms) Editor as the Default Editor for html Files
By default, Visual Studio
opens HTML files with the
extension of .htm or .html using its
basic text editor, which means you have no Design view available
while editing your HTML documents, initially. To change this default behavior
you have two choices:
- Use the Solution Explorer Open With... menu option
- Changing the setting in the Tools --> Options dialog box
Solution Explorer Method
 Figure 2: The context menu that appears when you right click on an html file in the Visual Studio Solution Explorer.
Step 1: In the Solution Explorer window right-click on any file that has a file extension of .htm or .html or .aspx.
Step 2: From the menu that appears click on the Open With... option as shown in figure 2.
Step 3: When the Open With... dialog box opens you will see a list of editors appear. Click to select the HTML (Web Forms) Editor choice. Not the HTML (Web Forms) Editor with Encoding choice.
Step 4: Once you have the HTML (Web Forms) Editor option selected, click on the Set As Default button. You should see the word Default show up next to your selected HTML (Web Forms) Editor choice in the list of options.
Step 5: To finish the process click on the OK button, and your document should open in the HTML (Web Forms) Editor. You will know if it has opened in the HTML (Web Forms) Editor if you the three choices: Design, Split, and Source in the bottom-left corner under the Document window.
 Figure 3: The Open With dialog box with the HTML (Web Forms) Editor selected and set as the default editor.
Note: You can also change the split view from horizontal to vertical, read Configuring Split View to learn how.
Tools --> Options Dialog Box Method
Step 1: Open the Tools
menu and click on Options.
Step 2: When the Options
dialog box opens you will notice a Search box
in the top left of the window, and underneath the Search
box is a list of Visual Studio's configurable options organized
into categories. The list of categories is called the Categories pane. In the Categories pane scroll down and click the triangle
to the left of the Text Editor category to open
its options list, then click on the File Extension
option to select it. Your screen should now look like figure 4.
 Figure 4: The Options dialog box showing the File Extension Editor screen selected.
The pane in the
Options dialog box to the right of the category
listings is the Settings pane. The settings in
the Settings pane change depending on the
option you have selected in the Category pane on the left. On the File Extension Settings pane you can assign which of the many Visual Studio text editors you want to open a particular file extension.
The File Extension Settings is a three-step process:
Step 1: Type in a file extension (in this case HTM or HTML) in the box under the
heading Extension:
Step 2: Select the editor you
want associated with that extension from the options in the
drop-down-list box under the heading Editor:.
Step 3:
Click the Add button to the right of the
Editor selection to complete the mapping of the
file extension to the selected editor. Figure 5 shows the File
Extension settings pane with both .htm and .html mapped to the
HTML (Web Forms) Editor.
Figures 5 and 6 below depict the three step process for assigning an extension to an editor and what the completed File Extension Settings pane should look like when you have completed the recommended changes for the CSIS 115A and CSIS 125A classes.
 Figure 5: The three steps for assigning an extension to an editor
 Figure 6: The changes made to the File Extension settings
Configuring Split View
The HTML (Web
Forms Designer) Editor supports using the Design View
to make changes to your HTML pages and it gives you have ability to
split your Document window into two panes, a
view known as Split View, displaying both
Source View and Design View
simultaneously. The first figure on this page with the caption The Visual Studio graphical user interface (GUI) shows the Document
window in Split View. Notice that the
Source View and the Design View are
arranged vertically side-by-side; to change how the HTML
(Web Forms Designer) Editor displays the Split View
panes follow these steps:
Step 1: Open the Tools menu and
select Options at the bottom of the menu.
Step 2: From the categorical list of
options in the Options dialog box open the Web Forms Designer category by clicking on the heading Web Forms Designer.
Step 3: In the settings pane to the right, under the heading Start Pages you can assign which view you see when first opening a document
Step 4: At the bottom of the Web Forms Designer settings pane is a check box allowing you to change your split view from the default horizontal view to vertical (side-by-side).
 The Web Forms Designer settings pane.
⇑ Table of Contents
How to Create a New Project
Visual Studio includes numerous project templates to help you get started coding. This tutorial provides instructions on how to create a new C# console project.
Using the File Menu's New Option
When you want to create a new project, Website, or file in Visual Studio, click on the File menu in the menu bar, and choose the New option, you should see a context menu similar to the one shown in figure 12.
 Figure 12: The New context menu in Visual Studio 2019.
Creating a New Solution/Project
Visual Studio organizes projects into solutions. This means that if you don't already have a solution created previously where you are adding projects to, then in order to create a new project you will also need to create a new solution.
To begin the process of creating a new Solution/Project, as seen in figure 13, click on the Project option in the File-->New context menu or use the keyboard shortcut combination Ctrl+Shift+N.
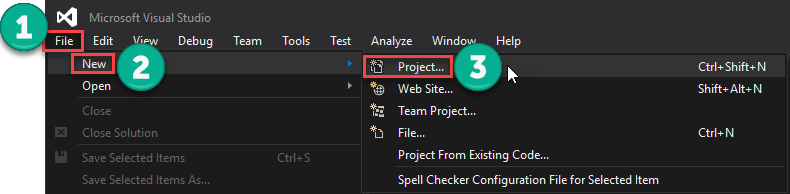 Figure 13: Opening the New Project dialog box.
-
Once the New Project dialog box appears (figure 14)
-
Use the Search box or the drop down list controls to locate the project template you want to create. Once the project choice you are looking for appears in the list of template choices just click the template type to select it and then click the Next button to go to the Configure Project screen.
 Figure 14:
-
On the Configure your new project screen (figure 15) type in the name of your project. If this is the very first project your are creating, you are also creating a new solution folder on your storage device (most likely your C: hard disk drive) to contain
one or more projects, so you may also need to change the Solution name to meet specific class assignment requirements (Important! no spaces in the project or solution names).
-
By default Visual Studio will save your solution to your C:\Users\Username\source\repos folder. You can change the location of where your solution will be saved to by clicking on the Browse button (small button with three ellipses to right of Location field input box) and navigating to a different folder.
-
Then, click the Create button to create the new project.
 Figure 15
MSDN: Creating Solutions and Projects
New C# Console Template
Starting with Visual Studio 2022, the C# Console template based on the dot net Core framework, no longer includes using directives, a namespace designation, a program class, or a Main() method in the template by default. These are all handled behind the scene by the Roslyn compiler.
You can override this default C# console template configuration by checking the "Do not use top-level statements" check box on the Additional information screen during the creation of a new C# Console project.
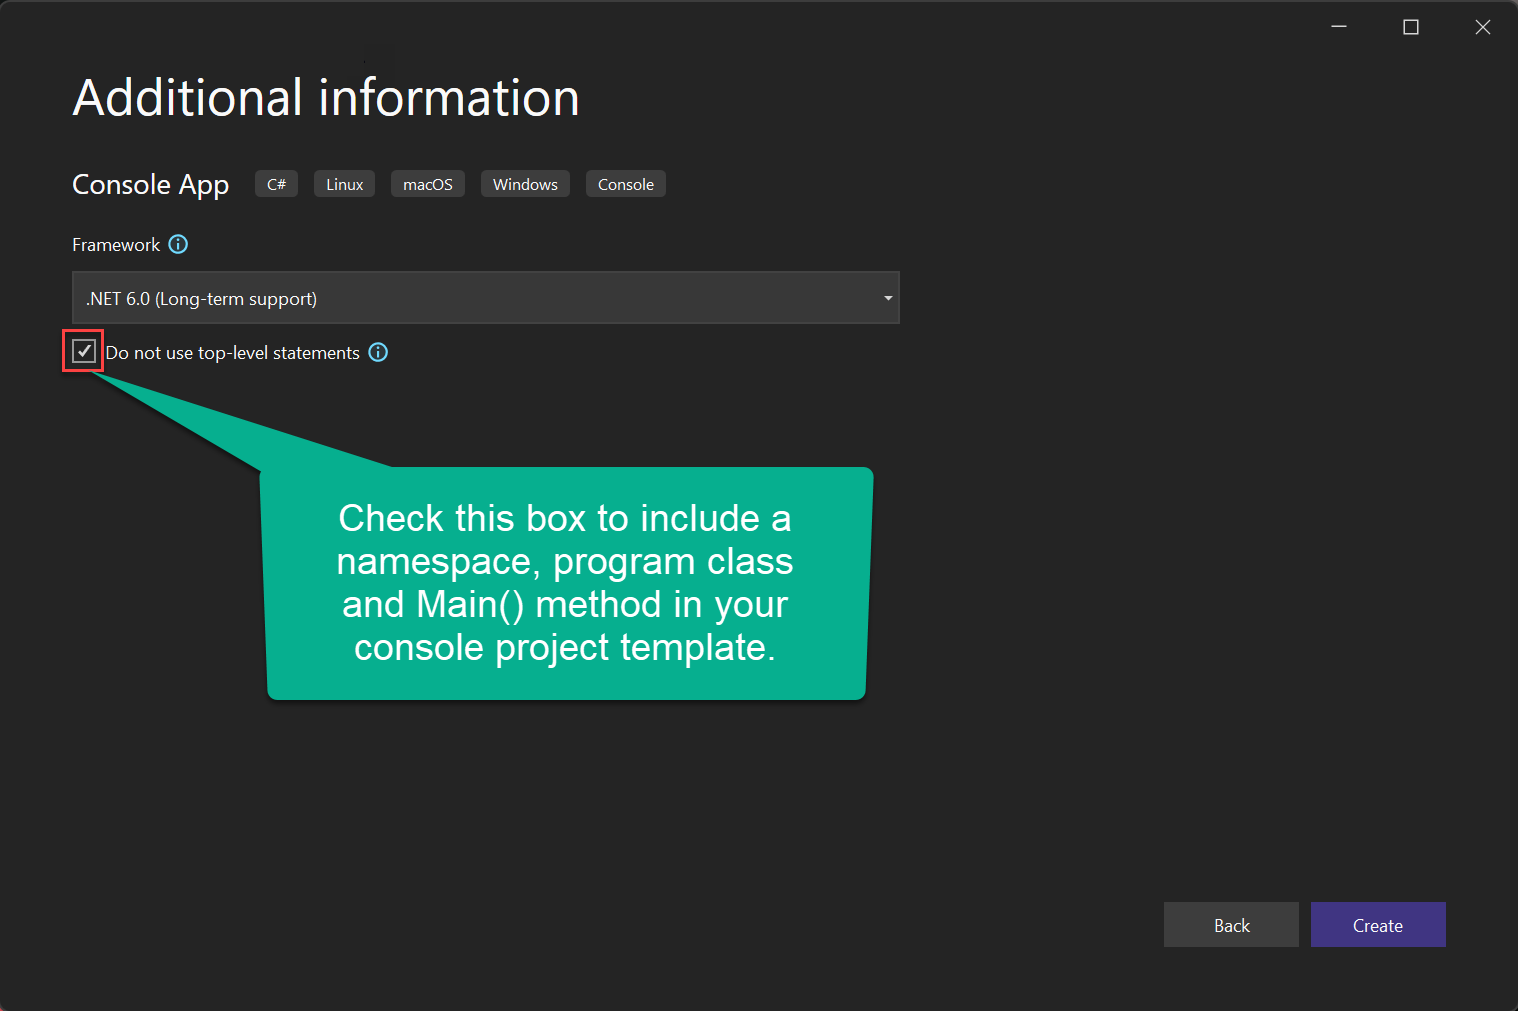 By checking the "Do not use top-level statements" check box on the Additional information screen, the C# Console template will include the standard using System, namespace, and program class structure used previously.
MSDN: Top-level statements - programs without Main methods
MSDN: C# console app template generates top-level statements
⇑ Table of Contents
How To Open An Existing VS Project
The most common way to open a Visual Studio project is to locate the .sln file which links to the project and double-click on it. Usually the .sln file is in the solution folder which contains the project folder shown in figure 15.
 Figure 17: The File --> Open context menu.
⇑ Table of Contents
Figure 17: The File --> Open context menu.
⇑ Table of Contents
How To Locate Your Project Files
By default Visual Studio creates a Solution folder for each project you create; unless you are adding a project to an existing solution, in which case the new project folder is added to the original solution folder. The default location where VS creates new solution folders is on the default system drive (usually c: on most workstations) in the user's source repo folder. For example, c:\Users\Username\Source\Repos\SolutionName.
Figure 18a shows the contents of the Solution folder named Lesson2 which is inside of the Projects folder of the Visual Studio 2017 folder which is inside the Documents folder in my OneDrive folder.
Note: Projects can be opened and loaded into Visual Studio by double-clicking on the .sln (Solution) file for the project.
Note: Projects can be opened and loaded into Visual Studio by double-clicking on the .csproj file for the project.
⇑ Table of Contents
How To Open a Web Site
Step 1: In Visual Studio, open the File menu, move your
mouse cursor down to the Open option and then choose
Web Site from
the fly-out menu that appears as shown in figure 1. Notice that the keyboard shortcut for this task is Shift+Alt+O (that's the letter O not a number 0).
 Figure 1: Opening a Web site using the
Visual Studio File menu.
Figure 1: Opening a Web site using the
Visual Studio File menu.
Step 2: Next you will see the Open Web Site dialog box. Use the File System tab to locate the root folder of your Web site, your CSIS115A. CSIS525, or CSIS786 folder (depending on the class you are enrolled in) and select it. Once you have selected your data folder, click the Open button in the bottom right-hand corner of the dialog box as shown in figure 2.
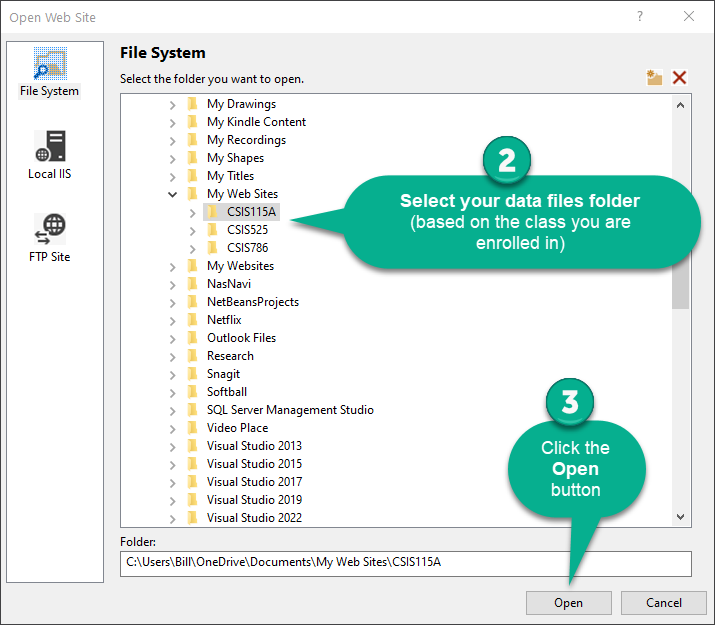 Figure 2: The Open Web Site dialog box with the CSIS 115A Web site folder selected.
Step 3: Click the Open button and your site's files and folders should appear in the Solution Explorer as shown in figure 3.
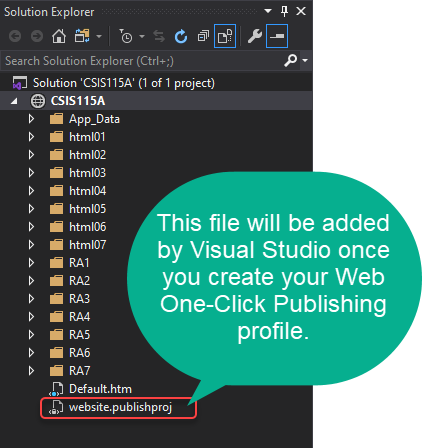 Figure 3: The Visual Studio Solution Explorer displaying the contents of the open CSIS115A Web site.
⇑ Table of Contents
Figure 3: The Visual Studio Solution Explorer displaying the contents of the open CSIS115A Web site.
⇑ Table of Contents
How to Create a New HTML Page
To create a new HTML page in your Web site:
- Open the web site in Visual Studio Community.
- Right-Click on you root website folder or any syb-folder in the Solution Explorer window.
- In the context menu that appears, click Add and a flyout menu will appear.
- In the flyout menu, click the HTML Page option and you will get a dialog box.
- In the dialog box, type in the name for you new HTML page, and then click the OK button.
- YOur new HTML page will open in the Document Editor window and the new HTML file will appear in the Folder you added the HTML page to.
 Click image for larger image.
Another New Twist in VS 2022
The first time you open your class data files for CSIS 115A, CSIS 525, and CSIS 786 in Visual Studio Community 2022, you will get the dialog box shown in the image below.
 The Target framework not supported dialog box which appears the first time you open your data folder in Visual Studio.
In the dialog box, accept the default choice, "Update the target to .NET Framework 4.8 (recommended)," and then click the Continue button. After you click the Continue button, a new file named Web.config will be added to your data folder in the Solution Explorer window. Delete the Web.config file from the Solution Explorer window by right-clicking the file and choosing Delete. The reason for deleting it is if it gets published to your student Web folder it will prevent you from being able to view files copied to your student Web folder.
NOTE: you can also check the Remember my choice checkbox or not, as it will have no impact.
Anatomy of a Solution (.sln) File
A .sln file is simply a text file which visual studio parses to learn of the version number of VS that was used to create the solution, the identification and location of the project(s) in the solution, and some global configuration info pertinent only to Visual Studio.
Essentially what this means to a developer is that if the solution file or the project folder are moved to different folders other than where Visual Studio originally put them, the .sln file which used to open your project no longer will. Of course you could always edit the .sln file in notepad, or other ASCII editor, and change the path statement for the project folder to reflect the new location of the actual project folder. Remember, the key is to indicate the proper path from where the solution file is located to where the project folder is located.
One other note: if you relocate the Solution folder, which contains the Solution file and the project folder(s), everything should work as expected because the initial path set for each project folder is as a sibling to the Solution file. Meaning that the Solution file and its related Project folders need to both exist in the same parent folder in order for the default path to work correctly.
In the image below you can see the reference in the Solution file for the project is folderName\ProjectName.csproj
 ⇑ Table of Contents
Links of Interest
Visual Studio Videos
Intro to GitHub Copilot in Visual Studio (2025 Edition)
00:10:38
How I Code with GitHub Copilot in Visual Studio 2022 to Boost Productivity Everyday
00:24:03
ASP.NET Web Forms Crash Course 2025
01:13:07
Microsoft FINALLY killed it
00:06:44
Web Development with Visual Studio 2026 (Getting Started)
00:09:46
Turn ON these 3 NEW Visual Studio 2026 Insiders AI features NOW!
00:05:20
Visual Studio 2026 is fast, modern, and AI-powered | BRK122
00:44:44