The hypertext markup language (HTML) is the core language of the World Wide Web (WWW). Tim Berners-Lee was the primary author of HTML along with several of is colleagues at the CERN nuclear collider in Switzerland. The HTML language was released to the public in 1989. It was originally developed as a language for semantically describing scientific documents. Its general design, however, has enabled it to be adapted, over the subsequent years, to describe a number of other types of documents and even applications. In its latest incarnation, that is to say HTML5, it is used to "markup" content for being displayed in a computer program known as a Web browser. In contrast to how a desktop application functions, as one autonomous package, HTML requires special software known as an HTML interpreter to be installed on the client device in order to be processed — most commonly this is done by embedding the HTML interpreter into a Web browser which interprets the HTML code and converts it into the machine language format tha can be processed by the client computer on which the Web browser is installed.
Overview
The HTML (HyperText Markup Language) is the most basic building block of the Web. It defines the semantics (meaning) and structure of the content in an HTML document. HTML documents are simply ASCII text files which have a file extension of .htm or .html. You can use any ASCII text editor that you choose to edit your HTML documents, but be warned, you cannot use programs like Microsoft Word to create pure HTML documents. Although it is possible to create a document in Word and save it as HTML, this is different than just writing HTML code in an ASCII text editor. If you want to write HTML documents using an ASCII text editor, I would recommend that you start out using a program like Microsoft's Notepad or Apple's TextEdit. Apple's TextEdit program is similar to Microsoft Word in that, by default, it does not write text as ASCII text, you must change it default behavior to allow it to write pure ASCII text. Click on this link to learn how to set up TextEdit as a plain text (ASCII) editor.
The reality is you won't get very far using basic ASCII text editing tools to create your HTML documents.The problem with using a pure vanilla ASCII editor is that they don't have features like code coloring to differentiate tags from attributes and their values, and there is no code completion where once you type the opening tag you automatically get the closing tag typed out for you. To get to this level, I would recommend Brackets. If you want to go to the next level, you will need to use an integrated development environments (IDE).
IDEs are the tool of choice for modern-day Web developers. If you are using a Windows computer, Microsoft's Visual Studio is an IDE that is favored by many. If you are using an Apple Mac computer, then Adobe's Dreamweaver is a good choice. There are many other choices available like Sublime, with more coming out all the time. When you get get down to it, the most important thing is for the developer to find a tool they are comfortable with for writing HTML. Because in the end, HTML is still just HTML, and as long as it is written syntactically correct that's all the Web browser is goiing to care about.
The lessons in this course will all be demonstrated using Visual Studio. With that said, instructions are included on how to get setup to use Visual Studio in addition to ASCII text editors like Notepad or TextEdit as well as Dreamweaver, including how to publish your files to the student Web server using FTP.
⇑ Table of Contents
Introduction to HTML
View this video to learn how easy it is to begin writing HTML code.
Creating HTML Elements
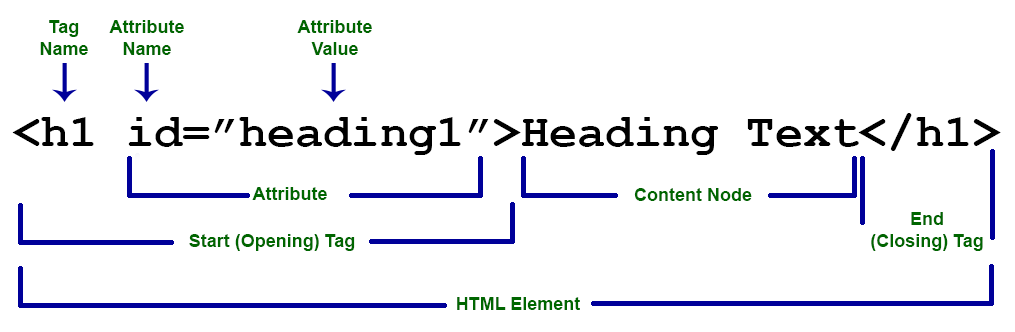
HTML is not a programming language per se, it is technically referred to as a markup language. In fact, that distinction is in its acronym, HyperText Markup Language (HTML). In order to markup up the contents of page, you will use HTML tags to create HTML elements which are comprised of opening tags and closing tags which encompass the content being marked-up. Some HTML elements are self-closing tags; you will read more about those tags later in this lesson.
HTML tags consist of tag names that are placed between angle brackets < >. HTML Tags look something like this: <html>, <head>, <body>, <p>, <form>, etc. Using HTML tags, a Web developer can "markup" the textual content of a document organizing it into sections (head and body) and various other HTML elements. As an HTML author your intention is to give semantics (meaning) and structure to the content of the document.
Opening HTML tags can also include one or more attributes which provide the opportunity to assign various properties to the HTML element being defined.
Simply put, HTML elements are comprised of content marked-up (wrapped) inside of HTML tags.
HTML is not a case sensitive language so you can type the tag names in all lowercase, all uppercase, or mixed case if you'd like. However, it is recommended that you pick one format and stick with it. Being consistent with how you type your tag names will make your documents much easier to read. Also, since your textual content is generally going to be using mixed case, using all lowercase or all uppercase is preferred by most HTML authors.
In the sections that follow you will see how to build the basic structure of an HTML page and how to utilize some of the commonly used HTML tags.
The Document Type Declaration
First and foremost, the Document Type Declaration (DTD) is actually referred to as a declaration and not an HTML element, should always be the first line of code in an HTML page. The DTD identifies to the HTML interpreter (Web browser) which version of HTML the page is using. This declaration aids the Web browser in correctly displaying the contents of the page.
To indicate that our pages should be interpreted as HTML5 all we have to do is type the following at the top of out HTML document:
<!DOCTYPE html>
The HTML Element
<html>
This tag says that this is the beginning of an HTML document.
You should also note that there are two types of tags, opening tags, and closing
tags. The closing tag for the opening tag shown above is:
</html>
The only difference is that there is a forward slash before the tag name.
Most, but not all, tags have closing tags, some are "self closing" tags requiring only the opening tag terminated with a forward slash and a closing angle bracket like this <img src="file.png" />.
The html tag tells the Web browser to interpret the rest of the file as html, that is until it reaches the closing </html>
tag.
So what we can say from the above is that the first tag in an HTML file after the document type declaration DTD tag needs to be the <html> tag. It tells the browser that this is the beginning of an html file. As you have probably guessed, the last line of an HTML file must be the
closing </html> tag.
⇑ Table of Contents
The Head Element
HTML files consist of two sections, they are the head and the body sections. Within the opening and closing <html> tags, you need to define
these two sections. The head gets defined like this:
<head>
</head>
And the body gets defined:
<body>
</body>
We can create a simple html file like so:
<!DOCTYPE html>
<html>
    <head>

    </head>

    <body>

    </body>
</html>
The <head> section of the Web page is typically reserved for
placing the title of the document as well as meta tags which describe the
content of the Web page to spiders and Web crawlers used by major search
engines like Google or Bing. If you move on and learn to write JavaScript code, you
will find that there is a lot of things that can be placed in the head of
the document (note that unobtrusive JavaScript principles recommend that all JavaScript code be maintained in separate files from your content). You will also find that if you are creating Cascading Style
Sheets (CSS) that the head section of the document is useful for CSS references as well (more about
CSS later, but note that is recommended that style rules also be maintained in files separate from your content).
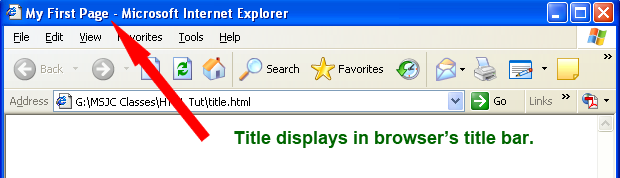
As I stated above, typically, the one thing that
you are going to be sure to put in the head of an HTML document is the title and we do
this with the <title> tag. In order to have the title of your Web page display in a Web browser's title bar you need to "encapsulate" the title (place it between) an opening and closing <title> tag, as seen in this example:
<!DOCTYPE html>
<html>
    <head>
        <title>My First Page</title>
    </head>

    <body>

    </body>
</html>
Click here
to see the code run
When you run the above page, you may think to
yourself that adding the title tag really didn't do anything. You should look
closer. Notice the title bar at the top of the browser window. It should have
"My First Page" displayed in it.
Now you try it. Copy the code in the example above into any ASCII text editor. Save the file with an 'htm' or 'html' extension. Then double-click on the file you saved and see if it works.
If you are using Visual Studio, add a new HTML page to your Website using the Visual Studio Explorer window, paste the copied code into the new HTML document, then right-click the file in the Solution Explorer and choose the View in Web Browser option to view it in your default Web browser.
⇑ Table of Contents
The Body Element
Following the Head section of the HTML document is the Body section. The content of the Body section will display in the document window of a user's Web browser. The content of the document is what you spend most of your time "marking up" essentially you are identifying portions of the document as HTML
Elements and the Attributes of these Elements will store values that apply to
the HTML Element and its content; things like style and size information are
just a couple of examples.
 ⇑ Table of Contents
Block Level Elements
In a Web page, most content is marked as either a block-level element or an inline element. A block-level element contains content displayed in a separate section within the page, setting it apart from other blocks on the page. Headings and paragraphs are examples of block-level elements.
Headings
Headings, like in the example above, are a way for you to place emphasis on the text above a paragraph. Headings come is 6 sizes ranging from the <h1> tag all the way down to the smallest <h6> tag. Lets take a look:
<!DOCTYPE html>
<html>
    <head>
        <title>My First Page</title>
    </head>

    <body>
        <h1>This is Heading 1</h1>
    </body>
</html>
Click here to see the code run
Now lets look at all 6 headings so that you can see the difference:
<!DOCTYPE html>
<html>
    <head>
        <title>My First Page</title>
    </head>

    <body>
        <h1>This is Heading 1</h1>
        <h2>This is Heading 2</h2>
        <h3>This is Heading 3</h3>
        <h4>This is Heading 4</h4>
        <h5>This is Heading 5</h5>
        <h6>This is Heading 6</h6>
    </body>
</html>
Click here to see the code run
Paragraphs
When you write documents of any length, the time is going to come when you are going to have to organize your writing into paragraphs. The same holds true for html documents. You create paragraphs using the opening <p> and closing </p> tags.
All of the information pertaining to the paragraph goes between the tags. When you create a paragraph, like the one above and this one, the browser will place a space between the two. Let's look at a piece of code.
<!DOCTYPE html>
<html>
    <head>
        <title>Paragraphs</title>
    </head>

    <body>
        <p>In the Land of Oz there have always been four witches, two of them good, two of them bad. Now Lucinda, the Wicked Witch of the East, is dead. But in the West lives an  even wickeder witch Belinda.</p>
        <p> As if far away, a sound of crazy laughter is heard. Ah! Belinda has found out about this and is angry. (Crazy laughter is heard again.) But don’t be afraid. She lives far away, in the Land of the Winkies.</p>
    </body>
</html>
Click here to see the code run
Lists
HTML supports three kinds of lists: ordered lists, unordered lists, and definition lists. An ordered list display numbers or letters to represent the hiearchy of a structure. In an unordered list each line will have a bullet proceeding it. A definition list consist of a listing of terms and their definitions.
Ordered Lists
To create an ordered list an opening <ol> tag and a closing </ol> tag are used to encapsulate list elements. Each item in the list is encapsulated between an opening <li> tag and closing </li> tag, making each item in the list a list element.
<ol>
<li>List Item 1</li>
<li>List Item 2</li>
<li>List Item 3</li>
</ol>
In a Web browser it will look like this:
- List Item 1
- List Item 2
- List Item 3
Unordered Lists
To create an unordered list use the opening <ul> and closing </ul> tags to encapsulate the list elements, as seen in this example:
<ul>
<li>List Item 1</li>
<li>List Item 2</li>
<li>List Item 3</li>
</ul>
In a Web browser it will look like this:
- List Item 1
- List Item 2
- List Item 3
Definition List
To create a definition list use the opening <dl> and closing </dl> tags to encapsulate the definition list elements which consist of the definition term element, created using an opening <dt> tag and a closing </dt> tag and the definition description element created using an opening <dd> tag and a closing </dd> tag, as seen in this example:
<dl>
<dt>Term 1</dt>
<dd>Definition 1</dd>
<dt>Term 2</dt>
<dd>Definition 2</dd>
</dl>
In a Web browser it will look like this:
- Term 1
- Definition 1
- Term 2
- Definition 2
For more detailed instructions on how to create HTML lists view Tutorial 1.3.
⇑ Table of Contents
Table of Block-Level Elements
| Element | Usage | Category | Default Style |
| <address> |
contact information |
formatting |
italic text |
| <article> |
article content |
style and semantics |
none |
| <aside> |
aside content |
style and semantics |
none |
| <blockquote> |
long ("block) quotation |
formatting |
indented left and right |
| <body> |
defines the document's body section |
basic HTML |
none |
| <dd> |
used for describing a term in a description list |
lists |
disclosure widget |
| <details> |
disclosure widget |
styles and semantics |
defines additional details that the user can view or hide |
| <dialog> |
dialog box or window |
styles and semantics |
dialog box |
| <div> |
document division |
styles and semantics |
none |
| <dl> |
description list |
lists |
none |
| <dt> |
description term |
lists |
none |
| <fieldset> |
fieldset label |
forms and input |
border around the fieldset |
| <figcaption> |
define a caption for the image in a <figure> element. |
images |
italisized text |
| <figure> |
groups media content with a caption (see figcaption) |
images |
none |
| <footer> |
section or page footer |
styles and semantics |
none |
| <form> |
input form |
forms and input |
none |
| <h1, h2, h3, h4, h5, h6> |
heading level 1-6 |
basic HTML |
h1 largest, h6 smallest |
| <head> |
a container for metadata (data about data) and is placed inside of the tag and before the tag |
meta data |
not displayed |
| <header> |
section or page header |
styles and semantics |
none |
| <hr> |
horizontal rule (dividing line) |
basic HTML |
draws rule width of container |
| <html> |
defines the html content section of the document |
none |
none |
| <li> |
list item |
lists |
bullet or number to left |
| <main> |
contains the central content unique to the document |
styles and semantics |
none |
| <nav> |
contains navigation links |
links |
none |
| <ol> |
ordered list |
lists |
list-style-type: decimal, 1em margin top and bottom |
| <p> |
paragraph |
basic HTML |
margin 1em top and bottom |
| <pre> |
preformatted text |
formatting |
monospaced font |
| <section> |
a section of a web page |
styles and semantics |
none |
| <table> |
represents tabular data |
tables |
align-left |
| <ul> |
unordered list |
lists |
list-style-type:disc, 1em margin top and bottom |
⇑ Table of Contents
Inline Elements
HTML's inline elements are used as character formatting elements. Several have been deprecated by the W3C including: <i> for italicizing text and <b> for bolding text. The current recommendation by the W3C requests that Web developers use <em> to italicize text and <strong> to bold or call emphasis to text (especially helpful for text readers used by vision impaired visitors).
⇑ Table of Contents
Table of Inline Elements
| Element | Usage | Category | Default Style |
| <a> |
hypertext link |
links |
blue underline |
| <abbr> |
abbreviation or acronym |
formatting |
underline dotted |
| <audio> |
embedding audio elements |
audio/video |
width: 300px; height: 54px; |
| <b> |
bring attention to element |
formatting |
bold |
| <bdi> |
biderectional isolatation element |
formatting |
text direction |
| <bdo> |
bidirectional text override |
formatting |
overrides text direction |
| <br> |
line break |
basic HTML |
produces a line break |
| <button> |
used to submit forms |
forms and input |
represents a clickable button |
| <canvas> |
to draw graphis and animation |
images |
none |
| <cite> |
describe a reference to cited work |
formatting |
italic text |
| <code> |
displays text as computer code |
formatting |
monospace font |
| <data> |
links a given piece of content with a machine-readable translation |
forms and input |
none |
| <datalist> |
contians a list of option elements that represent the permissible or recommended options available to chose from within other ocntrols |
forms and input |
none |
| <del> |
represents a range of text that has been deleted |
formatting |
strikethrough |
| <dfn> |
indicates the term being defined within the context of a definition phrase or sentence |
formatting |
italics |
| <em> |
marks text that has stress emphasis |
formatting |
italics |
| <embed> |
embeds external content at the specified point |
programming |
none |
| <i> |
represents a rang of text that is set off from the normal text for some reason |
formatting |
italics |
| <iframe> |
embeds another HTML page into the current one |
frames |
none |
| <img> |
embeds an image into a document |
images |
none |
| <input> |
creates interactive controls in web-based forms |
forms and input |
depends on type attribute |
| <ins> |
represent a range of text that has been added to a document |
formatting |
text-decoration:underline |
| <kbd> |
represents a span of inline text denoting textual user input from a keyboard, voice input, or any other text entry device |
formatting |
monospace |
| <label> |
represents a caption for an item in an interface |
forms and input |
cursor:default |
| <map> |
used to define an image map |
images |
none |
| <mark> |
represents text which is marked or highlighted for reference or notation purposes |
formatting |
yellow highlight |
| <meter> |
represents either a scalar value within a known range or a fractional value |
formatting |
horizontal range bar |
| <noscript> |
defines a section of HTML to be inserted if a script type on the page is unsupported or if scripting is currently turned off in the browser |
programming |
none |
| <object> |
represents an external resource, which can be treated as an image, a nested browsing context, or a resource to be handled by a plugin |
programming |
none |
| <output> |
a container element into which a site or app can inject the results of a calculation or the outcome of a user action |
forms and input |
none |
| <picture> |
contains zero or more elements and one ![]() element to offer alternative versions of an image for different display/device scenarios element to offer alternative versions of an image for different display/device scenarios |
images |
none |
| <progress> |
displays an indicator showing the completion progress of a task, typically displayed as a progress bar |
formatting |
horizontal progress indicator |
| <q> |
indicates that the enclosed text is a short inline quotation |
formatting |
quoted italicized text |
| <ruby> |
represents small annotations that are rendered above, below, or next to base text, usually used for showing the pronunciation of East Asian characters |
formatting |
text placed above asian character |
| <s> |
renders text with a strikethrough |
formatting |
text with strikthrough line |
| <samp> |
used to enclose inline text which represents sample |
formatting |
monospaced text |
| <select> |
represents a control that provides a menu of options |
forms and input |
drop-down list box |
| <slot> |
part of the Web Components technology suite—is a placeholder inside a web component that you can fill with your own markup, which lets you create separate DOM trees and present them together |
Web component |
none |
| <small> |
represents side-comments and small print, like copyright and legal text, independent of its styled presentation |
formatting |
text one size smaller than regular text size |
| <span> |
generic inline container to group elements for styling purposes |
style and semantics |
none |
| <strong> |
indicates that its contents have strong importance, seriousness, or urgency |
formatting |
bold text |
| <sub> |
specifies inline text which should be displayed as subscript |
formatting |
baseline of text is lower than baseline of regular text |
| <sup> |
specifies inline text which is to be displayed as superscript |
formatting |
baseline of text is higher than baseline of regular text |
| <svg> |
defines a container for svg graphics |
images |
none |
| <template> |
a mechanism for holding HTML that is not to be rendered immediately when a page is loaded but may be instantiated subsequently during runtime using JavaScript |
formatting |
none |
| <textarea> |
represents a multi-line plain-text editing control |
forms and input |
a multiline textbox |
| <time> |
represents a specific period in time |
formatting |
bolded text |
| <u> |
represents a span of inline text which should be rendered in a way that indicates that it has a non-textual annotation |
formatting |
none |
| <var> |
represents the name of a variable in a mathematical expression or a programming context |
formatting |
bold italic text |
| <video> |
embeds a media player which supports video playback into the document |
Audio and Video |
video player |
| <wbr> |
represents a word break opportunity—a position within text where the browser may optionally break a line, though its line-breaking rules would not otherwise create a break at that location |
formatting |
line feed |
⇑ Table of Contents
Empty Elements
An empty element is one that only uses one tag instead of a pair of tags; they include: the <img/> tag, the <hr/> tag, and the <br/> tag. Notice the addition of the forward slash after the tag name and before the closing angle bracket, like so />.
Images
Images can be inserted into an HTML document by using the <img> tag and its src attribute.
This example code will display an image when used on the cis.msjc.edu Web site:
<img src="/courses/images/burbfarm.jpg" alt="Burbfarm." />
Will produce this:

Whenever there is a path statement in an HTML document, e.g. src="/courses/images/burbfarm.jpg", the user's Web browser will send a request to the Web server, asking it to locate the resource identified in the path statement. Pay close attention to how the path to the image file is written. The src attribute path statement "/courses/images/burbfarm.jpg" says to a Web server "start at the root of the Web site", this is done by using a forward slash at the beginning of the statement. Once the root folder of the Web site is located the 'courses' portion of the path statement says to the server open the sub-folder 'courses', and inside of that folder open the subfolder 'images', that is where to find the file 'burbfarm.jpg'. The server locates the file 'burbfarm.jpg' and returns it to the Web browser for display in the Web page.
The alt attribute of the img tag is now required for Web pages that must be Section 508 compliant. In 1998, Congress amended the Rehabilitation Act to require Federal agencies to make their electronic and information technology accessible to people with disabilities. Inaccessible technology interferes with an individual's ability to obtain and use information quickly and easily. Section 508 was enacted to eliminate barriers in information technology, to make available new opportunities for people with disabilities, and to encourage development of technologies that will help achieve these goals. The law applies to all public agencies when they develop, procure, maintain, or use electronic and information technology. Due to the enactment of Section 508 it is good practice, and highly recommended, that you always include the alt attribute whenever you add an img tag to a Web page.
Horizontal Rule
To insert a horizontal rule in a document you use the <hr/> tag which has a few helpful attributes including: size and shadow (both deprecated in HTML5), and width. Here are some code examples that in an HTML document will produce several horizontal lines of varying sizes, shapes, and colors:
<hr width="50%" size="5px"/>
<hr color="red" width="50%" size="5px"/>
<hr color="blue" width:200px; size="10px"/>
<hr color="#00FF00" width="100% size="40px" noshade="noshade"/>
In an HTML5 document you would apply a CSS style either inline or in a stylesheet. Here is an inline style example:
<hr style="border: solid 5px #0000FF;" width="50%" />
Which would display like this:
Line Breaks
If you want to generate a line feed, meaning moving a line of text underneath the line of text proceeding it, you use the <br /> tag. Line breaks or "soft returns" as they are sometimes called, move the text down based on the line-height setting for the line of text. This is unlike a <p> element or <div> element which is spaced on the value set for the padding and margin values of the element. Usually you'll use the <br /> tag inside of <p> or <div> elements.
⇑ Table of Contents
Special Characters
Occasionally, you will want to type certain characters that are not available on the keyboard. The format for inserting these characters into your Web page is &code;, where &code; is the name or ID number of a character proceeded by an ampersand and followed by a semi-colon. For instance you can use either:
© = ©
-OR-
© = ©
See the table below for more special character codes.
Table of Special Character Codes
This table speaks for itself, it is a list of special characters and the code or name that can be inserted into your HTML documents.
| Symbol |
Code |
Name |
Description |
| © |
© |
© |
Copyright symbol |
| ® |
® |
® |
Registered trademark |
| · |
· |
· |
Middle dot (bullet) |
| ° |
° |
° |
Degree symbol |
| |
  |
|
Nonbreaking space, used to insert consecutive blank spaces |
| < |
< |
< |
Less than symbol |
| > |
> |
> |
greate than symbol |
| & |
& |
& |
Ampersand |
Character Encoding
These are only a few of the chracter codes that you can use in your HTML documents. As you may or may not be aware, in order for a computing device to store symbols and characters in memory they must be in binary format - a series of zeros and ones. In order for this to work a process known as character encoding takes place. This process has evolved as computer memory has evolved over the years from 7-bit character encoding to 8-bit, and now 16-bit encoding. The original character encoding was called the ASCII (pronounced "as-key") character set, but nowadays the unicode character set is used.
How Web Browsers Handle White Space
When Web browsers interpret HTML documents they ignore multiple spaces. For instance, if you type "hello [spacbar][spacebar][spacebar][spacebar]world" the result will be "Hello world" with only one space in between "Hello" and "world" because the extra spaces are ignored. This can be helpful if you are typing a long line of text and want to move parts of it to the next line or lines in order to make it more readable in the source code editor. This works perfectly fine because the extra white space between the characters are ignored and will still appear as one long string of words, wrapping as necessary depending on the width of the Web browser window. This can be problematic if you are one of those people who want to create columns of data by placing equal spaces or tabs in between the values in each column. Because Web browser ignore the extra spacing the values will not line up as you expect; an HTML table must be used to correctly organize tabuler data on a page.
⇑ Table of Contents
Commenting your HTML code is a good idea. Not only will it help you find and understand portions of your code later, it will also help other coders who may need to modify your HTML code. You can add comments in your HTML code by starting the comment with the characters <!-- and ending your comment with the characters -->. For example:
<!-- Add your comments here -->
- OR-
<!-- This begins the navigation section -->
Note: your comments will not appear in italics, that is only done here to separate the example comments from the actual HTML code used to create the comments.
⇑ Table of Contents
Validating Your HTML Code
Web standards are evolving and changing constantly. It's can be difficult to stay on top of these changes and it is for that reason that it is wise to have your Web pages validated by the W3 Markup Validation Service. To do this, simply navigate your Web browser to validator.w3.org and then type in the URL for your Web page in the Address box on the page that appears. Next click on the Check button and read the results that appear.
Tips for Good HTML
- Use line breaks and indented text to make your HTML file easier to read.
- Insert comments into your HTML file to document your work.
- Enter all tag and attribute names in lowercase.
- Place all attribute values in quotes.
- Close all two-sided tags.
- Make sure that nested elements do not cross.
- Use styles in place of presentational attributes whenever possible.
- Use logical elements to describe an element's content. Use physical elements to describe the elements appearance.