Related Links
The links listed here are the authoritative sources for the CSS standard which is maintained by the World Wide Web consortium (W3C for short). They are a bit technical as they are written by engineers, but as you learn more about CSS you may have questions about what the latest standards are or what direction CSS is headed in. These sources will help answer those questions.
For resources to help you learn more about how to use CSS, see the Links of Interest section.
⇑ Table of Contents
Introduction
As the HTML language evolves, the World Wide Web Consortium (W3C) approves and deprecates which HTML elements are allowable in any one specification (HTML 4.01, XHTML 1.0, HTML5, etc.). For instance,
in HTML 4.01 if you wanted to display text in a different font you could simply encapsulate the text using the opening <font> and closing </font> tags. In the newer HTML specifications (XHTML 1.0, HTML5, and later) you will see that many formatting elements like <font>, <center>, etc. have been deprecated. Deprecated sounds far worse than it is, all it really means is "disapprove of". The impact of these changes are not always immediate; however, newer versions of your favorite Web browser (or more importantly your potential customer's Web browser) may or may not continue to support
the deprecated elements; it all depends on the whims of the Web browser's development team once an element has been officially deprecated by the W3C. The biggest change from HTML 4.01 to XHTML 1.0, and now HTML 5 is the deprecation of all of the content formatting elements, the W3C now encourages developers to use the formatting methods offered by cascading style sheets (CSS for short) instead. CSS is a language for describing the rendering of HTML and XML documents on screen, on paper, in speech, etc. The W3C is currently working on the latest revision, CSS3.
CSS offers several advantages to Web developers, the biggest of which has to be the ability to separate a documents formatting information from its content. This helps provide consistency of look and feel across the entire Web site and it does so with great efficiency by applying the DRY principle. By creating and saving your CSS rules in a centralized external style sheet, which is linked to by all of your site's Web pages, if you decide at a later date that you want to change a commonly used element's color, font size, or other CSS property, you simply need to change any applicable style rules in the style sheet, and immediately the change(s) will be applied by all the Web pages in your web site which are linked to the modified style sheet. Pretty cool; right?
Another important advantage of using cascading style sheets is you can control the scope of your formatting from very broad to extremely granular, with broad being favored wherever possible. This allows you to set up global styles for your web site using one style sheet and allowing for changes to styles at the department level where each department includes their style sheet with their HTML documents in addition to the global style sheet.
The CSS properties of an HTML element can also be easily controlled programmatically. If you are writing JavaScript code, you will find that you can
make HTML more dynamic by manipulating styles with events. For example you can
easily create a nice menu with rollovers by simply switching styles when the
mouse rolls over your image, button, or hypertext link. This type of code is called DHTML (Dynamic
HTML) because you are making the page change dynamically when specified events
take place within your Web page.
CSS, like HTML, is one of those technologies where it is easy to learn basic syntax, but it will take you a lifetime to understand the impact of all of its complexities.
⇑ Table of Contents
CSS Rules
One or more CSS rules are used to apply formatting to one or more elements of an HTML document. A CSS rule, as it's called, is really a selector linked to a list of one or more formatting declarations known as the declaration block.
Components of a CSS Rule
1. a selector identifies where in the HTML document a CSS rule will be applied.
2. a declaration block consists of one or more declarations separated by
semi-colons and encapsulated in a single pair of curly braces.
A CSS rule consists of two components.
1. A selector which is used to identify the HTML element that the rule is targeting. A selector can be a simple as a tag name like h1 or a an id value #FirstName or a class name like .accent
2. A declaration consists of a CSS property followed by a colon and one or more value(s) being assigned to the property. A declaration is either empty or consists of a CSS property name followed by a colon (:) and then a value. More than one declaration can be applied per selector when separated by a semicolon (;), and more than one selector can be assigned per declaration block when the selectors are separated by a comma (,).
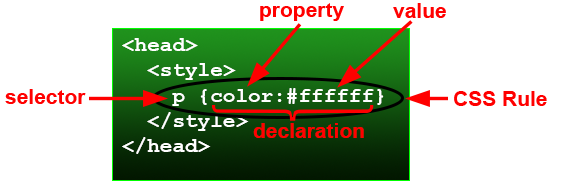 Figure 1: Embedded style sheet example.
In the above example, an embedded CSS rule has been nested in a style element in the head section of an HTML document. The rule is targeting all paragraph elements in the document and it is assigning white as the color for all paragraph text.
There is no limit to the number of declarations you can have in a single CSS rule or selectors you can have assigned to a single declaration block.
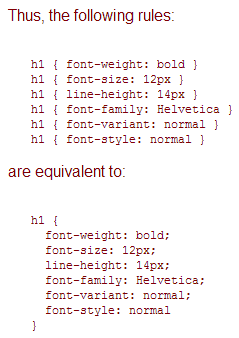 Figure 2: An example of a CSS rule with multiple declarations separated by semi-colons (;).
In the above example, under the are equivalent to heading, the HTML h1 element is being used as the selector. Notice that all of the styles fall within opening and closing curly braces
and just like inline styles, they are separated by semicolons.
Selectors
CSS uses Selectors for binding style properties to elements in an HTML document. The technology is called cascading style sheets because the styles applied at the higher levels of an HTML document's hierarchy will cascade down to the elements at the lower levels. In other words if you assign the <body> element red for its color property then all the descendant elements will have their color property set to red unless overridden by another rule closer to the lower element which reassigns the color property to something else; like green. This is a good example of why you want to be careful what properties you set at the higher levels, especially <body>. For more detailed information on selectors and the various kinds of selectors available in CSS, please read the CSS Selectors tutorial.
Although there are several CSS selector types you can use, the most common are the tag selector, the class selector, and the ID selector.
A tag selector uses the name of an HTML element like h1, img, p, a, ul, or li, as examples. Notice each selector matches a type of HTML element, h1 is the selector for targeting a heading level 1 element, img is the selector used to target an image element, p targets a paragraph element, a an anchor element, ul an unordered list element, and li a list element.
A class selector is used to target an element in which a class attribute has been embedded, like <ul class="myList". In that case, the selector would be .myList. Notice that a period is added before the class value.
An ID selector is used to target an HTML element which has an id attribute embedded in it, like <h1 id="Instructions">. In that case, the selector would be #Instructions. Notice that a # character is used to prefix the id value.
CSS is a case-sensitive language. Your CSS selectors must match in both case and spelling in order to locate their corresponding HTML elements correctly. If you want a selector to target an HTML element, you will use all lowercase characters in your selector, e.g. img, ul, li, a, p, etc. For class selectors, the selector will always begin with a period followed by the class name. ID selectors begin with a # (octothorpe) followed by the id value assigned to the element.
NOTE: an id name must be unique and can only exist once in any given HTML page.
Declarations
A CSS declaration consist of a CSS or vendor-specific property name followed by a colon and then the value you want to assign to it, or unassign in the case of the unset value. Each declaration is terminated with a semi-colon, as shown in this example. property:value; There are literally thousands of CSS properties that can be used. Properties like color, width, height, border, border-radius, padding, and margin, just to name a few.
⇑ Table of Contents
Naming Conventions
A naming convention refers to how you go about naming classes and IDs in order to be able to better remember them and to make them more universally useful for others to use them. There are three key attributes you should consider when naming classes or IDs:
- Class names should provide appropriate meaning
- Class names should identify the context in which they are used
- Class names should reflect a specific formatting style
In order to give names meaning, you want to consider how it will be used to markup your HTML elements. Does the element represent a group of other child elements, like a section, an article, a header, a navbar, a form, a sidebar, etc. Also, what is the context of use, is it a heading, a paragraph, etc, and is it a small version of a heading, or is it a medium size, or large size?
These components that make up these categories can be referred to as blocks, elements, and modifiers as described on the BEM naming convention website. Since naming conventions, the reasons for using them, and how to use them can be a complex subject, we won't spend much time on the subject in this tutorial. Just know that the company you eventually work for will most likely have a naming convention already in place and documented in a style guide. or if you are working for yourself, that you will have to determine what will be an appropriate CSS naming convention to use.
If you would like more detail on using an appropriate CSS naming convention or the specifics of the BEM naming convention, read these short articles:
⇑ Table of Contents
Three Ways to Define Styles (CSS Rules)
There are three options Web developers have when it comes to defining CSS rules:
- Inline - applied to a specific element through the use of a style attribute in the element's opening tag.
- Embedded - CSS rules are created and stored within a <script> element within the
<head> section of an HTML document.
- External - CSS rules are stored in a style sheet which is saved as a separate document and can be applied to one or more pages in a Web site
to provide a consistent look and feel across all elements of the site.
Inline Styles
The easiest to learn but the least flexible are inline styles.
They are called inline because they are added directly into an HTML element's opening tag. Lets take a look...
<h1 style="color:red">This is an h1 tag with color</h1>
The above code will give display the following output:
This is an H1 Tag with color
Let's break down the code from above. Inline styles are applied by using the style attribute within the opening tag of the HTML element you want the style to apply to, the h1 element in the case of our example above. The style attribute is followed by an = (equals) sign, then, within a set of quotes, you type one or more CSS property:value declarations that you want applied to the element.
In order to assign values to CSS properties you type a CSS property name followed by a : (colon) and then a valid value for the property. In the example above the value red is being assigned to the CSS color property, which d point out means text color.
If you want to add more than one CSS declaration to an inline style, separate each declaration by a ; (semicolon). Typing a semicolon after the last declaration in the list and before the closing quote is optional. In the next example, we will apply two CSS declarations to a paragraph element. We will set the color of the text and the font size.
<p style="color:#FF0000; font-size:14pt"> This is a paragraph test</p>
The above code will have the following output:
This is a paragraph test
Notice that the font-size is set to 14 pt. This is kind of a nice thing with styles, it allows
you to set the font size the same way you would in Microsoft Word, but you want to be careful because each Web browser sizes points (pt) differently, whereas pixels (px) is standardized across all Web browsers. Of course
you can still set it in pixels if you want; just use px instead of pt. Just be sure that measurement indicator (pt, px, in, etc.) follows the value immediately with no space in between. Notice too that in order to define the color value a hexadecimal rgb triplet is used. You can also specify a color's value by its name as well, e.g. red, blue, green, etc.
You are probably
asking yourself, where do I go to find all of the CSS properties that I can use? That
is a good question and the answer is changing as the W3C updates the CSS specification. That is why it is always best to go right to the source for answers to questions like this - W3C CSS3 Properties List.
Embedded Styles
Creating styles in the <head> section of an HTML document is known as an embedded style
sheet. Embedded style sheets are more functional than
inline styles in that you can create styles
which have greater scope; meaning they can be applied to more than just a single element in the document,
even so, they are still best used for simple pages—not when you are creating a big
multi-page web site.
To create an embedded style sheet you must surround all of your CSS Rules within a set of
opening <style>
and closing </style> tags. You can place this anywhere within the head section of the document.
Lets look at
the paragraph and h1 examples again, this time using a style that is defined within the head of the document.
<head>
      <title>Style sheets are fun</title>
    <style>
        h1 {color:red;}
         p {
            color:#00008b;
            font-size: 14pt;
         }
    </style>
</head>
<body>
    <h1>This is an H1 Tag with color</h1>
    <p>This is a paragraph test</p>
</body>
Click here to see the code run
What you should notice is that the styles will be applied
to all <h1> and <p> tags within the document. That may or may not
be good. So you should ask, what if I only want to apply the style to paragraph
and h1 tags that I choose? Or, what if I want to apply the same style to different
elements?
The answer to these questions is quite simple. You define
your own custom styles. You can name them any name that you would like, and then
apply it to whatever tags that you choose.
Lets take a look at an example:
<head>
    <title>Style sheets are fun</title>
    <style>
        .myStyle {
            color:blue;
            font-size: 16px;
            font-weight: bold;
        }
    </style>
</head>
<body>
      <p class="myStyle">This is paragraph 1</p>
      <p>This is paragraph 2</p>
      <p class="myStyle">This is paragraph 3</p>
      <div class="myStyle">Just for good measure, It is in a div also</div>
</body>
Click here to see the code run
A few things that you should have noticed are, first,
the dot (.) before the style name selector when defining the CSS rule; you must put a dot in front of any custom
style selector that you create, otherwise the HTML interpretor will think that it is a standard HTML tag
and the style definition will be ignored. The second thing is, notice that when
you want to apply the style to the html element you use the keyword class. You do this because, essentially, what you have done is
created your own class style. Finally, you do not use the dot after the class attribute in the HTML element, you just put the name of the style rule that you want to apply to it.
One other thing to point out is that you can give your custom
styles any name you would like. It is probably a good idea to give them a name
that describes what it does. For instance .paragraphHead tells you something
about the style where as .myStyle does not. Also you CAN
NOT put spaces in your custom style names.
For instance .paragraph Head is NOT valid but .paragraphHead is. Lower Camel Case is commonly used for naming custom CSS classes, but not required. Style id and class names are usually based organizational standards.
External Styles
Creating external style sheets is easy. You simply open
a text file with your favorite text editor (Notepad will do) and write all of
your styles within it. The styles you write within an external style sheet are
exactly the same as the styles you would put in the head of a document. When
you are finished, save the file with an appropriate name and give it the extension
".css". Actually you can give your style sheets any extension
that you want but by convention they are given .css. For instance myStyles.css.
External style sheets are preferred because you can keep the style sheets that you create in a single folder, usually named styles and then import each style sheet as needed into your HTML documents. There are a couple of different
ways to import them and here they are:
<link href="StyleSheet.css" rel="stylesheet" type="text/css">
@import url("..\Style\sylstyle.css");
If you are importing you files with code above using the
import statement, it is important that you surround it with <style> </style>
tags like so:
<style>
    @import url("..\Style\sylstyle.css");
</style>
Here is an example external style sheet. It has two custom
classes defined in it. The first is myStyle and the second is anotherStyle;
.myStyle {
    color:blue;
    font-size 16 pt;
    font-weight: bold;
}
.anotherStyle {
    background-color:cyan;
    border:2px solid navy;
    color:navy;
    width:125px;
    text-align:center;
}
This file was saved as myStyles.css.
Below is an HTML page that attaches the above style sheet
with the link tag
<head>
    <title>Using external Styles</title>
    <link href="myStyles.css" rel="stylesheet" type="text/css">
</head>
<body>
      <p class="myStyle">This is a test of external styles using a paragraph tag</p>
      <div class="anotherStyle">A Button ? </div>
</body>
Click here to see the code run
Finally, the same example as above except this time we use
the import statement to attach the style sheet to the page
<head>
    <title>Using external Styles</title>
    <style>
        @import url("myStyles.css");
    </style>
</head>
<body>
    <p class="myStyle">This is a test of external styles using a paragraph tag</p>
    <div class="anotherStyle">A Button ? </div>
</body>
Click here to see the code run!
Important CSS Concepts
There are a couple of concepts about CSS that you need be aware of.
First, when CSS rules use the same selector but differ in declarations, the rule closest to the element will be applied. What this means is, if you have an external style sheet that defines a rule for body and has a declaration of color:red;, then you add an embedded style sheet rule that sets body with a declaration of color:green;, and then also have an inline body style which declares color:white, the body of the document will be white, because inline styles are closer to the element than the embedded or linked style rules are.
Second, when adding style sheet links or import statements in the head section of your HTML document, it is important to order the links correctly when two or more style sheets are used. This is because if you have created CSS rules that use the same selector pattern but have differing declarations, the last style sheet linked in the HTML head section will overwrite any rules contained in previously linked style sheets.
⇑ Table of Contents
CSS Comments
In order to add comments into your embedded or external CSS style sheets is to place the text between the character sequences of /* and */. For example:
/* Comments are a way for you to leave remarks about your styles. */
⇑ Table of Contents
Links of Interest
This list provides you with a list of resources for learning more about CSS.
Podcasts of Interest